SNES EPROM Programmer With Arduino

Most video game manufacturers aren’t too keen on homebrew games, or people trying to get more utility out of a video game system than it was designed to have. While some effort is made to keep people from slapping a modchip on an Xbox or from running an emulator for a Playstation, it’s almost completely impossible to stop some of the hardware hacking that is common on older cartridge-based games. The only limit is usually the cost of an EPROM programmer, but [Robson] has that covered now with his Arduino-based SNES EPROM programmer.

Normally this type of hack involves finding any cartridge for the SNES at the lowest possible value, burning an EPROM with the game that you really want, and then swapping the new programmed memory with the one in the worthless cartridge. Even though most programmers are pricey, it’s actually not that difficult to write bits to this type of memory. [Robson] runs us through all of the steps to get an Arduino set up to program these types of memory, and then puts it all together into a Super Nintendo where it looks exactly like the real thing.

If you don’t have an SNES lying around, it’s possible to perform a similar end-around on a Sega Genesis as well. And, if you’re more youthful than those of us that grew up in the 16-bit era, there’s a pretty decent homebrew community that has sprung up around the Nintendo DS and 3DS, too.

Thanks to [Rafael] for the tip!

Happy Programmer’s Day

Today (September 13, 2015) is Programmer’s Day — a recognition day that started in Russia, but has been adopted by many countries. While it is great that there is a day recognizing the contribution of programmers to society, the really interesting part is why it is on September 13 (except on leap years).

The leap year part should be a clue. Today is Julian day 256. We’ll guess that anyone reading Hackaday doesn’t need to be told the rest of the story. While it might not be as good of an in-joke as May the 4th (be with you), it is satisfying to know that it isn’t just a random date from the calendar. Now if we could only get the day off as paid vacation…

Continue reading “Happy Programmer’s Day”

“Bricking” Microcontrollers In LEGO Motivates Young Programmers

Back when he was about seven years old, [Ytai] learned to program on an Atari 800XL. Now he has a seven-year-old of his own and wants to spark his interest in programming, so he created these programmable LEGO bricks with tiny embedded microcontrollers. This is probably one of the few times that “bricking” a microcontroller is a good thing!

IMG_20150519_144818
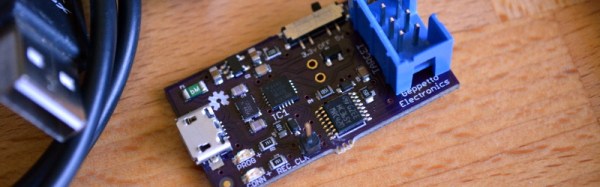
The core of the project is the Espruino Pico microcontroller which has the interesting feature of running a Java stack in a very tiny package. The Blocky IDE is very simple as well, and doesn’t bog users down in syntax (which can be discouraging to new programmers, especially when they’re not even a decade old). The bricks that [Ytai] made include a servo motor with bricks on the body and the arm, some LEDs integrated into Technic bricks, and a few pushbutton bricks.

We always like seeing projects that are geared at getting kids interested in creating, programming, and hacking, and this certainly does that! [Ytai] has plans for a few more LEGO-based projects to help keep his kid interested in programming as well, and we look forward to seeing those! If you’re looking for other ways to spark the curiosity of the youths, be sure to check out the Microbot, or if you know some teens that need some direction, perhaps these battlebots are more your style.

Review: UISP Programmer For AVR

I got into AVR chips because they are easy to program, and that has become more and more true over the years with the ever-falling cost of programmers. But it’s pretty easy to make a mistake when burning the fuses on the chips and if you don’t have a proper programmer (my first programmer was a horrifyingly slow self-built DAPA cable) you’ll have a brick on your hands. This little board may be able to help in that situation. I gave the USB µISP a try this week. The half-stick-of-gum-sized board flashes firmware like a champ and includes a rescue pin for when you have clock source problems.

My full review is below. All technical information for the µISP can be found in the User’s guide. The board itself is now available to purchase in the Hackaday Store.

Continue reading “Review: UISP Programmer For AVR”

Showing An AVR Programmer Who’s Boss

[Bogdan] makes a good point. When you use a dev board you get programming, debugging, power sourcing, and usually a UART. When you go to the trouble of hooking up a programmer why don’t you get the same thing? Astutely, he points out that all you usually get with programmers is programming. So he set out to add features to the hardware he uses to program XMEGA.

The first part of the trick hinges on his use of PDI programming. This is slightly different from ISP programming. Both use a six-pin connector cable but with PDI two of these pins are unused. He took this opportunity to reroute the chip’s TX and RX pins through the cable, which now gives him an avenue to use a UART-to-USB adapter without adding any cables to his target board. Rather than add a second USB cable he rolled a USB hub into the mix. An LM1117 regulates the 5V USB rail down to 3.3V as a source for the target board.

The programmer being used is an Atmel ICE. As you might imagine he didn’t want to make permanent alterations to it. His modifications are all handled externally, with one IDC cable connecting the programmer to his added circuitry and another headed off to the target board. For now he’s jumpering RX/TX to the programming header but plans to route the signals on future PCBs.

High Voltage AVR Programmer

The most common way of programming AVR microcontrollers is the In System Programming port. That little six-pin header with MOSIs and MISOs coming out of it will program every AVR you’ll ever come across. The ISP does have a downside – fuses. Set your fuses wrong, and without a High Voltage Serial Programmer, your chip is bricked. [Dilshan] designed his own HVSP that’s less expensive than the Atmel STK500 and has a nice GUI app.

Instead of following in the footsteps of the USBtinyISP, [Dilshan] is using a PIC18F as the main microcontroller in the programmer. This chip was chosen because of its built-in USB functionality. Because the High Voltage part of a HVSP operates at 12V, actually providing that voltage needed to be taken into consideration. For this, [Dilshan] is using standard 78xx regulators with an 18V input.

The app to control this programmer does everything you would expect, including all the usual AVRdude commands. A great build, and just what we need to reset the fuses on a few dozen chips we have sitting around.

3D Printed Pogo Pin Programmer

The new hotness for Internet of Things hardware is the ESP8266. Alone it can connect to a WiFi network, but it doesn’t really have a lot of output options. Paired with an ATMega, and you really have something. That’s the philosophy behind the WIOT board, and when [Chris] was assembling these boards, he needed a way to flash firmware. The board has an unpopulated ISP header from the assembler, so pogo pins are the answer. How do you make a pogo pin jig? With a 3D printer, of course.

The ISP header wasn’t populated to give the board a slim profile, but this means a jig of sorts would be needed to program the WIOT. The first attempt was buying a few pogo pin adapters from Tindie, but this was terribly uncomfortable to hold while the board was being programmed.

To fix this problem, a small clip device was rigged up, printed out, and used for programming. Interestingly, this clip has a very deep throat, and a few holes used for bolting on a separate programmer. This shows a lot of forward thinking: the programmer can be reused for different boards with completely different layouts and programmers. If the next revision of the WIOT needs a JTAG header to program the micro, the problem of programming it is already covered.