Prusa Printer Gets An LCD-ectomy, Gains A VFD

What’s wrong with the OEM display on a Prusa I3 Mk3? Nothing at all. Then why replace the stock LCD with a vacuum fluorescent display? Because VFDs are much, much cooler than LCDs.

(Pedantic Editor’s Note: VFDs actually run a little warm.)

At least that’s the reasoning [Scott M. Baker] applied to his Prusa upgrade. We have to admit to a certain affection for all retro displays relying on the excitation of gasses. Nixies, Numitrons, and even the lowly neon pilot light all have a certain charm of their own, but by our reckoning the VFD leads the pack. [Scott] chose a high-quality Noritake 4×20 alphanumeric display module for his upgrade, thriftily watching eBay for bargains rather than buying from the big distributors. The module has a pinout that’s compatible with the OEM LCD, so replacing it is a snap. [Scott] simplified that further by buying a replacement Prusa control board with no display, to which he soldered the Noritake module. Back inside the bezel, the VFD is bright and crisp. We like the blue-green digits against the Prusa red-orange, but [Scott] has an orange filter on order for the VFD to make everything monochromatic. That’ll be a nice look too.

A completely none functional hack, to be sure, but sometimes aesthetics need attention too. And it’s possible that a display switch would help the colorblind use the UI better, like this oscilloscope mod aims to do.

Continue reading “Prusa Printer Gets An LCD-ectomy, Gains A VFD”

An Exhaustive Guide To Building 18650 Packs

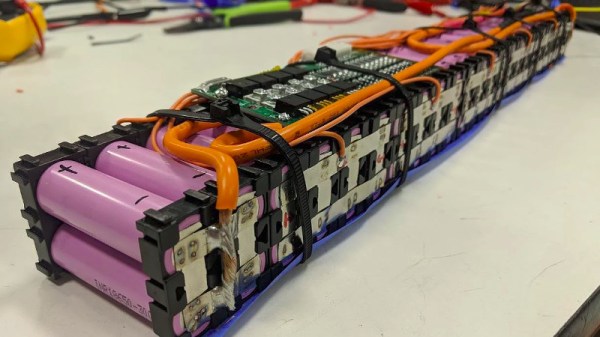
Most of us know the basics of building packs of lithium-ion batteries. We’re familiar with cell balancing and the need for protection circuitry, and we understand the intricacies of the various serial and parallel configurations. It’s still a process that can be daunting for the first-time pack-builder though, because the other thing that most of us know about lithium ion batteries is that getting things wrong can cause fires. Rule zero of hackerspaces is “Don’t be on fire”, so what’s to be done? Fortunately [Adam Bender] is on hand with an extremely comprehensive two-part guide to designing and building lithium-ion battery packs from cylindrical 18650 cells. (Edit 2025: re-linked through Internet Archive.)

In one sense we think the two-parter is in the wrong order. Part two takes us through all the technical details and theory, from lithium-ion chemistry to battery management systems and spot-welding nickel busbars, while part one shows us the construction of his battery pack. There are also a couple of videos, which we’ve placed below the break. It’s still not a job for the faint-hearted, but we’d say he’s produced about as professional and safe a pack as possible.

If spot welding worries you then it might be possible to build a pack without it. But it’s always worth considering: would you be better served buying one?

Continue reading “An Exhaustive Guide To Building 18650 Packs”

Reverse Engineering WyzeSense Hardware

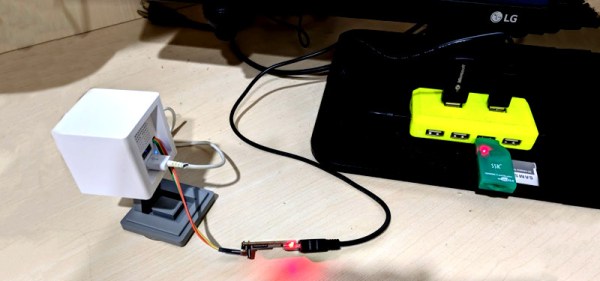
Wyze are a company that produces a variety of home automation products. Their Wyze Sense package is a system of contact and PIR home security sensors, that piggy backs off their Wyze Cam product. In the interests of being able to use this hardware outside the prescribed corporate ecosystem, [Xuan Xing] got down to hacking.

The project starts by tearing down the Wyze Cam, and getting serial console access. This was made easier by an existing Github project, which develops custom firmwares for smart cameras. With that in place he was able to see what was going on under the hood, and read the camera’s system logs.

By poring over these logs, and examining the disassembled Wyze Sense dongle, he’s well on the way to discovering how the sensors communicate with the Wyze Cam. The end goal is to enable the Wyze security sensors to be used with the Raspberry Pi platform, and to share the code on Github for other makers to experiment with.

Home automation platforms come and go quicker than the seasons change. This makes the hardware a popular target for hackers trying to get things running independently of any one company’s servers.

Art Project Analyzes Every Public Recording Of Facebook’s CEO Since 2004

[Benjamin Grosser] had a simple question: “What does Mark Zuckerberg think about?” The resulting art project is named ORDER OF MAGNITUDE and to create it he researched archives of every public utterance the founder and CEO of the world’s largest social media network has made, going as far back as 2004.

The end product is a nearly fifty-minute film consisting entirely of cuts centered around what [Benjamin] says are three of the Facebook CEO’s most favored and often-used terms:

  • The word “more”
  • The word “grow”
  • Metrics such as “ninety-nine percent”, “two million”, and terms of that nature.

The idea is that the resulting video provides insight into what Mark Zuckerberg thinks about, has focused on, and how that has (or has not) changed between 2004 and now.  How well does ORDER OF MAGNITUDE do that? Watch the video below, and judge for yourself.

Continue reading “Art Project Analyzes Every Public Recording Of Facebook’s CEO Since 2004”

New PCB Revives Ancient Bubble LED Displays

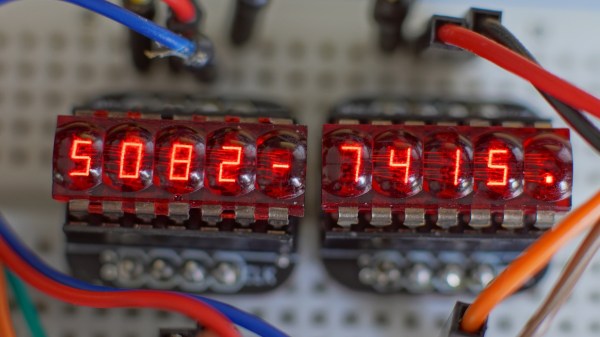
For those of us who remember LED calculators, the HP 5082-7400 series red “bubble” displays hold a special charm. Available in 3, 4, or 5-digit varieties, these multiplexed 7-segment displays provided countless hours of entertainment to those who would spell upside-down words on their pocket calculators. In case you happen to be lucky enough to have access to a few of these beautiful vintage display sticks, [Gigawipf] has designed a small driver PCB that lets you easily interface them to a modern microcontroller.

At the heart of the board, aimed at either the 5082-7405 or 5082-7415 5-digit modules, are a pair of 74HC595 shift registers in tiny QFN packages. Five lines from one register drive one of the common cathodes for the selected digit, while the other register drives the eight anode lines through 330-Ohm resistors. The boards are slightly smaller than the width of the displays allowing you to stack them seamlessly for more digits, and eight header pins on each allow you to plug them into solderless breadboards for prototyping. The result is easy to drive with some simple code, and [Gigawipf] provides an example for Arduino as part of the project. The Eagle design files are supplied, as well as Gerbers for those who just want to have some boards made. This sounds like a great way to get some of these vintage displays going again.

If you can’t find any of these displays to play, with, you can try making some larger digits from individual surface-mount LEDs.

The Day Hackaday’s Theme Was Broken

Today at about 10:00 AM Pacific time, Hackaday’s site host had an outage. All websites on the WordPress VIP Go platform were down, and that includes Hackaday. For about 45 minutes you couldn’t load any content, and for a bit more than two hours after that all we could display was a default WordPress theme with an alarmingly bright background.

At first, we were looking at a broken home page with nothing on it. We changed some things around on the back end and we had a black text on white background displaying our latest articles. Not ideal, but at least you could catch up on your reading if you happened to check in right at that time.

But wait! Unintended consequences are a real drag. Our theme doesn’t have comments built into the front page and blog page views, but the WordPress stock themes do. So comments left on those pages were being blasted out to your RSS feeds. I’d like to apologize for that. Once it was reported, we turned off comments on those pages and deleted what was there. But if you have a caching RSS reader you’ll still see those, sorry about that.

As I type this, all should be back to normal. The front end was restored around 1:00 PM Pacific time. We’ve continued our normal publishing schedule throughout, and we hope you have had a good laugh at this debacle. It might be a few days before I’m able to laugh about it though.

Injection Molding With A Hot Glue Gun

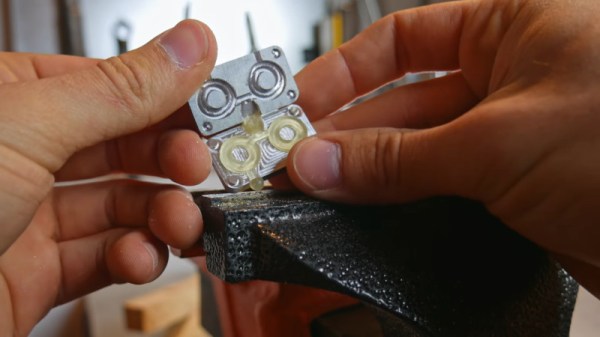
Injection molding is an industrial process used the world over for the quick and economical production of plastic parts. [Nikodem Bartnik] wanted to experiment with this at home, so whipped up some molds and got to work (Youtube link, embedded below).

[Nikodem] produced aluminium molds, using a Dremel-based CNC platform. This allowed for the design to be created in CAD software, and helps with the production of the geometry for both the part, as well as the gates and vents. Having learned about thermal issues with an early attempt, the mold was then clamped in a vice. Wood was used as an insulator to minimise heat lost to the vice.

With this setup, it was possible to mold M5 washers using hot glue, with good surface finish. Later attempts with a larger mold were unsuccessful, due to the glue cooling off before making it through the entire mold. [Nikodem] has resolved to improve his setup, and we look forward to seeing what happens next. We’ve seen others experiment in this area before, too. Video after the break.

Continue reading “Injection Molding With A Hot Glue Gun”