3D-Printed Moiré Illusion May Just Drive You Crazy

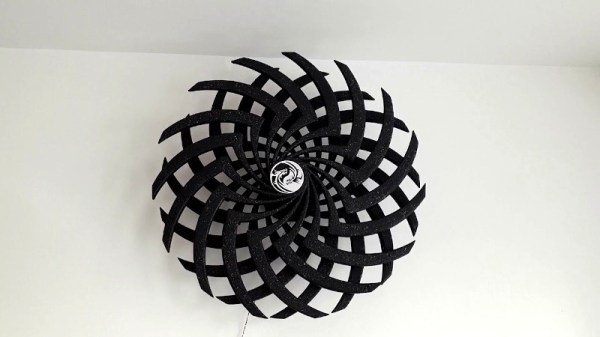
Moiré illusions can be visually captivating, particularly when a little rotational motion is thrown in the mix. [Dushyant Ahuja] was a fan of these moving Moiré sculptures he’d seen around the place, and decided to create his own.

The build is based around spinning two spoked discs in opposite directions, such that the spokes create moving Moiré patterns as they turn. To achieve this, the discs were 3D printed, along with a central housing containing two 12 volt gear motors. 3D printed gears are used to allow both discs to rotate about the same axis. Nominally, the motors spin relatively slowly, generating a pleasing, hypnotic effect when turning the discs.

The drivetrain is under the control of an ESP8266, though [Dushyant] notes that to get the basic effect, one need only connect the motors to a 12 volt power supply and let them run. However, future plans involve adding some LEDs for bling, and varying the motor speed to create yet more complex effects. With the microcontroller already installed, upgrades should be a cinch.

Moiré effects are good for everything from guiding ships to taking precision measurements. If you’ve found a new application for these confounding line patterns, be sure to let us know! Video after the break.

Continue reading “3D-Printed Moiré Illusion May Just Drive You Crazy”

Baby’s First Jukebox Is Fun For Parents, Too

Believe it or not, there’s a $400 toy mp3 player out there for kids. It looks pretty nice, with colorful buttons and a wood console and all, but those features don’t really justify the price tag. [DerThes] wanted one for his 2-year-old anyway, so he made his own ruggedized version for a whole lot less.

The simple and kid-friendly interface lets [DerThes Jr.] choose from one of nine albums to play by pushing one of the candy-colored buttons. The bottom row of buttons handle play/pause and moving through the track list. When mom and dad get tired of listening to whatever the kids are into these days, they can enter the special god mode code to access 99 of their favorite albums.

This baby boombox is built with an Arduino Uno and an Adafruit music maker shield. [DerThes] etched his own PCB to hold the buttons and the pair of shift registers needed to interface them with the Uno. If you’ve never etched before, here’s a good chance to dip your toe in the ferric chloride, because [DerThes] has the transparency in his repo and a line on a nice instructional video.

If you don’t think your toddler is ready to respect a field of momentaries, you could make a jukebox with NFC blocks.

[via Arduino blog]

Datacenter UPS Heads Home For Off-Grid Power Solution

The news sites seem never to be without stories of Elon Musk and his latest ventures, be they rapid transit tube tubes in partial vacuum, space flight, or even personal not-a-flamethrowers. Famous for electric vehicles, Musks’s Tesla also has a line of solar products and offers the Powerwall home battery power system. These are tantalizing to anyone with solar panels, but the price tag for one isn’t exactly a dream.

[Nathann]’s budget couldn’t stretch to a Powerwall, but he did have access to a hefty ex-datacentre uninterruptible power supply (UPS) and a large quantity of lead-acid cells. From this he built his own off-the-grid power in the cellar of the home. It’s not as elegant as a Powerwall, but it can power the house on moderate usage, so he claims, for up to ten days.

On one level the installation is more of a wiring job than one of high technology, but the logistics of dealing with nearly 100 lead-acid cells are quite taxing. The UPS takes four battery packs, each clocking in at 288 V. The cells are joined with copper straps, and the voltage and current involved is not for the faint-hearted. An accidental short vaporized a screw and a battery terminal; if this were our house we’d put fuses in the middle of the battery packs.

The batteries are stored on wooden pallets atop brick pillars in case the cellar floods. The basement installation now is ready for the addition of solar and wind-based off-grid sources. Maybe your battery power solution will be less hair-raising, but it’s unlikely to be cheaper. Meanwhile this isn’t the first such project we’ve seen, though others usually go for 18650 Li-Ion cells, the use of lead acid remains a viable and economical solution.

Altair 8800 Again Project

[Dirk] posted a video (you can see below) titled, “Mystery Retro Project Start.” That turned out to be the first of a multipart series on his Altair 8800 Again simulator. The front panel appears to be laser cut and in some future video episodes, we expect to see him simulate the CPU with a Teensy.

There have been plenty of 8800 clones ranging from projects that recreate the original PCBs, to those that just run a Raspberry Pi inside. The middle ground will use an Arduino or some other small CPU to simulate the 8080 CPU.

Continue reading “Altair 8800 Again Project”

City Clock Is Beautiful Tribute To Parisian Architecture

Binary clocks are often created as a programming exercise, or to display the time in a project with the minimal practical components. Displaying the time in binary needn’t always be for practicalities sake, however. The City Clock shows that it can be applied quite artfully, too.

The electronic side of things is simple – an Arduino Nano runs 13 LEDs, with a digital IO pin for each. Including a real time clock module is optional, though we imagine pretty essential if you wish the clock to keep accurate time. The LEDs are fitted into a grid, which is fitted behind the windowed facade of the building. This helps block light leaks between adjacent segments, giving a more polished look to the final design. The whole assembly is built out of lasercut wood, making it a quick and easy build if you’ve got such a tool handy.

It’s a simple concept, but one that is particularly striking in action. Even to those unaware of its horological abilities, it presents the appearance of a living building, with inhabitants switching lights on and off throughout the day. It would make an excellent bookshelf or coffee table piece, and we’re highly tempted to give building our own a go. Video after the break.

Continue reading “City Clock Is Beautiful Tribute To Parisian Architecture”

OpenDog: Adding Force Sensitive Feet

[James Bruton] OpenDog remains one of the most impressive home-built robotics projects we’ve seen here on Hackaday, and it’s a gift that just keeps on giving. This time he’s working on adding force sensing capabilities to OpenDog’s legs to allow for more dynamic movement control.

The actuators in the legs are three-phase outrunner motors that drive ball-screws via a belt. This configuration is non-backdrivable, meaning the legs cannot be moved when an external force is, which could lead to mechanical failures. He as tested other backdrivable leg configurations with other robots, but did not want to rebuild OpenDog completely. The solution [James] went with is a redesigned foot with an inbuilt switch, to confirm that the foot is touching the ground, and a load cell attached in the middle of the bottom leg segment. The load cell is bolted rigidly onto the leg segment, which allows it to sense when the leg is carrying load, without damaging the load cell itself.

Unfortunately all the serial ports on OpenDog’s main Teensy 3.6 controller are already used, so he converted the signal from the load cell to PWM, to allow it to be read by a normal GPIO pin. This works well in isolation, but when [James] switches on the motors, the PWM signal from the load sensor gets flooded by interference, making it unreadable. To solve this problem, he wants to implement a CAN bus, which will allow for more inputs and outputs and hopefully solve the interference problem. However, [James] has no experience with the CAN protocol, so learning to use it is going to be a project on its own.

OpenDog is turning into a very lengthy, time-consuming project, [James] says that the lessons learned from it have been invaluable for a number of other projects. This is something to keep in mind with everything we tackle. Choose projects were the experience gained and/or relationships developed are worth it on their own, even when the project fails in a conventional sense. This way you can never really lose.

Making A Custom Caliper Case For Pros

Every professional has a tool set that they would never part with. Likewise, for experimental physicists, mechanical engineers, and tinkerers, a caliper set can be unspeakably crucial to their work. That’s why [Andrew Birkel] designed his own personal caliper set to fit just the right proportions for his tools while adding a bit of personal flair.

The project uses CNC routing, Solidworks for CAD, laser engraving, and woodworking to design the custom case for a set of calipers, metric and English screw pitch gauges, fillet gauges, and radius gauges. It’s a practical build for a custom tool set that doesn’t already come with a case of its own. The particular tools were chosen for their use in particle physics experiments: for determining threads, inside and outside curvatures, and measuring length, depth, and width.

The box was made from an oversized piece of wood with holes drilled into the sides. After compiling the G-code program for the build, the two halves of the box was was milled from the wood. The first run on the CNC mill with aluminum managed to cause the grain to split, so [Birkel] went with a CNC router instead. Once the piece was sanded, hidden barrel hinges were added. The finished box was wiped down with mineral oil and teak oil to bring out the natural coloration of the wood as well as to add protection (lacquer mixed into the oil). To finish it off, the case was customized with a laser engraved name and email for identification.

It’s a pretty slick build to say the least, and certainly one that can be customized to the dimensions of whatever tools your personal caliper set happens to have.