When Kenyan engineer [Aloise] found out about the health risks of household air pollution, they knew there had to be a smart solution to combatting the problem while still providing a reasonable source of energy for families cooking without the luxury of cleaner fuels. Enter OpenHAP, a DIY household air pollution monitor that provides citizen scientists and researches the means to measure air particulates in developing countries.
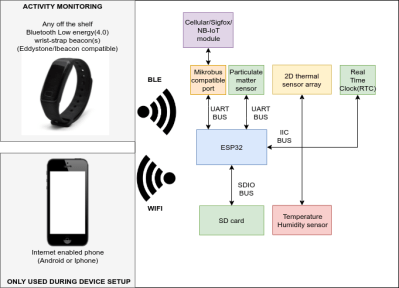
The device is based on an ESP32 communicating with a ZH03B Particulate matter sensor over UART; a DS3231SN real-time clock (RTC), temperature and humidity sensor, and MLX90640 2D thermal sensor array over I2C; and wirelessly sending the data received to a Bluetooth low energy wrist-strap beacon and an Internet enabled phone. The device also uses a TCA9534 GPIO expander to control the visual and auditory notifiers (buzzers and LEDs) and to interface to a SD card.
The project uses the libesphttpd project modified for the ESP32 for the webserver, which is used to stream data to a mobile handset or computer using the WiFi capabilities of the ESP32. The data includes real-time sensor information, system status, storage media status, visualizations of the thermal array sensor data (to ensure the camera is facing the source of heat), and tag information to test the limits of the Bluetooth tag with regards to distance.
Power input is provided through a Micro-USB connector, protected with a TVS diode and a Schottky diode in series to prevent reverse power flow.
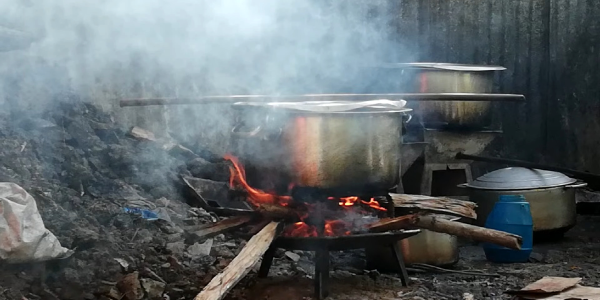
The project was tested in two real-life scenarios: one with a household in rural Kenya and another with an urban low-income family of four. In the first test, the family used a three stone open fire stove. A FLiR thermal camera captured the stove temperatures, while a standard camera was enough to capture the high levels of smoke inside the kitchen. The readings from OpenHAP were high enough to exceed the upper detection threshold for the particulate sensor, showing that the woman cooking in the house was receiving the equivalent of 8 cigarettes a day, about 8 x the WHO’s recommended particulate levels.


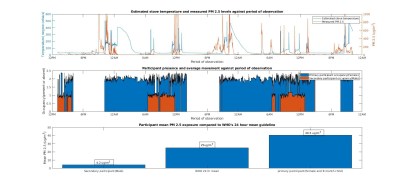 Within the second household, a typical energy mix of charcoal briquettes and kerosene was typically used for cooking, with kerosene used during the day and briquettes used at night. The results from measuring pollution levels using OpenHAP showed that the mother and child in the household regularly received around 1.5 x the recommended limit of pollutants, enough to lead to slow suffocation.
There’s already immense potential for this project to help researchers test out different energy sources for rural households, not to mention the advantage of having a portable low-energy pollution monitor for citizen scientists.