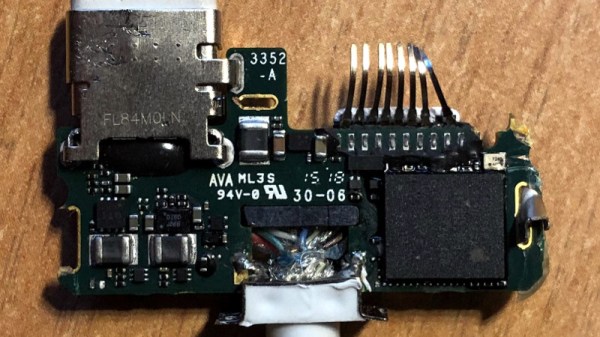
A Chandelier Guaranteed To Make Some Retro Game Hardware Collectors Wince

If there’s one thing our community is good at, it’s re-imagining redundant old hardware, particularly in the field of classic gaming consoles and their peripherals. Dead consoles have become new ones, Powergloves have ventured into virtual reality, and light guns, well, they’ve become novelty light fittings.

The [JJGames] Nintendo light gun chandelier will probably make collectors wince who prefer their retro hardware pristine, but it’s certainly an eye-catching conversation piece. The twelve guns are carefully disassembled and the Nintendo electronics removed, before a bulb holder and teardrop lamp is installed. Wiring is completed with twist caps,  the guns are joined at the grip with some metal strips and glue, and a chain for ceiling attachment completes the ensemble. A dozen pieces of ireplacable retro hardware sacrificed for a novelty, or a masterpiece of interior decoration? You decide, though we’d opt for the latter in the context of the retro games based business in which it sits.

Our favourite NES lightgun hack ever has to be [Seb Lee-Delisle]’s one that fires a real laser. Meanwhile [JJGames] have made it here before in a similarly wanton use of classic Nintendo plastic, with their urinal made from SNES cartridges.

Resistance Is Futile, You Want This LED Cube

We’re suckers for a good desk toy here at Hackaday, so this 2019 Hackaday Prize entry from [Jack Flynn] certainly caught our eye. The idea is that by using professionally manufactured dual layer PCBs and only surface mount components, you can create a cube that has an LED matrix on each face and all of the electronics hidden within. We’re not entirely sure if there’s any practical application for such a device, but we know we’d certainly like to have one blinking madly away on our shelf regardless.

Before having any of the PCBs manufactured, [Jack] is putting a considerable amount of thought into the design so he doesn’t end up painting himself info a corner (which is of course eight times as bad when you’re building a cube). By importing the PCB files into OnShape, he’s able to “assemble” a virtual representation of the final product to better understand how everything will fit together. He wants to limit the amount of times the cube will need to be pulled apart, so everything from how it will sit in its 3D printed cradle to the placement of breakaway tabs that ensure the internal power switch is accessible are being carefully planned out.

The current design puts the “brains” on the bottom board, with every other panel holding a daisy-chained MAX7219 to drive its own individual 64 LED matrix. Initially the dimensions of the ATmega328p powered cube will be 42 x 42 x 42 mm, with a total of 384 LEDs. Ultimately, [Jack] hopes the modular nature of the design could allow the size of the cube to be increased, or perhaps even take on a different shape entirely.

Generally the LED cubes we see are of the more wiry variety, so it’s particularly interesting when they take on solid forms like this one. Given the nearly universal popularity of blinking LED gadgets, we think this particular project is well positioned to make the leap from one-off hack to a commercial product.

Continue reading “Resistance Is Futile, You Want This LED Cube”

Parametric Amplifiers And Varactors

It is hard to imagine a time without active amplification. However, if you go back far enough, radio communications started in an era where generating RF required something like a spark gap and reception was only possible if the signal was strong enough at the antenna — like with a crystal radio. It would be a few years before tubes allowed both transmitted and receiving signals to be electronically amplified and longer still before transistors that would work at radio frequency appeared. However, even active devices have had their limitations and the parametric oscillator and amplifier are ways around some of those problems.

These were more popular in the 1970s when it was harder to get transistors that would work at very high frequencies. They are still useful when you need very low noise amplification. In addition, the same effect is used in optical devices and you can even observe the effect in mechanical devices.

What Is It Exactly?

The phrase parametric means that the amplification or oscillation occurs because of the change in a parameter of the system. A simple example would be a variable capacitor. We know the charge in a capacitor is equal to the capacitance times the voltage across the unit. That also implies that, if charge is known, we can know the voltage by dividing the charge by the capacitance. To put it in numerical terms, if  a 0.1 farad capacitor has 12V across it, the charge is 1.2 coulombs. Suppose our input signal is 12V and we let the capacitor charge up to that value. Then we twist the capacitor’s knob to give it a value of 0.05 farad. The charge can’t change, so now we have 24 volts across the capacitor. That’s an amplification of 2 times. These values, of course, are not practical. Nor is it practical to twist a capacitor knob constantly to amplify. However, it is a good analog of how a parametric amplifier works.

Continue reading “Parametric Amplifiers And Varactors”

Hackaday Podcast 016: 3D Printing With Steel, Molding With Expanded Foam, QUIP-Package Parts, And Aged Solder

Join Editors Elliot Williams and Mike Szczys to recap the week in hardware hacking. This episode looks at microfluidics using Shrinky Dinks, expanding foam to build airplane wings, the insidious effect of time on component solder points, and Airsoft BBs used in 3D printing. Finishing out the episode we have an interview with two brothers who started up a successful business in the Shenzhen electronics markets.

Take a look at the links below if you want to follow along, and as always, tell us what you think about this episode in the comments!

Take a look at the links below if you want to follow along, and as always, tell us what you think about this episode in the comments!

Direct download (60 MB or so.)

Continue reading “Hackaday Podcast 016: 3D Printing With Steel, Molding With Expanded Foam, QUIP-Package Parts, And Aged Solder”

A Farmer’s Guide To Technology

One of the hardest aspects of choosing a career isn’t getting started, it’s keeping up. Whether you’re an engineer, doctor, or even landscaper, there are always new developments to keep up with if you want to stay competitive. This is especially true of farming, where farmers have to keep up with an incredible amount of “best practices” in order to continue being profitable. Keeping up with soil nutrient requirements, changing weather and climate patterns, pests and other diseases, and even equipment maintenance can be a huge hassle.

A new project at Hackerfarm led by [Akiba] is hoping to take at least one of those items off of farmers’ busy schedules, though. Their goal is to help farmers better understand the changing technological landscape and make use of technology without having to wade through all the details of every single microcontroller option that’s available, for example. Hackerfarm is actually a small farm themselves, so they have first-hand knowledge when it comes to tending a plot of land, and [Bunnie Huang] recently did a residency at the farm as well.

The project strives to be a community for helping farmers make the most out of their land, so if you run a small farm or even have a passing interest in gardening, there may be some useful tools available for you. If you have a big enough farm, you might even want to try out an advanced project like an autonomous tractor.

Make That Special Cup Of Coffee By Completely Tweaking The Coffee Machine

An interesting part of working on the Building Management and Control (BMaC) project – as previously covered on this site – was the reverse-engineering and ultimately the gaining of full control over the coffee machines at the office. Not the boring filter coffee machines, mind you, but the fully automatic espresso machine type that grinds beans, makes coffee, adds milk, and much more. Depending on one’s budget, naturally.

These little marvels of engineering contain meters of tubing, dozens of sensors, valves, ceramic grinders, and heating elements. The complexity of this machinery made us think that maybe there was more that we could do with these machines beyond what their existing programming and predefined products would allow. Naturally, there was.

Continue reading “Make That Special Cup Of Coffee By Completely Tweaking The Coffee Machine”

3D Printer Becomes Soldering Robot

What do you do if you have to solder thousands of through-hole parts? The expensive, professional way of doing this is running the boards through a wave soldering machine, or a machine with a fancy CNC solder fountain. The amateur way of soldering thousands of through-hole joints is putting some boards on the workbench and sitting down with a soldering iron. There is nothing in between; you’re either going to go with full automation for a large soldering job, or you’re doing it completely manually. That’s the problem this soldering robot solves. It’s a small, cheap, but still relatively capable soldering robot built out of a 3D printer.

This project is a solution to the development hell of the OpenScan project. This project is built around a small, simple printed circuit board that uses several 0.1″ female headers to connect an Arduino and motor drivers. Soldering them by hand is simply boring, and 3D printers are cheap, so the great mind behind this project decided to use a printer to pump out solder.

The modifications to the printer include a mount for a TS100 soldering iron and a modified filament extruder that pushes a spool of solder through a PTFE tube. The GCode for this soldering job was created manually, but you could also use a slicer instead. After 20 hours of development, the ‘success rate’ – however that is defined – is between 60-80%. That needs to get up to four or five nines before this DIY soldering robot is practical but this is a decidedly not-bad result for a few hours of tinkering.

This printer mod works great for the use case of stuffing a few 0.1″ headers into a board and letting a robot automatically solder the joints, but this printer will run into a problem with the general case of soldering a lot of randomly-shaped through hole parts. You need to actually hold the parts up against the board while soldering. There’s an easy solution to this problem: just flip the 3D printer upside down. This hack of a cheap 3D printer is so, so close to being a great solution to soldering thousands of through-hole parts quickly and easily, and we’re looking forward to seeing where the community takes this idea. You can check out the video demo below.

Continue reading “3D Printer Becomes Soldering Robot”