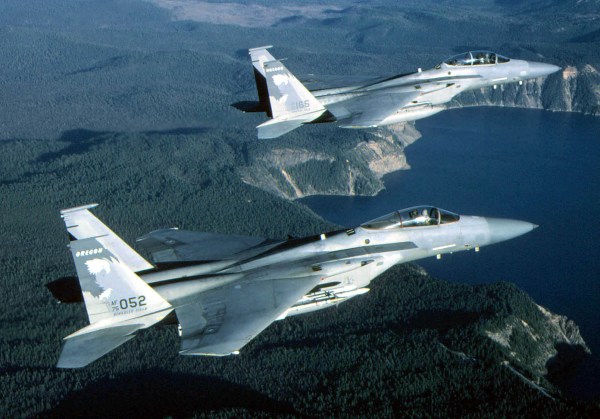
Hacking This Smart Bulb Is Almost Too Easy

The regular Hackaday reader no longer needs to be reminded about how popular the ESP8266 is; they see the evidence of that several times a day. But what might not be quite so obvious is that it isn’t just us hacker types that are in love with the inexpensive IoT microcontroller, it’s also popping up more and more frequently in commercial products.

As [Majenko] demonstrates, one of those ESP-powered devices is the LOHAS Smart LED Bulb. Upon cracking one open, he found that these relatively low-cost bulbs are little more than a standard ESP8266 chip and a couple of LED drivers. He wanted to see how hard it would be to get his own code running on the bulb, and by the looks of it, it took longer to get the thing open then it did to load it up with a custom firmware.

The bulb’s PCB features the aforementioned ESP8266, a 1MB 25Q80 flash chip, and MY9231 LED drivers. Whoever put the board together was nice enough to label the RX, TX, and GPIO test points, though [Majenko] notes that what’s labeled as 3.3 V appears dead. With a ESP-01 programmer wired up to the board and the appropriate board settings (which he provides), you can use the Arduino IDE to upload whatever you like to it.

Running “Hello World” on a smart bulb is fun and all, but what about kicking on those LEDs? [Majenko] found a library that works with the MY9231 drivers, and it didn’t take long to figure out which of the ESP’s pins were used to communicate with them. All in all, he said it was far easier than he expected.

You’ll probably want to put this bulb back into service after reprogramming, so [Majenko] advises caution when cracking open the shell. There are clips holding on the diffuser which he assures us are going to break no matter what you do, plus some silicone adhesive. He suggests super glue to hold it together when you’re done programming it, and using an OTA firmware so you don’t need to get back in there.

In the past we’ve shown how some hackers are rolling their own smart bulb hardware, but with cheap commercial offerings that are so easily hackable, it frankly doesn’t seem worth the effort. On the other hand, an influx of cheap ESP-powered bulbs isn’t all good news.

Jigsaw Motor Uses PCB Coils For Radial Flux

Electric motors are easy to make; remember those experiments with wire-wrapped nails? But what’s easy to make is often hard to engineer, and making a motor that’s small, light, and powerful can be difficult. [Carl Bugeja] however is not one to back down from a challenge, and his tiny “jigsaw” PCB motor is the latest result of his motor-building experiments.

We’re used to seeing brushless PCB motors from [Carl], but mainly of the axial-flux variety, wherein the stator coils are arranged so their magnetic lines of force are parallel to the motor’s shaft – his tiny PCB motors are a great example of this geometry. While those can be completely printed, they’re far from optimal. So, [Carl] started looking at ways to make a radial-flux PCB motor. His design has six six-layer PCB coils soldered perpendicular to a hexagonal end plate. The end plate has traces to connect the coils in a star configuration, and together with a matching top plate, they provide support for tiny bearings. The rotor meanwhile is a 3D-printed cube with press-fit neodymium magnets. Check out the build in the video below.

Connected to an ESC, the motor works decently, but not spectacularly. [Carl] admits that more tweaking is in order, and we have little doubt he’ll keep optimizing the design. We like the look of this, and we’re keen to see it improved.

Continue reading “Jigsaw Motor Uses PCB Coils For Radial Flux”

Artificial Intelligence Powers A Wasp-Killing Machine

At the time of publication, Hackaday is of the understanding that there is no pro-wasp lobby active in the United States or abroad. Why? Well, the wasp is an insect that is considered incapable of any viable economic contribution to society, and thus has few to no adherents who would campaign in its favor. In fact, many actively seek to defeat the wasp, and [Tegwyn☠Twmffat] is one of them.

[Tegwyn]’s project is one that seeks to destroy wasps and Asian Hornets in habitats where they are an invasive pest. To achieve this goal without harming other species, the aim is to train a neural network to detect the creatures, before then using a laser to vaporize them.

Initial plans involved a gimballed sentry-gun style setup. However, safety concerns about firing lasers in the open, combined with the difficulty of imaging flying insects, conspired to put this idea to rest. The current system involves instead guiding insects down a small tube at the entrance to a hive. Here, they can be easily imaged at close range and great detail, as well as vaporized by a laser safely contained within the tube, if they are detected as wasps or hornets.

It’s an exciting project that could serve as a good model of how to deal with invasive insect species in the wild. We’ve seen insects grace our pages before, too.  Video after the break. Continue reading “Artificial Intelligence Powers A Wasp-Killing Machine”

Say It With Me: Bandwidth

Bandwidth is one of those technical terms that has been overloaded in popular speech: as an example, an editor might ask if you have the bandwidth to write a Hackaday piece about bandwidth. Besides this colloquial usage, there are several very specific meanings in an engineering context. We might speak about the bandwidth of a signal like the human voice, or of a system like a filter or an oscilloscope — or, we might consider the bandwidth of our internet connection. But, while the latter example might seem fundamentally different from the others, there’s actually a very deep and interesting connection that we’ll uncover before we’re done.

Let’s have a look at what we mean by the term bandwidth in various contexts.

Continue reading “Say It With Me: Bandwidth”

A Baby’s First Year In Data, As A Blanket

New parents will tell you that a baby takes a few months to acquire something close to a day/night sleep pattern, and during that time Mom and Dad also find their sleep becomes a a rarely-snatched luxury. [Seung Lee] has turned this experience into a unique data visualisation, by taking the sleep pattern data of his son’s first year of life and knitting it into a blanket.

The data was recorded using the Baby Connect app, from which it was exported and converted to JSON. This was in turn fed to some HTML/Javascript which generated a knitting pattern in a handy format that could be displayed on any mobile or portable device for knitting on the go. The blanket was then knitted by hand as a series of panels that were later joined into one, providing relief as the rows lined up.

The finished product shows very well the progression as the youngster adapts to a regular sleep pattern, and even shows a shift to the right at the very bottom as a result of a trip across time zones to see relatives. It’s both a good visualisation and a unique keepsake that the baby will treasure one day as an adult. (Snarky Ed Note: Or bring along to the therapist as evidence.)

This blanket was hand-knitted, but it’s not the first knitted project we’ve seen. How about a map of the Universe created on a hacked knitting machine?

Exploring The Raspberry Pi 4 USB-C Issue In-Depth

It would be fair to say that the Raspberry Pi team hasn’t been without its share of hardware issues, with the Raspberry Pi 2 being camera shy, the Raspberry Pi PoE HAT suffering from a rather embarrassing USB power issue, and now the all-new Raspberry Pi 4 is the first to have USB-C power delivery, but it doesn’t do USB-C very well unless you go for a ‘dumb’ cable.

Join me below for a brief recap of those previous issues, and an in-depth summary of USB-C, the differences between regular and electronically marked (e-marked) cables, and why detection logic might be making your brand-new Raspberry Pi 4 look like an analogue set of headphones to the power delivery hardware.

Continue reading “Exploring The Raspberry Pi 4 USB-C Issue In-Depth”

Raspberry Pi Cyberdeck Inspired By Rare MSX

When we see these cyberdeck builds, the goal is usually to just make something retro-futuristic enough to do William Gibson proud. There’s really no set formula, but offset screens coupled with large keyboards and a vague adherence to 1980s design language seem to be the most important tenets.

Granted the recent build by [lewisb42] still leans heavily on those common tropes, but at least there’s a clear lineage: his Raspberry Pi retro all-in-one is styled after a particularly rare bright red variant of the MSX that Sony released in Japan. Known as the HIT-BIT HB-101, some aficionados consider the circa-1984 machine to be the peak of MSX styling. Since getting his hands on a real one to retrofit wasn’t really an option, he had no choice but to attempt recreating some of the computer’s unique design elements from scratch.

The faceted sides were 3D printed in pieces, glued together, and then attached to a 1/4″ thick backplate made out of polycarbonate. For the “nose” piece under the keyboard, [lewisb42] actually used a piece of wood cut at the appropriate angles with a table saw. The top surface of the computer, which he calls the FLIPT-BIT, is actually made of individual pieces of foamed PVC sheet.

If all this sounds like a big jigsaw puzzle, that’s because it basically is. To smooth out the incongruous surfaces, he used a combination of wood putty, body filler, spot putty, and more time sanding then we’d care to think about. For the 3D printed surface details such as the screen bezel and faux cartridge slots, he used a coat of Smooth-On’s XTC-3D and yet more sanding. While [lewisb42] says the overall finish isn’t quite as good as he hoped, we think the overall look is fantastic considering the combination of construction techniques hiding under that glossy red paint job.

As for the electronics, there’s really no surprises there. The FLIPT-BIT uses a keyboard and touchpad from Perixx, a seven inch TFT display, and of course the Raspberry Pi 3. The display runs at 12 V so [lewisb42] used a combination of a generic laptop-style power supply and a 5 V step-down converter to keep everyone happy. While it doesn’t currently have a battery, it seems like there’s more than enough room inside the case to add one if he ever wants to go mobile.

If this build doesn’t properly scratch your Neuromancer itch, never fear. Just take a look at this decidedly less friendly-looking build that even includes a VR headset for properly jacking yourself into the matrix.