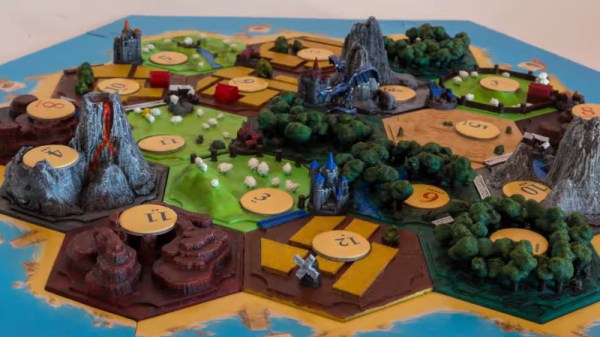
A Raspberry Pi Is A Hardware Hacker’s Swiss Army Knife

By now most of us have used a Raspberry Pi at some level or another. As a headless server it’s a great tool because of its price point, and as an interface to the outside world the GPIO pins are incredibly easy to access with a simple Python script. For anyone looking for guidance on using this device at a higher level, though, [Arun] recently created a how-to for using some of the Pi’s available communications protocols.

Intended to be a do-everything “poor man’s hardware hacking tool” as [Arun] claims, his instruction manual details all the ways that a Raspberry Pi can communicate with other devices using SPI and I2C, two of the most common methods of interacting with other hardware beyond simple relays. If you need to go deeper, the Pi can also be used as a full JTAG interface or SWD programmer for ARM chips. Naturally, UART serial is baked in. What more do you need?

As either a tool to keep in your toolbox for all the times you need to communicate with various pieces of hardware, or as a primer for understanding more intricate ways of using a Raspberry Pi to communicate with things like sensors or other computers, this is a great write-up. We also have more information about SPI if you’re curious as to how the protocol works.

Thanks to [Adrian] for the tip!

Simple, Self-Contained LoRa Repeater In About An Hour

[Dave Akerman]’s interest in high-altitude projects means he is no stranger to long-range wireless communications, for which LoRa is amazingly useful. LoRa is a method of transmitting at relatively low data rates with low power over long distances.

Despite LoRa’s long range, sometimes the transmissions of a device (like a balloon’s landed payload) cannot be received directly because it is too far away, or hidden behind buildings and geography. In these cases a useful solution is [Dave]’s self-contained LoRa repeater. The repeater hardware is simple, and [Dave] says that if one has the parts on hand, it can be built in about an hour.

The device simply re-transmits any telemetry packets it receives, and all that takes is an Arduino Mini Pro and a small LoRa module. A tiny DC-DC converter, battery, and battery charger rounds out the bill of materials to create a small and self-contained unit that can be raised up on a mast, flown on a kite, or carried by a drone.

The repeater’s frequency and other settings can even be reprogrammed (using a small windows program) for maximum flexibility, making the little device invaluable when going hunting for landed payloads like the one [Dave] used to re-create a famous NASA image using a plastic model and a high-altitude balloon. Check out the details on the GitHub repository for the project and start mashing “add to cart” for parts at your favorite reseller.

Marvelously Machined Clutch Masters Musical Marble Machine Mayhem

As far as marble runs go, few can hope to compete with [Wintergatan]’s amazing musical works. While undertaking the build of the Marble Machine X, timing problems became apparent. You can crank the machine faster or slower to alter the tempo, but the time it took marbles to drop due to gravity and hit an awaiting drum remains constant. You can’t control gravity, so you look to a mechanical solution in adjusting marble drops. In music, as in a jewel heist, timing is everything. Thankfully, [Machine Thinking] was on hand to collaborate, and a solution was found in the form of a beautifully machine indexable clutch.

The duo came together and designed a clutch, that would allow the timing relationship between various parts of the Marble Machine X to be varied. At 7:10 into the Wintergatan video below he gets down to brass tacks on how this brass music timing clutch actually works. At 90 BMP, the clutch allows the synchronization of the machine to be altered in approximately 10ms increments. Without this vital addition, drum beats would tend to slip out of time.

It’s a part that would challenge the novice, requiring the cutting of teeth and the inscription of accurate markings to allow it to do its job. However, it’s no trouble for [Machine Thinking], who shared a video of the machining process, including the outsourcing of the hand-engraved dial numbers.

Such a piece takes significant work to produce, and yet it is just one part of a much larger machine. We can’t wait to see the Marble Machine X finished, but if you’re unfamiliar with [Wintergatan]’s earlier works — you’re in for a treat.

Continue reading “Marvelously Machined Clutch Masters Musical Marble Machine Mayhem”

Creating A Contest-Winning Amiga Demo Soundtrack

The Amiga platform took the world by storm in the 1980s. Developed by a crack team and brought to market by Commodore, the OCS chipset brought high-quality graphics and sound into the home computer market in a way never seen before. These capabilities cemented the Amiga’s place in the demoscene, and it maintains an active development community to this day. [Hoffman] is one such member of that community, and has shared some of the hacks that go into pulling off a banging soundtrack in a cutting-edge A500 demo.

The Amiga has 512 KB of so-called chip RAM, accessible by the custom chips and CPU for all tasks. There’s also commonly an additional 512 KB in a trapdoor under the machine, though it is limited in the ways it can be used. With these limits in place, [Hoffman] was overjoyed when the rest of the team allocated him a full 200 KB of memory for the soundtrack. In order to make the most of this precious resource, hacking ensued.

[Hoffman] does a great job of explaining all the tricks involved in creating a compelling 5 minute soundtrack in just 200 KB of RAM. There’s discussion of compression, sample sizes, and the vagaries of the ProTracker format. Smart hacks such as prioritized sample loading and pre-rendering drum loops also help to get the project over the line.

It’s a great write-up, which clearly explains the strategies used to help build a world-class demo soundtrack. [Hoffman] promises that the tricks used by the rest of the crew are equally as impressive, which we’re sure helped Eon to win the Amiga Demo Compo at Revision 2019. We’ve featured Revision winners here before, too. Demo video after the break.

Continue reading “Creating A Contest-Winning Amiga Demo Soundtrack”

Drone Registration Tax Sought By UK’s CAA

As the UK’s aviation regulator, the Civil Aviation Authority is tasked with “making aviation better for those who choose to fly and those who do not”. Their latest plan to further this mission comes in the form of a drone registration tax. The proposal, which is open to online responses until 7 June, seeks to pass on the cost of a drone registration system to those who register themselves.

Proposals for a drone registration scheme have been in the works for a while now, and if enacted it would go into effect on 1 November. Owners of craft weighing more than 250 g (0.55 lbs) would have to fork out £16.50 ($21.50) per year, ostensibly to pay for the administration of the scheme. The CAA are basing this rate on as many as 170,000 people registering. In the US, the FAA has a drone registration program in place that requires registration based on the same 250 g weight guideline, but only charges $5 (£3.82) for a 3-year license, about thirteen times less than the CAA proposal.

Long-time readers will be familiar with our ongoing coverage of the sometimes-farcical saga of drone sightings in British skies. Airports have been closed (and implausible excuses have been concocted), but one thing remains constant: no tangible proof of any drone has yet been produced. Faced with a problem it doesn’t fully understand, the British Government is looking to this registration program.

It goes without saying that people misusing drones and endangering public safety should be brought to justice as swiftly as possible. But our concern is that the scale of the problem has been vastly over-represented, and that this scheme will do little to address either the problem of bogus drone sightings or the very real problem of criminal misuse of drones for example to smuggle contraband into prisons. It’s difficult to think this measure will have an effect on the number of incidents blamed on drones, and the high cost included in the proposal is a troubling burden for enthusiasts who operate responsibly.

Scratch Built Smartwatch Looks Pretty Darn Sharp With 3D Printed Case And Round LCD

These days, if you want a smart watch, you’re spoiled for choice. The major smartphone players all have devices on the market, and there’s plenty of third party manufacturers vying for your dollar, too. You might think it’s impossible achieve the same finish with a 3D printer and a reflow oven, but you’re wrong. [Samson March] didn’t quite fancy something off the shelf, though, and instead build an amazing smartwatch of his own.

The beautiful case is printed in a woodfilled PLA — consisting of 70% plastic and 30% sawdust. This allows it to be sanded and stained for an attractive final product. Printing artifacts actually add to the look here, creating somewhat of a woodgrain effect. There’s a round LCD for a more classical watch look, which displays various graphics and even contact photos for incoming messages. Like most smartwatches on the market, it uses Bluetooth Low Energy for communication, and has a rechargeable lithium battery inside. Estimated battery life is approximately one week, depending on the frequency of use, and the recharging base he fabricated is as beautiful as the watch itself.

It’s a tidy build that shows off [Samson]’s design skills, and files are available on GitHub if you’d like to make your own. Laying out the full design in Fusion 360 prior to the build enabled the watch to be optimized for size constraints, creating an attractive and comfortable piece. With that said, if you’re a fan of a more hardcore electronic aesthetic, perhaps something 8-bit might be more your speed.

[via reddit, thanks to Aliasmk for the tip!]

Jumbo LEDs Make For A Handy ATtiny Beacon

Inspiration can come from anywhere. Sometimes it’s just a matter of seeing an interesting part that you want to fiddle around with badly enough that you end up developing a whole idea, and potentially product, around it. That’s how [Bobricius] found himself creating this very slick little warning beacon, and looking at the end result, we think he made the right decision.

The Kingbright DLC-6SRD “jumbo” LED is actually six individual emitters built into a plastic diffuser. Interfacing with the device is simple enough; each LED has its normal anode and cathode leg, all you need to do is power them up. What [Bobricius] has created is a simple PCB design that the DLC-6SRD can plug right into, complete with a 2032 coin cell holder on the opposite side.

Of course, just lighting up all six elements at the same time wouldn’t be very interesting. [Bobricius] is controlling them individually right off of the digital pins of an ATtiny10 with the help of some Charlieplexing. This makes all kinds of interesting patterns possible, and as demonstrated in the video after the break, the current iteration of the project uses some very simple code to “rotate” the LED as if it was the flasher on an emergency vehicle.

The addition of a few blinking LEDs can make a world of difference in terms of nighttime visibility, so a cheap stick-on module that adds such a distinctive light pattern could be a very important safety device. It could also be useful for UAVs, following the FAA’s new rules which would mandate anti-collision lights for night flying.

Continue reading “Jumbo LEDs Make For A Handy ATtiny Beacon”