This GCode Post-Processor Squeezes Lines Into Arcs

When the slicer software for a 3D printer model files into GCode, it’s essentially creating a sequential list of connected line segments, organized by layer. But when the features of the original model are dense, or when the model is representing small curves, slicers end up creating a proliferation of teeny segments to represent this information.

This is just the nature of the beast; lots of detail translates into lots of teeny segments. Unfortunately, some printers actually struggle to print these models at the desired speeds, not because of some mechanical limitation, but because the processor cannot recalculate the velocities of these segments fast enough. The result is that some printers simply stutter or slow down the print, resulting in print times that are much higher than they should be.

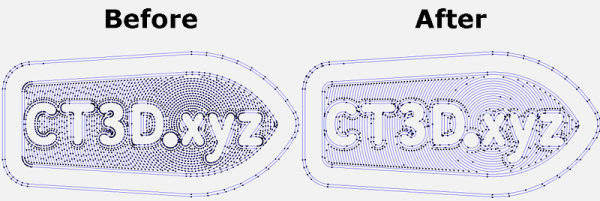
Enter Arc Welder, a GCode compression tool written by [FormerLurker] that scrutinizes GCode files, hunts for these tiny segments, and attempts to replace contiguous clusters of them with a smaller number of arcs. The result is that the number of GCode commands needed to represent the model drop dramatically as connected clusters of segment commands become single arc commands.

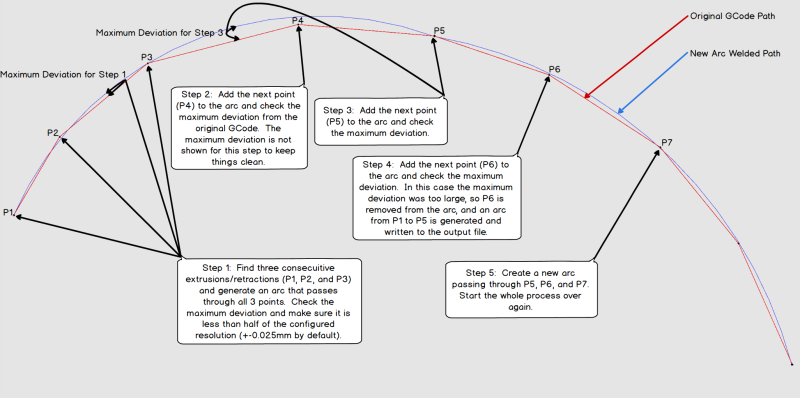
“Now wait”, you might say, “isn’t an arc an approximation of these line segments?” And yes–you’re right! But here lies the magic behind Arc Welder. The program is written such that arcs only replace segments if (1) an arc can completely intersect all the segment-to-segment intersections and (2) the error in distance between segment and arc representation is within a certain threshold. These constraints act such that the resulting post-processing is true to the original to a very high degree of detail.

A concise description of Arc Welder’s main algorithm as pulled from the docs

This whole program operates under the assumption that your 3D printer’s onboard motion controller accepts arc commands, specifically G2 and G3. A few years ago, this would’ve been uncommon since, technically, 3D printing and STL file only requires moving in straight line segments. But with more folks jumping on the bandwagon to use these motion control boards for other non-printing applications, we’re starting to see arc implementations on boards running Marlin, Smoothieware, and the Duet flavor of RepRap Firmware.

For the curious, this program is kindly both well documented on operating principles and open source. And if [FormerLurker] seems like a familiar name before–you’d be right–as they’re also the mind behind Octolapse, the 3D printing timelapse tool that’s a hobbyist crowd favorite. Finally, if you give Arc Welder a spin, why not show us what you get in the comments?

Thanks for the tip [ImpC]!

Open And Sustainable Engineering Hack Chat

Join us on Wednesday, August 19 at noon Pacific for the Open and Sustainable Engineering Hack Chat with Joshua Pearce!

Since the first of our hominid ancestors learned to pick up a rock and make it into a tool, we humans have been using our engineering skills to change the world. For most of the 2 million or so years since that first technological leap, natural materials like stone and wood were the focus of our engineering projects, and except for a few tantalizing remnants, most of what was built has returned to the Earth whence it came.

Then we discovered other materials; we learned to free metals from rocks and how to harvest the fossilized hydrocarbon remains of ancient plants. Iron, aluminum, plastic, and silicon became our stock in trade, and the planet is now layered so thick with these materials and the byproducts of harvesting them that a new geological epoch, the Anthropocene Epoch, has been proposed to cover this time of human activity and its impact on the geological record.

But if we humans are clever enough to make such an impact, we should be clever enough to think our way out of the mess, and wise enough to see the need. That’s where the efforts of Dr. Pearce’s research at the Michigan Tech Open Sustainability Technology (MOST) lab are focused. Dr. Pearce envisions a sustainable future powered by pervasive solar photovoltaic systems and using open-source technologies like 3D printing to drive new models for manufacturing. We’ve recently seen interesting work from his lab, like this grinder that makes custom compression screws for plastic recycling. The MOST page on Hackaday.io is filled with other great examples of the technology that supports their mission, from low-cost environmental testing instruments to 3D-printable microfluidics.

Dr. Pearce will join us on the Hack Chat to talk about open and sustainable engineering. Be sure to stop by with your questions and to find out what you can do to engineer a brighter future, starting right in your own shop.

join-hack-chatOur Hack Chats are live community events in the Hackaday.io Hack Chat group messaging. This week we’ll be sitting down on Wednesday, August 19 at 12:00 PM Pacific time. If time zones baffle you as much as us, we have a handy time zone converter.

Click that speech bubble to the right, and you’ll be taken directly to the Hack Chat group on Hackaday.io. You don’t have to wait until Wednesday; join whenever you want and you can see what the community is talking about.

Continue reading “Open And Sustainable Engineering Hack Chat”

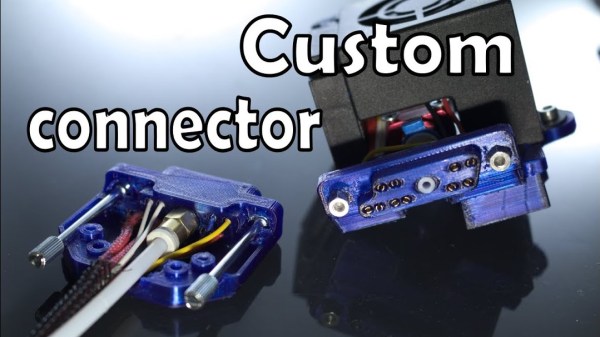
Feeding Both Filament And Electrons Through A Custom D-Sub Connector

We sometimes forget that 3D printers are just CNC platforms with a hotend attached, and there a whole range of alternative tool heads to use. [Jón Schone] has been doing exactly that, and needed a way to quickly disconnect his hotend completely from his printer, so he 3D printed his own custom D-sub connector for both filament and wires. (Video, embedded below.)

[Jon] has added a number of upgrades for his Creality CR10 3D printer, including a quick change tool mount to allow him to also use a laser engraver and even a small spindle. When the hotend is removed there’s no way to quickly disconnect the wiring , so the print head is usually left connected and placed to one side of the printer. For a quick detach solution for both wiring and the Bowden tube, he first modified an off-the-shelf D-sub connector. The connector was relatively expensive, and the tube had a tendency to pop out, which led to some failed prints.

[Jon] wanted to use proper Bowden tube fittings inside the connector, so he designed and printed his own D-sub connector and bought loose contacts. Pushing the contacts into the housing turned out to be quite difficult to do without breaking them, so he’s working on making that process simpler. This is just one of many examples of 3D printing 3D printer upgrades, which has been a core feature of the RepRap project right from the beginning. Check out the video after the break

We have no shortage of 3D printer hacks and there will be many more to come. Some cool recent ones includes the Jubilee CNC that was built from the start with automatic tool changing in mind, and a printer that fits in your backpack. Continue reading “Feeding Both Filament And Electrons Through A Custom D-Sub Connector”

An Open Hardware Laser Engraver For Everyone

Right now, you can get a diode laser engraver on eBay for around $100 USD. That sounds like a deal, but it’ll probably use some arcane proprietary software, won’t be terribly accurate, and the laser itself will almost certainly be fully exposed. Of course there’s no shortage of DIY builds which improve upon this situation greatly, but unfortunately the documentation and instructions to replicate them yourself often leave a lot to be desired.

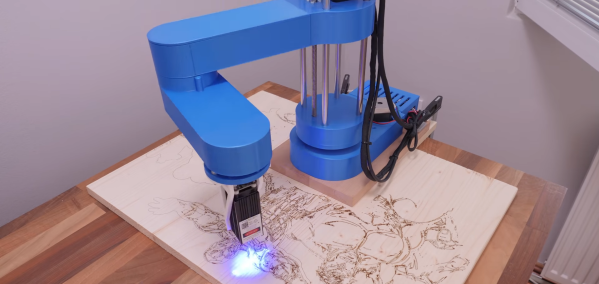
To get a safe and accurate laser platform into the hands of hackers everywhere, we need more well documented open source designs that are actually built with community in mind. Projects like the Engravinator from [Adam Haile]. This isn’t a one-off design with documentation thrown together after the fact, it’s a fully open hardware engraver with a concise assembly guide that’s built from 3D printed parts and readily available components. You’re free to source and print the parts yourself or, eventually, purchase everything as a kit.

Pen-equipped Engravinator

The microwave-sized Engravinator is built from standard 2020 aluminum extrusion, and offers a workable area of 130mm x 130mm. There’s a hatch on the front of the enclosure for objects that are small enough to fit inside the machine, but the open bottom and handles on the top also allow the user to place the Engravinator directly onto the work surface. [Adam] says this feature can be especially useful if you’re looking to burn a design into a tabletop or other large object.

Outside of the aluminum extrusion and miscellaneous hardware that make up the frame, most of the other parts are 3D printed. Released under the CERN Open Hardware License v1.2 and distributed as both STL and STEP files, the printable parts for the Engravinator are ripe for modification should you be so inclined. The same goes for the DXF files for the enclosure panels, which will need to be cut out of orange acrylic with a CNC or (ironically) a laser.

Continue reading “An Open Hardware Laser Engraver For Everyone”

British Cops Catch Shooter-Printing Villain

It’s a perennial of breathless British tabloid scare reporting that 3D printers will unleash a tide of weapons upon the streets. But perhaps it might actually be time for Brits lock up their children, because London’s Metropolitan Police have announced their first prosecution for 3D printing a handgun. The gun pictured appears to be a Repringer 5-shot .22 revolver, and was found by police during a drugs raid.

The UK has significantly restrictive firearms legislation and shooting incidents are extremely rare in the country, so while this might not raise any eyebrows on the other side of the Atlantic it’s an extremely unusual event for British police. It appears that the builder was not the type of libre firearms enthusiast who has made the news with similar work in the USA, so it has to be assumed that it was printed purely as a means to secure an illegal firearm however rough-and-ready or indeed dangerous it might be.

Stepping aside from the firearm aspect of the story, it should be of concern for any British 3D printer enthusiasts. As we’ve reported over the years with respect to drone incidents they can sometimes throw reason to the wind when faced with unfamiliar technology, indeed we’ve already seen them imagining RepRap parts to be for a firearm. We’d counsel all parties to keep sane heads, and hope that both the sentence for today’s criminal proves to be a suitable deterrent, and that no clueless fool decides to download and print another weapon for the hell of it. As always, we’ll bring you developments as they happen.

Print A Drill Press For Your Printed Circuit Boards

If you make printed circuit boards the old fashioned way by etching them yourself, you may need to drill a lot of holes; even surface-mount converts still need header pins on occasion. But, drilling these holes by hand often leads to broken drill bits, which always seems to happen with one un-drilled hole and no spare bits left. [Daumemo] came up with a solution: a 3D printed drill press for a Dremel or similar rotary tool.

While you can buy commercial presses designed to fit these tools, there’s a certain satisfaction to building your own, and if you have a well-stocked parts bin you might even finish it before a mail-ordered version could arrive. Certainly you could do it at lower cost. The design is straightforward, and uses printed parts augmented with “reprap vitamins” (i.e. the non-printable, typically metal, components). If you’ve ever built — or repaired — a 3D printer, you may have these pieces already: a couple of LM8UU bearings, some 8 mm steel rod, and a pair of springs seem like the most esoteric parts required, although even these could probably be substituted without much trouble.

Only a few pieces need to be printed: a base is outfitted with a removable table for holding the workpiece, while a lever actuates the frame holding the tool. [Daumemo] chose to print the design in ABS, but found that it flexes a little too much, occasionally requiring some care during use — a stiffer filament such as PLA might yield better results. Overall, though, this seems like a great project for that 3D printer you haven’t used in a while.

Be sure to check out the video of the press in action, after the break.

Continue reading “Print A Drill Press For Your Printed Circuit Boards”

Hackaday Celebrates 15 Years And Oh How The Hardware Has Changed

Today marks exactly 15 years since Hackaday began featuring one Hack a Day, and we’ve haven’t missed a day since. Over 5,477 days we’ve published 34,057 articles, and the Hackaday community has logged 903,114 comments. It’s an amazing body of work from our writers and editors, a humbling level of involvement from our readers, and an absolutely incredible contribution to open hardware by the project creators who have shared details of their work and given us all something to talk about and to strive for.

What began as a blog is now a global virtual hackerspace. That first 105-word article has grown far beyond project features to include spectacular long-form original content. From our community of readers has grown Hackaday.io, launched in 2014 you’ll now find over 30,000 projects published by 350,000 members. The same year the Hackaday Prize was founded as a global engineering initiative seeking to promote open hardware, offering big prizes for big ideas (and the willingness to share them). Our virtual connections were also given the chance to come alive through the Hackaday Superconference, Hackaday Belgrade, numerous Hackaday Unconferences, and meetups all over the world.

All of this melts together into a huge support structure for anyone who wants to float an interesting idea with a proof of concept where “why” is the wrong question. Together we challenge the limits of what things are meant to do, and collectively we filter through the best ideas and hold them high as building blocks for the next iteration. The Hackaday community is the common link in the collective brain, a validation point for perpetuating great ideas of old, and cataloging the ones of new.

Perhaps the most impressive thing about the last 15 years of Hackaday is how much the technological landscape has changed. Hackaday is still around because all of us have actively changed along with it — always looking for that cutting edge where the clever misuse of something becomes the base for the next transformative change. So we thought we’d take a look back 15 years in tech. Let’s dig into a time when there were no modules for electronics, you couldn’t just whip up a plastic part in an afternoon, designing your own silicon was unheard of, and your parts distributor was the horde of broken electronics in your back room.

Continue reading “Hackaday Celebrates 15 Years And Oh How The Hardware Has Changed”