Hackaday Links Column Banner

Hackaday Links: April 21, 2019

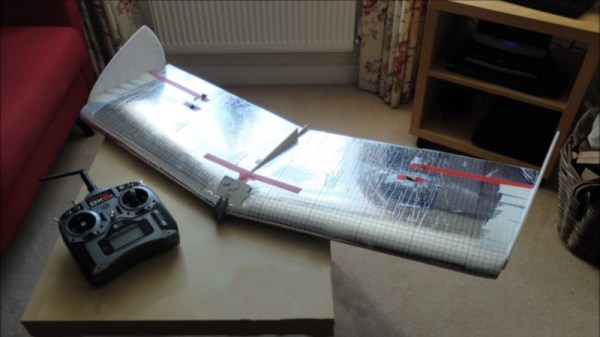
A Russian company has developed a drone with a very interesting control scheme. It’s a VTOL fixed wing, that takes off like a bicopter, transitions to use wings for lift, flies around for half an hour or so, and then lands on its tail. This is a big ‘un; the reported weight is 50 pounds. Although the available footage really doesn’t give any sense of scale, we would estimate the wingspan as somewhere between four and five feet. Fixed-wing VTOLs are close to the holy grail of current drone science — wings actually generate lift, and VTOL means Uber can deliver McDonalds to your driveway.

What happens when you give an idiot a USB killer? $60,000 in damages. A former student at the College of St. Rose killed 59 computers with a USB killer, basically a charge pump that dumps a hundred or so volts back into a USB port, destroying the computer. Yes, you can just buy USB killers on the Internet, and yes you can film yourself zapping computers and posting the videos on social media. Both are dumb ideas.

This week was huge for the preservation of our digital culture. The source for the original Infocom games, such as Zork and Hitchhiker’s Guide to the Galaxy have been archived and released. This is a rather interesting development, as these games were written in Zork Implementation Lanugage (ZIL), a language that is used by no one and there’s almost zero documentation. Yes, we have the source, but not a compiler. It’s Lisp-ish, and there are people working to make new games in this language. Also this week is the release of the source for Leisure Suit Larry. Hackaday readers will be familiar with Leisure Suit Larry as the protagonist is a 38-year-old loser who lives in his mother’s basement. This game goes off the rails when the protagonist decides to leave the basement, but it was written a long time ago, and I guess Al Lowe didn’t foresee the Internet or something. Tip of the very fancy hat to @textfiles here.

You in Jersey? The Vintage Computer Festival East is May 3-5th, and it’s bound to be a grand time. Keynotes are by Steve Bellovin, co-inventor of USENET, Ken Thompson (!), co-inventor of UNIX, and Joe Decuir, co-inventor of the Atari VCS, Atari 800, and the Commodore Amiga. There’s also a Software Store (new this year), which we can only hope is like walking into Babbage’s. Protip: while you’re there, go up to Asbury Park and visit the Silverball Museum. It’s a whole lot of pinball.

For easier production and assembly of circuit boards, you should only place your components on one side. Doing so means you don’t have to flip the board and run it through the pick and place again, and you don’t have to worry about glue. This is a single-sided circuit board. There’s only one side. It’s a Mobius PCB, the flex-circuit version of a handmade circuit board made with a conductive pen.

Making A Flying Wing With Expanding Foam

Many radio control aircraft modelers will be familiar with the process of cutting wings out of foam with the hot wire method. The tools are simple enough to build at home, and it’s an easy way of producing a lightweight set of wings without too much hassle. [IkyAlvin] walks a different path, however (YouTube link, embedded below).

Expanding foam is the key here – that wonderful sticky material in a can that never quite goes where you want it to. MDF and foam is used to create a mold to produce the wing forms. It’s then a simple matter of loading floor underlay into the mold to act as the outer skin, and then filling the mold with expanding foam and waiting for it to cure.

The final parts are assembled into a flying wing, and the first test flight is remarkably successful. Using foam overlay as a skin also has the added benefit of providing a sleek silver finish to the aircraft. It goes to show that there’s always room to explore alternative techniques outside of the mainstream. If you’d like to get more familiar with the classic hot wire technique, though, we can help there too. Video after the break.

Continue reading “Making A Flying Wing With Expanding Foam”

Vintage Slide Viewers Make Beautiful Retro Emulators

35mm still photography is still hanging on out in the wild, with its hardcore fans ensuring it never quite dies out despite the onward march of digital imaging. Slides are an even more obsolete technology, forgotten long ago when the quality of color negative films improved. The related paraphernalia from the era of the photographic slide continues to clutter up attics and garages the world over. [Martin Burlus] was in possession of some retro slide viewers, and found they made an excellent basis for a RetroPie build.

The build relies on stock standard fundamentals – a Pi Zero runs the show, combined with a USB hub and a power supply. [Martin] then chose to build this all inside the case of the slide viewer, combined with a 2.8″ PiTFT display. This neatly slots directly on to the Pi Zero’s 40-pin header, and comes complete with a touch screen. It’s the perfect size to slide into most slide viewers, though some models required removal of the tact buttons.

The slide viewers make for a charming enclosure, and the classic 1970s optics make for pleasant viewing. Throwing a modern display behind a vintage lens is a great way to give a project a more classic look and feel. One thing’s for sure – we’ll be keeping an eye out for a slide viewer of our own next time we’re passing through the local junk shops.

What’s The Secret Of Cyphercon?

Cyphercon is not particularly large, or in a glamorous part of the world — in fact most people who came in from out of town had to fight snow to make it. Yet when I stepped into the con last Thursday there was no doubt something awesome was in progress. People were camped out in small groups, working furiously on their computers, talks were packed with people who came alive in the Q&A, and everywhere you looked you found people deep in conversation with friends old and new. If you missed out on Cyphercon 4.0, you need to make an effort to be here for 5.0.

Join me after the break for the highlights of this two-day security conference nestled in the heart of Milwaukee.

Continue reading “What’s The Secret Of Cyphercon?”

Characterising A Potentiometer With A Stepper Motor

Potentiometers, or variable resistors, are a standard component that we take for granted. If it says “10k log” on a volume pot, than we fit and forget. But if like [Ben Holmes] you are modelling electronic music circuitry, some greater knowledge is required. To that end he’s created a rig for characterising a potentiometer to produce a look-up table of its values.

It’s a simple enough set-up in which a voltage controlled current source feeds the pot while an Arduino with a motor controller turns it through a stepper motor, and takes a voltage reading from its wiper via an analogue pin. Probably most readers could assemble it in a fairly short time. Where it becomes interesting though is in what it reveals about potentiometer construction.

Audio potentiometers are usually logarithmic. Which is to say that the rate of change of resistance is logarithmic over the length of the track, in an effort to mimic the logarithmic volume response of the human ear in for example a volume control. If you are taught about logarithmic pots the chances are you’re shown a nice smooth logarithmic curve, but as he finds out in the video below that isn’t the case. Instead they appear as a set of linear sections that approximate to a logarithmic curve, something that is probably easier to manufacture. It’s certainly useful to know that for [Ben]’s simulation work, but for the rest of us it’s a fascinating insight into potentiometer manufacture, and shows that we should never quite take everything for granted.

Continue reading “Characterising A Potentiometer With A Stepper Motor”

Concrete Table Even Includes A USB Hub

When designing furniture, material choice has a huge effect on the character and style of the finished product. Wood is a classic option, while more modern designs may use metal, plastic or even cardboard. Less popular, but no less worthy, is concrete. It’s heavy, cheap, and you can easily cast it into a wide variety of forms. [KagedCreations] thought this would be ideal, and whipped up this nifty piece of furniture with an integrated USB hub.

A pair of melamine shelves were scrapped to build the form, in which the concrete table is cast. Melamine is a popular choice, as it’s cheap, readily available, and releases easily from the finished concrete. Along with the USB hub, a wooden board is cast into the base of the concrete table top. This serves as an easy attachment point for the pre-made hairpin-style legs, which can be installed with wood screws.

The final result is a tidy side table that has plenty of heft to keep it stable and secure. It’s not the first concrete USB hub we’ve seen, but it’s likely the heaviest thus far. We’d love to see a version with an integrated charging pad, too – if you build one, be sure to let us know. Video after the break.

Continue reading “Concrete Table Even Includes A USB Hub”

Watch These Two Robots Cooperate On A 3D Print

Putting a 3D printer on a mobile robotic platform is one thing, but two robots co-cooperatively printing a large object together is even more impressive. AMBOTS posted the video on Twitter and we’ve embedded it below.

The robots sport omnidirectional wheels and SCARA format arms, and appear to interact with some kind of active tabletop to aid positioning. The AMBOTS website suggests that the same ideas could be used for other tasks such as pick and place style assembly work, and the video below of co-operative 3D printing is certainly a neat proof of concept.

As a side note: most omni wheels we see (such as the ones on these robots) are of the Mecanum design but there are other designs out there you may not have heard of, such as the Liddiard omnidirectional wheel.

Continue reading “Watch These Two Robots Cooperate On A 3D Print”