Save An Old Drill From Landfill, With Some Lithium-Ion Magic

What do you do, when your trusty cordless drill starts to lose battery capacity? You bought it a decade ago and parts are a distant memory, so there’s no chance of buying a new pack. If you are [Danilo Larizza], you strip away the old NiMh cells, and replace them with a custom pack (Italian, Google Translate link) made from 18650 Li-ion cells.

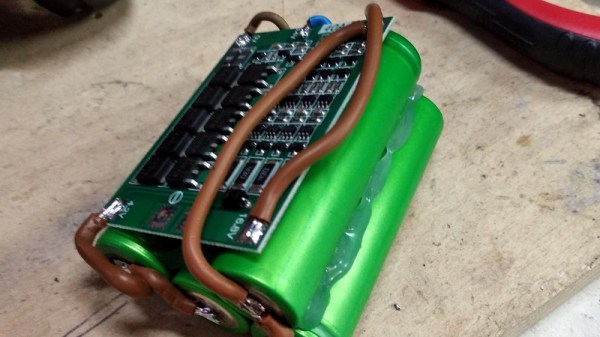
The build is a straightforward one to anyone familiar with lithium-ion packs, but to a battery newbie it should serve as a handy step-by-step description. He starts by selecting a range of matched cells from discarded laptop batteries and adds an off-the-shelf battery management board to keep everything safe. Interestingly he appears to have soldered his wires to the cells rather than the more usual spot-welding, sadly for many of us a spot-welder is beyond our means. It would be interesting to know both the mechanical integrity of the resulting connection and whether the heat of soldering might in some way affect the cells.

Firing up the drill with the new pack is not the immediate success he hoped it would be, the start-up current is so high that the battery management board goes into a fault condition. This situation is resolved with a model that can take more current, and he can take his drill out once more.

If you are annoyed by the rise of cordless tools, you’re in good company. Meanwhile if you lack a spot-welder for batteries, have a look at one of the nicer ones we’ve seen.

Reverse Engineering Shimano Bike Electronics

ANT+ is a wireless protocol specifically designed for use with sensors, and has similar functionality in some respects to Bluetooth Low Energy. It’s found a place among various bicycle equipment manufacturers, to connect smartwatches, cycle computers and electronic gear shifters. Of course, as soon as something becomes a defacto standard someone has to start coloring outside the lines. In this case, Shimano went off book with their DI2 groupset, leaving [kwakeham] with a reverse engineering job on his hands.

[kwakeham] gives us a great example of how to approach reverse engineering. Researching the Shimano hardware by its FCC ID shows that the device communicates using an NRF24AP2 chip, common in ANT+ devices. The Shimano device is then opened, and a logic analyser attached to various test points until the SPI interface between the transceiver and microcontroller is found. At this point, it’s a simple matter of putting the hardware through its paces and capturing data until the protocol can be pulled apart, piece by piece.

The work is documented on Github for anyone wishing to interface with the Shimano DI2 groupset. Reverse engineering is a powerful skill, that can teach you about everything from Pokemon to botnets. Video after the break.

Continue reading “Reverse Engineering Shimano Bike Electronics”

Sensor-Laden Pigeons Gather Data For Urban Weather Modeling

When it comes to gathering environmental data in real-world settings, urban environments have to be the most challenging. Every city has nooks and crannies that create their own microenvironments, and placing enough sensors to get a decent picture of what’s going on in all of them is a tough job. But if these sensor-laden pigeons have anything to say about it, the job might get a bit easier.

The idea for using pigeons as biotelemetry platforms comes to us from the School of Geography, Earth, and Environmental Sciences at the University of Birmingham in the UK. [Rick Thomas], lead investigator on the “CityFlocks” project, explains that meteorological models are hampered by a lack of data about the air in the urban canyons formed by tall buildings. Placing a lot of fixed sensors has a prohibitive cost, and using drones to do the job would probably cause regulatory problems, especially given recent events. But pigeons are perfect for the job once they’re outfitted with an “Avian-Meteorology Instrumentation Package (AvMIP)”. From the photographs we’re guessing the AvMIP is a pretty simple data logger with GPS and inputs for the usual sensors, all powered by a small LiPo pack. Luckily, the pigeons used are all domesticated racing birds that return to the nest, so no radio transmitter is needed, but if other urban avians such as peregrine falcons and seagulls are used then a future AvMIPS might leverage pervasive WiFi networks to upload data.

It’s not the first time we’ve seen mobile platforms used to fill in gaps in weather data, of course. And if this at all puts you in mind of that time pigeons were used to guide bombs, relax – no pigeons were harmed in the making of this research project.

Thanks to [Itay Ramot] for the tipĀ [via Gizmodo].

A Keyboard For Your Thumb

Here’s an interesting problem that no one has cracked. There are no small keyboards that are completely configurable. Yes, you have some Blackberry keyboards connected to an Arduino, but you’re stuck with the key layout. You could get one of those Xbox controller chat pads, but again, you’re stuck with the keyboard layout they gave you. No, the right solution to building small and cheap keyboards is to make your own, and [David Boucher] has the best one yet.

The Thumb Keyboard uses standard through-hole 4mm tact switches on a 10×4 grid, wired up in a row/column matrix. Yes, this is a mechanical keyboard, which is important: no one wants those terrible rubber dome keyswitches, and you need only look at the RGB gaming keyboard market for evidence of that. These tact switches fit into a standard perfboard, allowing anyone to build this at home with a soldering iron. After wiring up the keyboard and connecting it to an Arduino, [David] had a working keyboard.

There’s a lot going on with this build, not the least of which is the custom, 3D printed bezel for those tiny, tiny tact switches. This is a much simpler solution than building an entirely new PCB, which we’ve seen before. Since this is a 3D printed bezel, it’s easy to put labels or whatnot above the keys, or potentially print buttons. It’s great work, and one of the best small keyboards we could imagine.

How To Build A Mill With Epoxy

The typical machine tool you’ll find in a workshop has a base and frame made of cast iron or steel. These materials are chosen for their strength, robustness and their weight, which helps damp vibrations. However, it’s not the only way to make a machine tool. [John McNamara] has been working on a CNC mill with an epoxy base, with impressive results.

The molds were designed in CAD prior to casting, ensuring there was room for all required components.

The build is one that could be readily achieved in any decently equipped makerspace. [John] used lasercut steel parts to construct the molds for the epoxy base, with some custom turned parts as well. The precision cut parts fit together with great accuracy, and with proper control of the casting process there is minimal post-processing of the final cast piece required. The mold is built with zero draft angle, and is designed to be taken apart to remove the finished pieces. By using steel, the same mold can be used many times, though [John] notes that MDF could be used for a one-off build.

The base is cast in epoxy, mixed with granite aggregate and sand to create a strong, heavy, and vibration damping material. There are also steel reinforcements cast in place consisting of threaded rods, and conduits for various electrical connections. After casting, [John] has spent much time measuring and truing up the mill to ensure the best possible results from the outset.

It’s an impressive build, that shows that building your own accurate machine tools is quite achievable with the right tools and knowledge. We’ve seen similar work before, too – epoxy really does make a great material for casting at home.


Hacker Abroad: Owning A Business In China’s Electronics Markets

I spent a full day on Saturday in the electronics markets of Shenzhen, China. The biggest thing to take away from this is the sheer scale of business that is going on here. It’s a consumer-electronics tourist trap, it’s a manufacturing and wholesaling nexus point, and it’s a community of people working incredibly hard to get ahead in life.

A big thanks to Scotty Allen for introducing me to several store owners in the markets, and to a translator who went around with me. These connections were crucial for an inside look on the lifestyle of Huaqiangbei (HQB).

Continue reading “Hacker Abroad: Owning A Business In China’s Electronics Markets”

Can You Live Without The WS2812?

As near as we can tell, the popular WS2812 individually addressable RGB LED was released to the world sometime around the last half of 2013. This wasn’t long ago, or maybe it was an eternity; the ESP8266, the WiFi microcontroller we all know and love was only released a year or so later. If you call these things “Neopixels”, there’s a good reason: Adafruit introduced the WS28212 to the maker community, with no small effort expended on software support, and branding.

The WS2812 is produced by WorldSemi, who made a name for themselves earlier with LED driver solutions, especially the WS2811, an SOIC chip that would turn a common anode RGB LED into one that’s serially controllable. When they stuffed the brains from the WS2811 into a small package with a few LEDs, they created what is probably the most common programmable LED lighting solution available today.

A lot has changed in the six years that the WS2812 has been on the market. The computer modding scene hasn’t heard the words ‘cold cathode’ in years. Christmas lights are much cooler, and anyone who wants to add blinky to their bling has an easy way to do that.

But in the years since the WS2812 came on the market, there are a lot of follow-up products that do the same thing better. You now have serially addressable LEDs that won’t bring down the rest of the string when they fail. You have RGBW LEDs. There are LEDs with a wider color gamut and more. This is a look at the current state of serially addressable RGB LEDs, and what the future might have in store.

Continue reading “Can You Live Without The WS2812?”