Building An Artisanal Tape Measure

Some tools are so common, so basic, that we take them for granted. A perfect example is the lowly tape measure. We’ve probably all got a few of these kicking around the lab, and they aren’t exactly the kind of thing you give a lot of thought to when you’re using them. But while most of us might not give our tape measure a second thought, [Ariel Yahni] decided to create an absolutely gorgeous new enclosure for his. Because if you’re going to measure something, why not look good doing it?

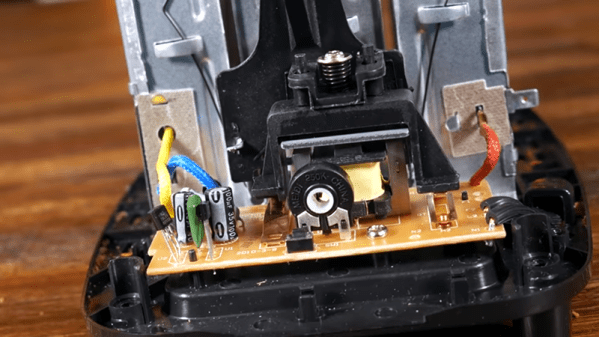
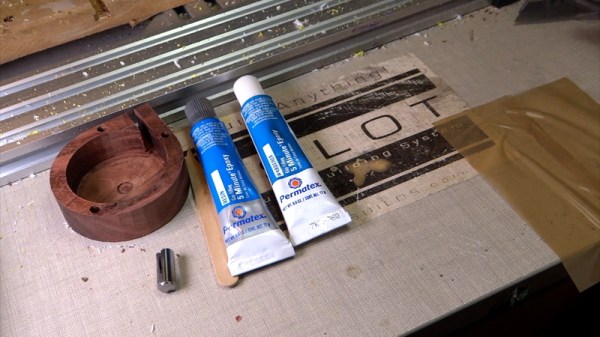
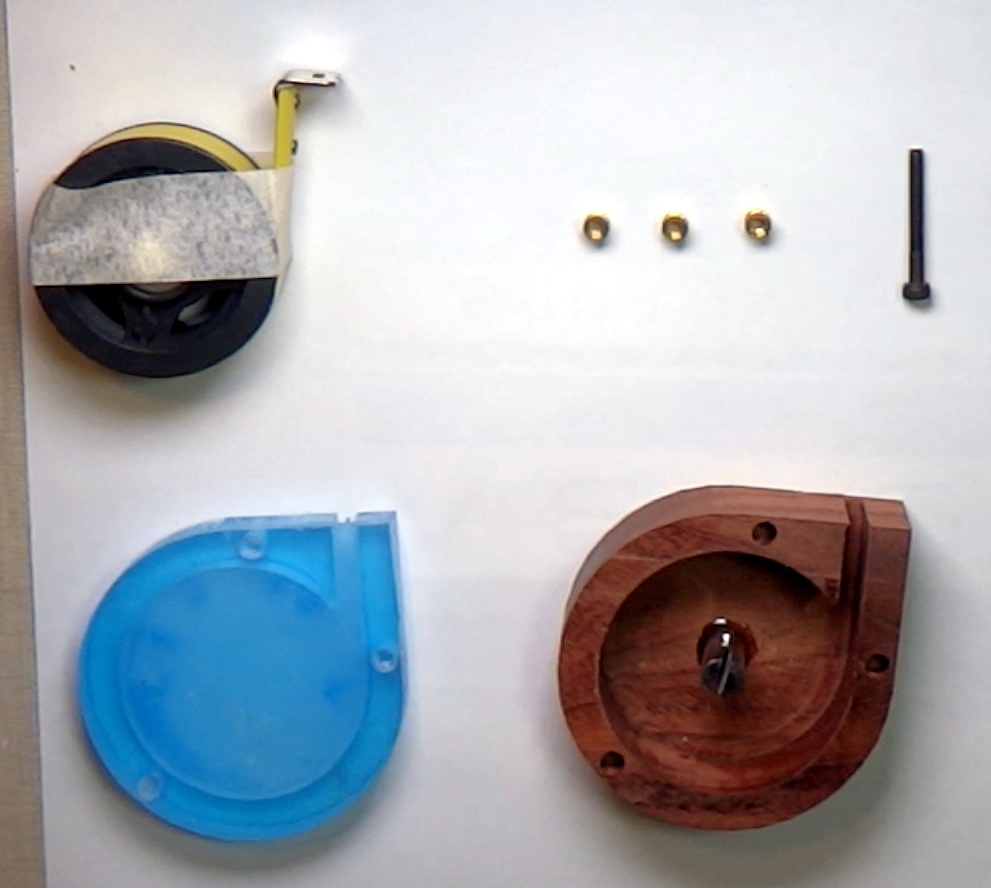
A CNC router is used to carve the body of the new tape measure out of a solid block of wood and cut a top plate out of clear acrylic. [Ariel] then used an angle grinder to cut off a small section of steel rod which he secured into a carved pocket in the base using epoxy. Finally, the internals of a commercial tape measure were inserted into this new enclosure, and the acrylic top was screwed down into place.

[Ariel] has made the DXF files for this project public for anyone else who wants to carve out their own heirloom tape measure, though it seems likely the designs will need some tweaking depending on the make and model of donor tape measure. While this might not be the most technically impressive project to run on Hackaday, it’s still a fantastic example of the sort of bespoke designs that are made possible with modern manufacturing methods.

This design reminds us of a similar project to turn a basic Honda key fob into a true conversation piece with the addition of some CNC’d hardwood and aluminum.

Continue reading “Building An Artisanal Tape Measure”

Full Motion Video And 3D Graphics Make This Genesis Demo Pop

The SEGA Genesis (aka Mega Drive) was launched at the tail end of the 1980s, bringing a new level of performance to the console world. At the time, 2D graphics ruled the roost, outside a few niche titles here and there. Decades later however, the demoscene continues to work in earnest. The Red Eyes demo is a great example of what can be done when pushing the Genesis hardware to the limits.

The demo features full motion video and an impressive 3D sequence. It’s quite a feat to pull this off with the limited resources of the Genesis platform. [Remute], [Kabuto] and [Exocet] have laid their secrets bare in a technical document, describing in explicit detail how it’s all achieved.

There’s plenty of juicy reading material here. There are palette hacks to produce high-quality greyscale images, rendering tips to produce the smooth 3D rendered sequences, as well as optimizations to create the best possible sample playback using the onboard YM2612 sound chip. It’s a tour de force of development, and it’s astounding to look behind the curtain to see just what can be achieved.

If you’re thinking about tinkering with the Genesis yourself, you might find it useful to have a dev kit on your bench. Video after the break.

Continue reading “Full Motion Video And 3D Graphics Make This Genesis Demo Pop”

The Surprising Tech Of A Cheap Toaster

How complicated can a toaster be? You can get a cheap one for way under $10 that is little more than a hot wire. However, there are a few little complications. First, consumer products need to be safe — lawsuits are expensive. Second, there has to be some mechanism to hold the toast down until it is done. If you can buy one for $10 you can bet it isn’t some super toast processor running Linux in there.

[Technology Connections] tore one down for you so you don’t have to. The circuitry is simple, and who knew there was a dedicated IC for toaster control? However, the real engineering is in the lowly little handle you pull down to start the toasting.

Continue reading “The Surprising Tech Of A Cheap Toaster”

LEDs Shine Through PCB On This Tiny Word Clock

Everyone seems to love word clocks. Maybe it’s the mystery of a blank surface lighting up to piece together the time in fuzzy format, or maybe it hearkens back to those “find-a-word” puzzles that idled away many an hour. Whatever it is, we see a lot of word clock builds, but there’s something especially about this diminutive PCB word clock that we find irresistible.

Like all fun projects, [sjm4306] found himself going through quite the design process with this one. The basic idea – using a PCB as the mask for the character array – is pretty clever. We’ve always found the laser-cut masks to be wanting, particularly in the characters with so-called counters, those enclosed spaces such as those in a capital A or Q that would be removed by a laser cutter. The character mask PCB [sjm4306] designed uses both the copper and a black solder mask to form the letters, which when lit by the array of SMD LEDs behind it glow a pleasing blue-green color against a dark background. Try as he might, though, the light from adjacent cells bled through, so he printed a stand that incorporates baffles for each LED. The clock looks great and even has some value-added modes, such as a falling characters display a la The Matrix, a Pong-like mode, and something that looks a bit like Tetris. Check out the video below for more details.

We’ve seen word clocks run afoul of the counter problem before, some that solved it by resorting to a stencil font, others that didn’t. We’re impressed by this solution, though, enough so that we hope [sjm4306] makes the PCB files available so we can build one.

Continue reading “LEDs Shine Through PCB On This Tiny Word Clock”

Hacker Abroad: Vietnam’s Hardware Hackers

One of the unfortunate things about Hackaday’s globe-spanning empire is that you often don’t get to meet the people you work with in person. Since I was in China and it’s right next door, I really wanted to pop over to Vietnam and meet Sean Boyce, who has been writing for Hackaday for a couple of years, yet we’ve never met. I suggested we could make this happen if we put together a meetup or unconference. Sean was immediately confident that the Ho Chi Minh City hardware hackers would turn out in force and boy was he right! On Sunday night we had a full house for the first ever Hackaday Vietnam Meetup.

Continue reading “Hacker Abroad: Vietnam’s Hardware Hackers”

Extraterrestrial Excavation: Digging Holes On Other Worlds

We humans are good at a lot of things, but making holes in the ground has to be among our greatest achievements. We’ve gone from grubbing roots with a stick to feeding billions with immense plows pulled by powerful tractors, and from carving simple roads across the land to drilling tunnels under the English Channel. Everywhere we go, we move dirt and rock out of the way, remodeling the planet to suit our needs.

Other worlds are subject to our propensity for digging holes too, and in the 50-odd years that we’ve been visiting or sending robots as our proxies, we’ve made our marks on quite a few celestial bodies. So far, all our digging has been in the name of science, either to explore the physical and chemical properties of these far-flung worlds in situ, or to actually package up a little bit of the heavens for analysis back home. One day we’ll no doubt be digging for different reasons, but until then, here’s a look at the holes we’ve dug and how we dug them.

Continue reading “Extraterrestrial Excavation: Digging Holes On Other Worlds”

Monitor Your 3D Printer With Node-RED And Tasker

Anyone with a desktop 3D printer knows that it can be a bit nerve-wracking to leave the machine alone for any extended period of time. Unfortunately, it’s often unavoidable given how long more complicated prints can take. With big prints easily stretching beyond the 20 hour mark, at some point you’re going to need to leave the house or go to sleep. We hope, anyway.

In an effort to make his time away from his printer a bit less stressful, [Mat] from NotEnoughTECH has put together a comprehensive framework for monitoring his machine on the go. After looking at existing remote monitoring solutions, he found none gave him the level of information he was after. His system collects up an incredible number of data points about the printer’s current status and pushes it all to his Android phone as a rich notification. Best of all, he’s documented the entire system in exquisite detail for anyone else who might want to follow in his footsteps.

There’s a considerable amount of hardware and software involved in this system, and getting it up and running won’t be quite as straightforward as using some of the turn-key solutions out there. Octoprint is responsible for controlling and monitoring the printer, and [Mat] is pulling data from its API using Node-RED. That data is formatted and ultimately delivered to his Android device as a notification with Tasker. On the hardware side he’s got a Sonoff POW R2 to not only turn the printer on and off but measure its energy consumption, a USB camera to provide a live view of the printer, and a couple of Raspberry Pis to run it all.

Even if you don’t have a 3D printer, or maybe just don’t leave the house to begin with, the video [Mat] has put together after the break that shows how all the elements of this system are pulled together in Node-RED is a fascinating look at the flow-based visual programming tool. Similarly, it’s a great demonstration on how Tasker can be used to add some very slick Android notifications for your project without having to commit to developing a native application for the platform.

If you like the idea of remotely monitoring your printer but aren’t ready to dive into the deep end like [Mat], there are easier options. With a Raspberry Pi running Octoprint added to your 3D printer and one of the existing mobile monitoring and control front-ends installed, you’ll be well on the way to tackling those big prints without having to pitch a tent in the lab.

Continue reading “Monitor Your 3D Printer With Node-RED And Tasker”