If you like your synthesizers glitchy, squawky, or simply quick-and-dirty, you won’t want to miss this week’s Hack Chat with Hackaday’s own [Elliot Williams], because he’ll be brain-dumping everything he knows about making music with 4000-series CMOS logic chips. Break out your breadboards!
Laser-Powered Flying Machine Weighs Milligrams
We’ve become used to seeing some beautiful hand-made creations at the smaller end of the flying machine scale, tiny aircraft both fixed and rotary wing. An aircraft that weighs a few grams is entirely possible to build, such have been the incredible advances in component availability.
But how much smaller can a working aircraft be made? Given a suitable team and budget, how about into the milligrams? [Dr. Sawyer Fuller] and his team at the University of Washington have made an ornithopter which may be the lightest aircraft yet made, using a piezoelectric drive to flap flexible wings. That in itself isn’t entirely new, but whereas previous efforts had relied on a tether wire supplying electricity, the latest creation flies autonomously with its power supplied by laser to an on-board miniature solar cell that protrudes above the craft on its wires.
Frustratingly Dr. Fuller’s page on the machine is lighter on detail than we’d like, probably because they are saving the juicy stuff for a big reveal at a conference presentation. It is however an extremely interesting development from a technical perspective, as well as opening up an entirely new front in the applications for flying machines. Whatever happens, we’ll keep you posted.
You can see the craft in the video below the break, and if you’re interested lies with more conventional tiny machines take a look at the creator of a 2.9g Mustang model.
Continue reading “Laser-Powered Flying Machine Weighs Milligrams”
360 Live VR Teleportation Uses Drones, Neural Networks, And Perseverance
This past semester I added research to my already full schedule of math and engineering classes, as any masochistic student eagerly would. Packed schedule aside, how do you pass up the chance to work on implementing 360° virtual teleportation to anywhere in the world, in real-time. Yes, it is indeed the same concept as the cult worshipped Star Trek transporter, minus the ability to physically be at the location. Perhaps we can add a, “beam me up, Scotty” command when shutting down.
The research lab I was working with is the Laboratory for Immersive CommunicatiON (LION). It’s funded by NSF, Microsoft, and Adobe and has been on the pursuit of VR teleportation for some time now. There’s a lot of cool technologies at work here, like drones which are used as location collection devices. A network of drones will survey landscape anywhere in the world and build the collection assets needed for recreating it in VR. Okay, so a swarm of drones might seem a little intimidating at first, but when has emerging technology not?
Continue reading “360 Live VR Teleportation Uses Drones, Neural Networks, And Perseverance”
Cheap Stuff To Hack: A Router With An SDR For $13
The history of consumer electronics is littered with devices that are relatively uninteresting at first, but become spectacular platforms for hardware exploitation once a few select people figure out how everything ticks. The Linksys WRT54G was just a router until someone figured out how to put a complete Linux system on them. Those RTL-SDR dongles were just for capturing over the air TV until someone realized they were actually a software-defined radio. The CueCat was just dot-com boom marketing garbage until… well, we picked up a lot of CueCats regardless.
Now there’s a new device sitting on the shelves at Walmart just waiting for some Linux hackers to have a go. It’s the Tzumi MagicTV, a device that allows you to watch over-the-air television on your phone. What’s inside? It’s a WiFi router, an RTL-SDR, and a battery pack in one tiny package. The best part? It costs $13, and apparently Walmart is just blowing them out.
Right now, there aren’t too many details on what’s going on inside the Tzumi MagicTV box, however, the discussion over on the RTLSDR subreddit has revealed enough to give us a good idea of what’s going on. The router inside the MagicTV is a TP-Link TL-WR703N, the exact same WiFi router that took the WRT54G’s place as the king of hackable routers a few years ago. The SDR chip is the same as the Astrometa DVB-T2, one of the common TV tuners on-a-stick. Other than that, there are TX and RX pins on the board, SSH is open, no one knows the password, but as of this writing, a few people are putting John the Ripper to work trying to break into this box.
What is the end goal of cracking this Linux box wide open? Well, it’s a WiFi router and an SDR, so if you want to make your own Flightaware ADS-B logger, that could be on the table. Of course, you could actually use it for its intended purpose and pull down over-the-air TV to your local network, but that seems so pedestrian after getting root on a $13 box from Walmart.
Thanks [Adam] for the tip!
Autonomous Spaceplane Travels To 10 Km, Lands Safely 200 Km Away
Space balloons, where one sends instrument packages to the edge of space on a weather balloon, are a low-cost way to scratch the space itch. But once you’ve logged the pressure and temperature and tracked your balloon, what’s the next challenge? How about releasing an autonomous glider and having it return itself to Earth safely?
That’s what [IzzyBrand] and his cohorts did, and we have to say we’re mightily impressed. The glider itself looks like nothing to write home about: in true Flite Test fashion, it’s just a flying wing made with foam core and Coroplast reinforced with duct tape. A pair of servo-controlled elevons lies on the trailing edge of the wings, while inside the fuselage are a Raspberry Pi and a Pixhawk flight controller along with a GPS receiver. Cameras point fore and aft, a pair of 5200 mAh batteries provide the juice, and handwarmers stuffed into the avionics bay prevent freezing.
After a long series of test releases from a quadcopter, flight day finally came. Winds aloft prevented a full 30-kilometer release, so the glider was set free at 10 kilometers. The glider then proceeded to a pre-programmed landing zone over 80 kilometers from the release point. At one point the winds were literally pushing the glider backward, but the little plane prevailed and eventually spiraled down to a perfect landing.
We’ve been covering space balloons for a while, but take a moment to consider the accomplishment presented here. On a shoestring budget, a team of amateurs hit a target the size of two soccer fields with an autonomous aircraft from a range of almost 200 kilometers. That’s why we’re impressed, and we can’t wait to see what they can do after a release from the edge of space.
Continue reading “Autonomous Spaceplane Travels To 10 Km, Lands Safely 200 Km Away”
Spellcasting Gun Uses POV Display, Not Magic
Persistence of Vision, or POV, displays are ever popular around these parts. Spin a few LEDs and you can make images appear in almost-thin air – just don’t stick your finger in the way. [FriskP] found a great application for this hardware – creating an anime-styled spellcasting gun.
The basic gun is built around a Nerf blaster, which is common in a lot of this type of steampunk and anime build. A Phantom3D POV display is then bolted on to the front along with some 3D printed components for style. The ensemble is then painted in a suitably awesome fashion.
We’re not sure on the software used, but [FriskP] has the gun displaying some amazing spell-type graphics that appear to hover in the air when the user pulls the trigger. The artwork is stunning, showing off some of the best graphics we’ve seen in the POV arena.
Overall, it’s a highly aesthetically pleasing build that any cosplayer would be more than proud to wield. It relies on the builder’s strong finishing and integration abilities more than raw electronic skill, but the end result is truly impressive.
We’ve seen plenty of POV displays around here before – you can get started with something as simply as a PC fan! Video after the break.
Continue reading “Spellcasting Gun Uses POV Display, Not Magic”
Gaming System Built With Kite, The DIY Android Kit
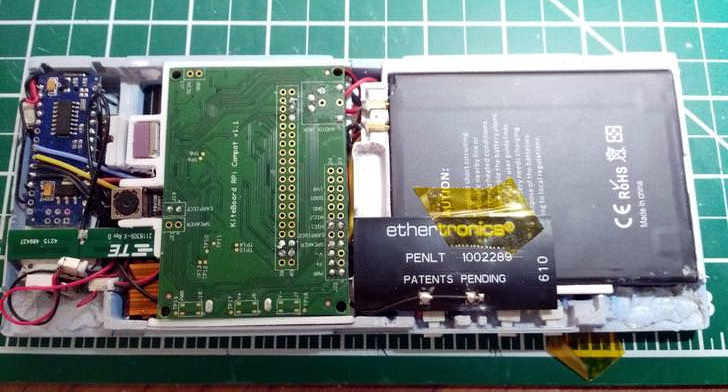
As a gamer, [Lexie Dostal] dreamed of a smartphone that was a viable gaming platform: something with enough power to run the games and emulators he was interested in, with the controls to make playing them feel natural. So when he got his hands on an early version of Kite, the modular open hardware platform designed to be hacked and customized, that’s exactly what he decided to build. The Kite kit would provide the touch screen and Android-equipped motherboard, he just needed to design a case and integrate controls to make it a real gaming device.
The case design [Lexie] came up with is inspired by the bottom half of the Nintendo 3DS, and ended up only a few centimeters wider than the stock case from the Kite kit. Unfortunately, his delta 3D printer wasn’t large enough to fit the device’s case, so he ended up having to break it into five separate pieces and glue them together. With the case in one piece he worked his way from 220 to 400 grit sand paper, filling any voids in the print with glue as he went. A few coats of primer, more sanding, and a final matte texture spray give the final case a very professional-looking finish.
Not only was the Nintendo 3DS an inspiration for the device, it was also a donor for some of the parts. The directional pad, analog “nub”, and buttons are replacement 3DS hardware, which is interfaced to the KiteBoard with an Arduino Nano. When he couldn’t find springs small enough to use for the shoulder buttons, he bought some thin music wire and wound them himself. Talk about attention to detail.
There’s quite a bit of gear packed into the case, but [Lexie] thinks there’s probably still room to make some improvements. He could free up some room by dropping the connectors and soldering everything directly, and says he’d like to come up with a custom PCB to better interface with the 3DS’s hardware to cut down on some of the wiring required. With the extra room he thinks the battery, currently a 3200 mAh pack designed for the LG V20 smartphone, could probably be replaced with something even bigger.
Readers may recall that the Kite is currently in the running for the 2018 Hackaday prize. Seeing Kite already delivering on the promise of making it easier to develop powerful Android devices is very exciting, and we can’t wait to see what else hackers will be able to do with it.


