Hackaday Links Column Banner

Hackaday Links: January 28, 2018

In case you haven’t heard, we have a 3D printing contest going on right now. It’s the Repairs You Can Print Contest. The idea is simple: show off how you repaired something with a 3D printer. Prizes include $100 in Tindie credit, and as a special prize for students and organizations (think hackerspaces), we’re giving away a few Prusa i3 MK3 printers.

[Drygol] has made a name for himself repairing various ‘home’ computers over the years, and this time he’s back showing off the mods and refurbishments he’s made to a pile of Amiga 500s. This time, he’s installing some new RAM chips, fixing some Guru Meditations by fiddling with the pins on a PLCC, adding a built-in modulator, installing a dual Kickstart ROM, and installing a Gotek floppy adapter. It’s awesome work that puts all the modern conveniences into this classic computer.

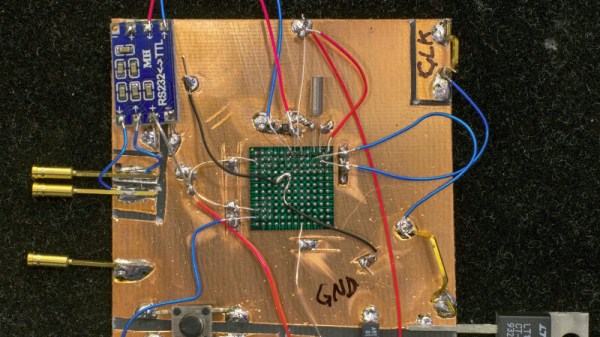
Here’s an FPGA IoT Controller. It’s a Cyclone IV and a WiFi module stuffed into something resembling an Arduino Mega. Here’s the question: what is this for? There are two reasons you would use an FPGA, either doing something really fast, or doing something so weird normal microcontrollers just won’t cut it. I don’t know if there is any application of IoT that overlaps with FPGAs. Can you think of something? I can’t.

Tide pods are flammable.

You know what’s cool? Sparklecon. It’s a party filled with a hundred pounds of LEGO, a computer recycling company, a plasmatorium, and a hackerspace, tucked away in an industrial park in Fullerton, California. It’s completely chill, and a party for our type of people — those who like bonfires, hammer Jenga, beer, and disassembling fluorescent lamps for high voltage transformers.

A few shoutouts for Sparklecon. The 23b Hackerspace is, I guess, the main host here, or at least the anchor. Across the alley is NUCC, the National Upcycled Computing Collective. They’re a nonprofit that takes old servers and such, refurbishes them, and connects them to projects like Folding@Home and SETI@Home. This actually performs a service for scientists, because every moron is mining Bitcoin and Etherium now, vastly reducing the computational capabilities of these distributed computing projects. Thanks, OSH Park, for buying every kind of specialty pizza at Pizza Hut. I would highly encourage everyone to go to Sparklecon next year. This is the fifth year, and it’s getting bigger and better every time.

ESP32 Makes For World’s Worst Radio Station

We can say one thing for [bitluni]: the BOMs for his projects, like this ESP32 AM radio transmitter, are always on the low side. That’s because he leverages software to do jobs traditionally accomplished with hardware, always with instructive results.

In this case, the job at hand is creating an RF oscillator in the broadcast AM band and modulating some audio onto it. From his previous experience using an ESP32 to watch video on an oscilloscope, [bitluni] knew that the microcontroller’s DACs were up to the task of producing an 800-kHz signal, and he managed to produce a more-or-less sine wave carrier with some clever code. His sketch takes data from a header file, modulates it onto the carrier, and sends it out over the ether using a short stub of wire for an antenna. The range is severely limited, but for what it is, it gets the job done and shows the basics. And as a bonus, [bitluni] included a bit of JavaScript that turns an audio file into a header file that’s ready to go out over the airwaves for all your trolling needs.

If you’re looking for a little more range for your low power transmitter and you’re a licensed amateur operator, you might want to explore the world of QRP radio.

Continue reading “ESP32 Makes For World’s Worst Radio Station”

Arcade Style Computer Hotkeys

Prolific maker [Sean Hodgins] has taken the wraps off of his latest one-day build, and as usual, it takes the kind of spare parts most people reading Hackaday will have in their parts bins and turns it into something fun and useful. This time around, he takes a bunch of spare arcade-style buttons he had from a previous project and combines them with an Adafruit Trinket (SAMD21 flavor) to make a USB input device for his computer.

[Sean] uses 1/4 inch acrylic to make the case, though he does mention that it could just as easily be 3D printed. But using the acrylic is easy and gives a nice glossy look to the final hardware. With a saw and a drill press you can make some very professional cases out of acrylic, which goes to show that you don’t necessarily need to have a high end 3D printer to create great looking enclosures.

As explained in the video, the Adafruit Trinket is not strictly necessary for this build, it’s just what [Sean] had lying around. Any microcontroller that can present itself to the operating system as a USB Human Interface Device (HID) will work fine for a project like this.

Software wise, a modified Arduino demo program is used to equate the states of the digital pins to pre-defined key combinations to be sent to the computer. In this simple example the key combinations are hard-coded into the Trinket’s source code, but a future enhancement could be adding a method of setting up new key combinations with a configuration tool.

We’ve covered our fair share of non-traditional USB input devices, all operating on largely the same principle. As it turns out, hackers have quite a pension for making oddball input devices.

Continue reading “Arcade Style Computer Hotkeys”

The Tiniest Working 68K System

68000 microprocessors appeared in the earliest Apple Macintoshes, the Commodore Amiga and Atari ST, and the Sega Genesis/Mega Drive among other familiar systems. If you were alive during the 16-bit era, there is a good chance that you will have owned a Motorola 68000 or one of its derivatives in a computer or game console. By the end of the 1990s it was clear that the 68K line had had its day on the desktop, but a new life for it at the consumer level was found in the PDA market. The first Motorola Dragonball was a 68000 series system-on-chip, and it was a few of these in a BGA package that [Plasmode] had in stock after ordering them in error believing them to be in a different package.

The Dragonball 68328 has an interesting bootstrap mode allowing it to run with no external ROM or RAM, and with only a serial connection to the outside world. Recognising this as having the potential for the smallest possible 68K system, he proceeded to make it happen with some impressive soldering direct to the solder balls of an upturned BGA package.

On a piece of PCB material are simply the 68328, a 32.768kHz crystal and capacitors, a MAX232 circuit for an RS232 serial connection, a reset button, and a power regulator. Using the Motorola DOS debug software which is still available for download after all these years, he was able to connect to his tiny 68K computer and run code. It’s not entirely useful, but of all the possible 68K configurations it has to be the smallest.

This isn’t the first minimal computer using only a processor chip and serial link, in the past we’ve shown you a PDP-11 in the same vein.

Biologic Additive May Lead To Self-Healing Concrete

If you get a cut or break a bone, your body heals itself. This everyday miracle is what inspired [Congrui Jin] to try to find a way to make concrete self-healing. The answer she and her colleagues are working on might surprise you. They are adding fungus to concrete to enable self-repair.

It isn’t just any fungus. The conditions in concrete are very harsh, and after testing twenty different kinds, they found that one kind — trichoderma reesei — could survive inside concrete as spores. This fungus is widespread in tropical soil and doesn’t pose any threat to humans or the ecology. Mixing nutrients and spores into concrete is easy enough. When cracks form in the concrete, water and oxygen get in and the spores grow. The spores act as a catalyst for calcium carbonate crystals which fill the cracks. When the water is gone, the fungi go back to spores, ready to repair future cracking.

Continue reading “Biologic Additive May Lead To Self-Healing Concrete”

Optical Tach Addresses The Need For Spindle Speed Control

With CNC machines, getting the best results depends on knowing how fast your tool is moving relative to the workpiece. But entry-level CNC routers don’t often include a spindle tachometer, forcing the operator to basically guess at the speed. This DIY optical spindle tach aims to fix that, and has a few nice construction tips to boot.

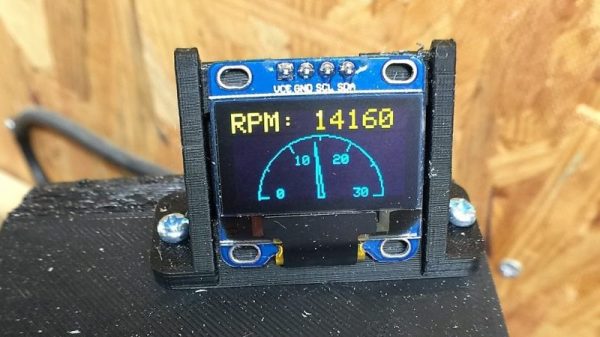
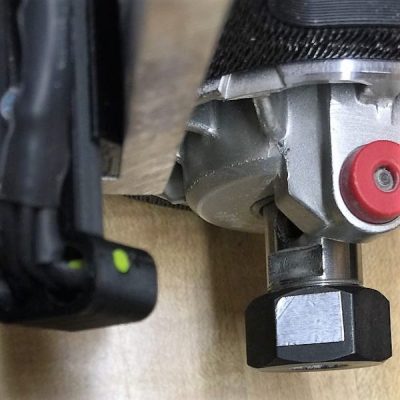
The CNC router in question is the popular Sienci, and the 3D-printed brackets for the photodiode and LED are somewhat specific for that machine. But [tmbarbour] has included STL files in his exhaustively detailed write-up, so modifying them to fit another machine should be easy. The sensor hangs down just far enough to watch a reflector on one of the flats of the collet nut; we’d worry about the reflector surviving tool changes, but it’s just a piece of shiny tape that’s easily replaced.  The sensor feeds into a DIO pin on a Nano, and a small OLED display shows a digital readout along with an analog gauge. The display update speed is decent — not too laggy. Impressive build overall, and we like the idea of using a piece of PLA filament as a rivet to hold the diodes into the sensor arm.

Want to measure machine speed but don’t have a 3D printer? No worries — a 2D-printed color-shifting tach can work too.

Continue reading “Optical Tach Addresses The Need For Spindle Speed Control”

Alexa Controls This Projector Thanks To ESP8266

[jfessard] doesn’t have extra-sensory perception, but does have an ESP8266. The little board seems to pop up in every hack these days. Inspired by not wanting to get up from the bean-bag chair or leave the electronics-housing cabinet wide open to use an HDMI switcher, [jfessard] hacked together an Alexa-compatible projector control via the ESP8266!

The core functionality here is the ability to turn the projector on and off, and to switch the HDMI source. [jfessard] connected the Panasonic PT-AE3000U projector to a Monoprice HDX-401TA 4×1 HDMI switcher. Tucked away in the cabinet below the projector, it is controlled using a IR LED transmitter breakout board sitting at the end of a fairly long set of jumper wire. The projector control itself is through a RS232 interface.

To make this easy to use with Amazon’s Alexa, [jfessard] turned to some libraries for the ESP8266 D1 Mini. The fauxmoesp library makes it look like a WeMo device, and the IRemoteESP8266 library made remote control code cloning a snap. One really frustrating part of this hack was the MAX232-style breakout board; getting a board to work when it’s labelled backwards takes a bit of head-scratching to figure out.

If the the projector ever gets too noisy, we suggest this hack that shushes the machine. For the moment, we’d rather take another look at this laser projector that mimics a cool ‘laser sky’ effect.