Solid Oak Arcade Cabinet: When Particle Board Won’t Do

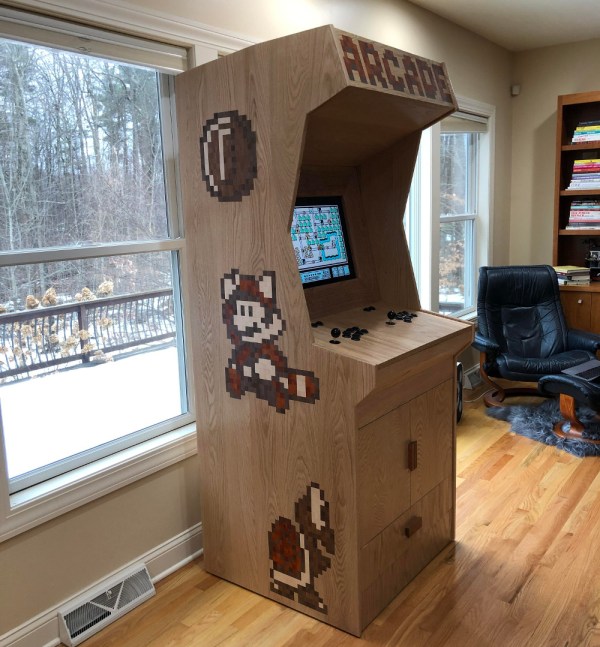
Having an arcade cabinet of one’s own is a common dream among those who grew up during the video game arcade heyday of the 80s and early 90s. It’s a fairly common build that doesn’t take too much specialized knowledge to build. This cabinet, on the other hand, pulled out all of the stops for the cabinet itself, demonstrating an impressive level of woodworking expertise.

The cabinet enclosure is made with red oak boards, which the creator [Obstreperuss] sawed and planed and then glued together to create the various panels (more details are available on his Imgur album). The Mario artwork on the sides and front aren’t just vinyl stickers, either. He used various hardwoods cut into small squares to create pixel art inlays in the oak faces. After the fancy woodwork was completed, the build was finished out with some USB arcade controllers, a flat-panel screen, and a Raspberry Pi to run the games.

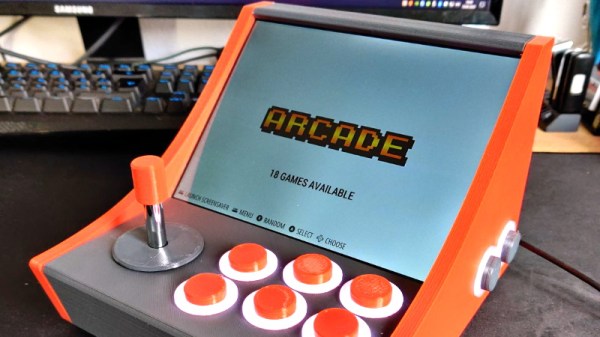
While the internals are pretty standard, we have to commend the incredible quality of the woodworking. It’s an impressive homage to classic arcade machines and we wouldn’t mind a similar one in our own homes. If you’re lacking the woodworking equipment, though, it’s possible to get a refined (yet smaller) arcade cabinet for yourself with a 3D printer instead.

Continue reading “Solid Oak Arcade Cabinet: When Particle Board Won’t Do”

Toddler Arcade Cabinet Is A Stand-Up Job

A few years ago, [Mark] built an arcade cabinet into a low table. But once his new gaming buddy [Grayson] came along and started crawling, it wasn’t practical to have a low, pointy table around. Trouble is, [Mark] had already given [Grayson] his first taste with a Thomas the Tank Engine game. Since the kid was hooked, [Mark] rebuilt the table arcade into a toddler-sized arcade cabinet that they can both use.

The brain — a Raspberry Pi running RetroPie — should be familiar to most of our readers. [Mark] found the perfect crappy old monitor when they were upgrading at his office, and found some nice speakers to give it good bass. We love the details like the chrome edging, and especially the kick bar/footrest along the bottom. It can be difficult to decide how to decorate a multi-arcade cabinet, so [Mark] went the sticker bomb route with 700 of them randomly distributed and safe from toddler wear and tear under five coats of clear wood varnish.

We think this looks great, especially since [Mark] doesn’t have a workshop and cut all that MDF by hand on a jigsaw in the kitchen. Check out the happy train engineer after the break.

Maybe once [Grayson] is old enough to break tablets, [Mark] can build a gaming tab-inet out of it. Just sayin’.

Continue reading “Toddler Arcade Cabinet Is A Stand-Up Job”

Miniature Star Wars Arcade Lets You Blow Up The Death Star On The Go

If you have fond childhood memories of afternoons spent at the local arcade, then you’ve had the occasional daydream about tracking down one of those old cabinets and putting it in the living room. But the size, cost, and rarity of these machines makes actually owning one impractical for most people.

While this fully functional 1/4th scale replica of the classic Star Wars arcade game created by [Jamie McShan] might not be a perfect replacement for the original, there’s no denying it would be easier to fit through your front door. Nearly every aspect of the iconic 1983 machine has been carefully recreated, right down to a working coin slot that accepts miniature quarters. Frankly, the build would have been impressive enough had he only put in half the detail work, but we certainly aren’t complaining that he went the extra mile.

[Jamie] leaned heavily on resin 3D printed parts for this build, and for good reason. It’s hard to imagine how he could have produced some of the tiny working parts for his cabinet using traditional manufacturing techniques. The game’s signature control yoke and the coin acceptor mechanism are really incredible feats of miniaturization, and a testament to what’s possible at the DIY level with relatively affordable tools.

The cabinet itself is cut from MDF, using plans appropriately scaled down from the real thing. Inside you’ll find a Raspberry Pi 3 Model A+ running RetroPie attached directly to the back of a 4.3 inch LCD with integrated amplified speakers. [Jamie] is using an Arduino to handle interfacing with the optical coin detector and controls, which communicates with the Pi over USB HID. He’s even added in a pair of 3,000 mAh LiPo battery packs and a dedicated charge controller so you can blow up the Death Star on the go.

Still don’t think you can fit one in your apartment? Not to worry, back in 2012 we actually saw somebody recreate this same cabinet in just 1/6th scale.

Continue reading “Miniature Star Wars Arcade Lets You Blow Up The Death Star On The Go”

Putting An Arcade Cabinet Inside Of An NES Controller

The arcade game shoehorned into an original Nintendo Entertainment System controller from [Taylor Burley] is certainly made slightly easier by its starting with one of those miniature cabinets that are all the rage now, but since he’s still achieved the feat of an entire arcade game in a controller we still stand by the assessment in our title.

In fact, he’s put not one but four arcade games into the controller. The board that [Taylor] liberated from the miniature game system can actually be switched between the onboard games by shorting out different pads on the PCB. Normally this would be done during manufacture with a zero-ohm resistor, but in this case, he’s wired the pads out to a strip of membrane keypad liberated from an LED remote control. By holding a different button while powering on the system, the user can select which of the games they want to boot into.

The original buttons and directional pad have been preserved, and in the video after the break, [Taylor] shows how he wires them into the arcade PCB. The Start and Select buttons had to go since that’s where the tiny color LCD goes now, but they wouldn’t have been used in any of these games anyway. With the addition of a small battery pack and charge controller, this build is a clever way to take several classic arcade titles with you on the go.

With the growing popularity of these tiny arcade cabinets, we’ve seen a number of hackers tearing into them. The work that [wrongbaud] has done in modifying them to run other ROMs is not to be missed if you’re looking at building a project using one of these little bundles of nostalgia.

Continue reading “Putting An Arcade Cabinet Inside Of An NES Controller”

Brain Transplant Makes One Arcade Machine Play Games From Another

We’re used to games consoles in which the same hardware plays a variety of different games, but if we were to peer inside arcade cabinets of an older vintage we’d find custom boards unique to every game. Some boards from the same manufacturers shared common hardware traits even if they weren’t identical though, and [twistedsymphony] has taken advantage of this to make one vintage Taito game — Gun & Frontier — run on the hardware for another, Ah Eikou no Koshien. It’s a fascinating tale across a forum thread, that’s well worth a read even if you will never touch a vintage arcade board.

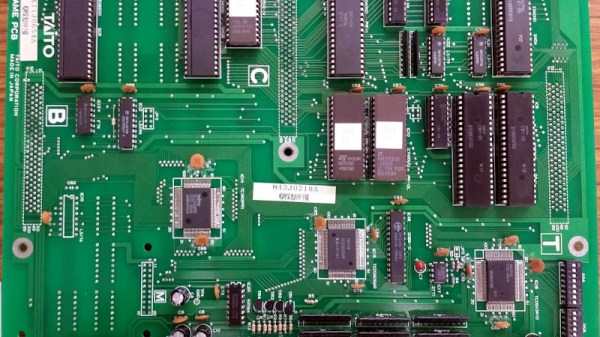
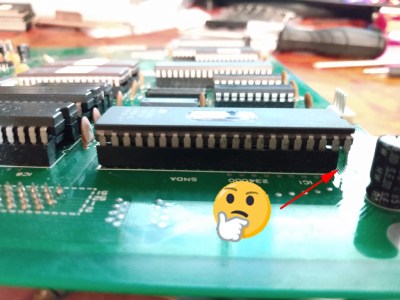
We might expect that the tool of choice would be a logic analyser or similar, but unexpectedly the solution to this hack was found in MAME. The arcade emulator conceals a wealth of information about these boards, from which you can discover their differences and try out possible solutions. The hardware hacks are surprisingly straightforward, a few bodge wires and an extra address line for a larger ROM. A programmable logic array required dumping and rewriting to fix a graphics corruption issue and a little bit of ROM tweaking after emulating a controller problem in MAME was required, but it seems that yes, one game can run on another. Certainly less painful than the Taito hack that required a chip to be decapped.

[via r/ReverseEngineering]

3D Print Your Way To A Bartop Arcade Cabinet

Custom arcade machines have always been a fairly common project in the hacker and maker circles, but they’ve really taken off with the advent of the Raspberry Pi and turn-key controller kits. With all the internals neatly sorted, the only thing you need to figure out is the cabinet itself. Unfortunately, that’s often the trickiest part. Without proper woodworking tools, or ideally a CNC router, it can be tough going to build a decent looking cabinet out of the traditional MDF panels.

But if you’re willing to leave wood behind, [Gerrit Gazic] might have a solution for you. This bartop arcade, which he calls the simplyRetro D8, uses a fully 3D printed cabinet. He’s gone through the trouble of designing it so there are no visible screw holes, so it looks like the whole thing was hewn from a chunk of pure synthwave ore. He notes that this can make the assembly somewhat tricky in a few spots, but we think it’s a worthy compromise.

Given the squat profile of the simplyRetro, the internals are packed in a bit tighter than we’re accustomed to seeing in a arcade build. But there’s still more than enough room for the Raspberry Pi, eight inch touch screen HDMI panel, and all the controls. To keep things as neat as possible, [Gerrit] even added integrated zip tie mount points; a worthwhile CAD tip that’s certainly not limited to arcade cabinets.

[Gerrit] has included not only the STL files for this design, but also the Fusion 360 Archive should you want to make any modifications. There’s also a complete Bill of Materials, as well as detailed instructions on how to pull it all together. If you’ve ever wanted your own arcade machine but felt a bit overwhelmed about figuring out all the nuances on your own, the simplyRetro could be the project you’ve been waiting for.

Of course if you do have access to a CNC or laser cutter, then there are some designs you could produce quite a bit faster.

An Arcade Cabinet With Displays To Spare

We’ve all got a pretty good mental image of what an arcade cabinet looks like, so you probably don’t need to be reminded that traditionally they are single-screen affairs. But that idea dates back to when they were built around big and bulky CRT displays. Now that we have modern LCD, LED, and OLED panels, who says you have to follow the old rules?

That’s precisely the sort of out of the box thinking that lead [Al Linke] to build this unique multi-display arcade cabinet. The game itself is still played on a single screen, but several smaller sub-displays are dotted all around the cabinet to indicate various bits of ancillary information. Are they necessary? Hardly. But we can’t deny it’s a clever idea, and we wouldn’t be surprised if we start seeing something similar in other DIY cabinets.

The build started with a commercially available cabinet from Arcade1Up, which at this point are popular enough that some of the Big Box retailers have them in stock. All of the electronics except for the display were stripped out, and replaced with a Dell OptiPlex 9020 computer and high-quality joysticks and buttons. [Al] then installed his various displays all over the cabinet, including a gorgeous LED marquee that we’ve featured previously.

So what do all these little screens do? [Al] explains them in the video after the break, but the general idea is that they provide contextual information about the game you currently have loaded up. A two-color OLED display shows the name of the game and what it’s rated, while a seven segment LED display shows the year the game was released. The displays are located both by the controls and where you’d expect the coin slot to be, so whether you’re actively playing or across the room, you can see all the information.

We’re always amazed to see how builders find ways to make their own personal arcade cabinets stand out. While it’s an idea that at this point we’ve seen quite a lot of, no two projects have ever been quite the same.

Continue reading “An Arcade Cabinet With Displays To Spare”