Chronio DIY Watch: Slick And Low Power

[Max K] has been testing the battery life of his self-designed watch under real-world conditions. Six months later, the nominally 3 V, 160 mAh CR2025 cell is reading 2.85 V, so the end is near, but that’s quite a feat for a home-engineered smart watch.

We’ve tipped our hats to the Chronio before in this Hacklet, but now that the code is available, as well as the sweet 3D-printed case files, it’s time to make your own. Why? It looks sweet, it plays a limited version of Flappy Bird (embedded below), and six month’s on a button cell is a pretty great accomplishment, considering that it’s driving a 96×96 pixel LCD display.

The Chronio is more than inspired by the Pebble watch — he based his 3D model directly on theirs — so that’s bound to draw comparisons. The Pebble is color, and has Bluetooth and everything else under the sun. But after a few weeks away from a power socket, ask a Pebble wearer what time it is. Bazinga!

Continue reading “Chronio DIY Watch: Slick And Low Power”

Very, Very Low Power Consumption

We’re pretty far away from a world full of wall-warts at this point, and the default power supply for your consumer electronics is either a microUSB cable or lithium batteries. USB ports are ubiquitous enough, and lithium cells hold enough power that these devices can work for a very long time.

USB devices are common, and batteries are good enough for most devices, not all of them. There is still a niche where& extremely long battery lifetimes are needed and tapping into mains power is impractical. Think smoke detectors and security systems here. How do power supplies work for these devices? In one of the most recent TI application notes, TI showed off their extremely low power microcontrollers with a motion detector that runs for ten years with a standard coin cell battery. This is one of those small engineering marvels that comes by every few years, astonishing us for a few minutes, and then becomes par for the course a few years down the road.

The first thing anyone should think about when designing a battery-powered device that lasts for years is battery self-discharge. You’re not going to run a battery-powered device for ten years with a AA cell; the shelf life for an Energizer AA cell is just 10 years. Add in a few nanoAmps of drain, and you’ll be lucky to make it to 2020. The difference here is a CR2032 lithium-ion coin cell. Look at the datasheet for one of these cells, and they can easily sit on a shelf for 10 years, with 90% of the rated capacity remaining.

With the correct battery in the device, you’ll need a microcontroller that runs at a sufficiently low power for it to be useful in the mid-2020s. The product for this is the CC1310, a very, very low power ARM Cortex-M3 and sub 1GHz transmitter in one package.

Once that’s settled, it’s simply a matter of putting a sensor on the board – in this case a PIR sensor – and a few analog bits triggering an interrupt occasionally. Have the microcontroller in sleep mode most of the time, and that’s how you get a low-power device with a battery that will last a decade.

Low Power And Pin-Constrained

We’ve all been there. You’re building up a microcontroller project and you wish that you could just add “one more feature” but you’re limited by the hardware. Time to start thinking. (Or, arguably, buy the next model up.)

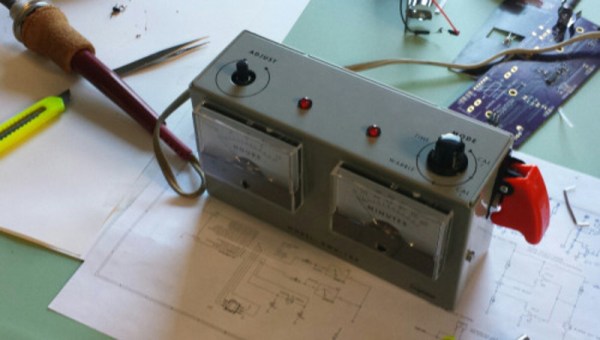
[Sam Feller] found himself in this position, adding a knob to set the time and a button to arm the alarm for his Analog Voltmeter Clock, and he came up with a way to implement an on-off switch, and poll a button and a potentiometer with only two pins of a microcontroller.

The problem with potentiometers in low-power designs is that they’re always leaking power. That is, unless you switch them off when you’re not using them. So the ideal solution is to power the potentiometer from one GPIO pin on the microcontroller, and read its value with another. That’s two GPIO pins just for the potentiometer. But [Sam] needed to read input from a button too, and he was out of pins.

His clever solution is to switch two resistors in or out of the circuit depending on the status of the pushbutton, so that the voltage range at the potentiometer is between either VCC and VCC/2 when the switch is pressed, or between VCC/2 and GND when the switch is not pressed.

If the ADC reads something higher than VCC/2, the microcontroller knows that the button is pressed, and vice-versa. The potentiometer’s setting determines exactly where the voltage lies within either range.

Done and done. If you find yourself in the similar situation of needing to read in values from a whole bunch of buttons instead of a potentiometer, then you can try using an R-2R DAC wired up to the pushbuttons and reading the (analog) value to figure out which buttons are pressed. (If you squint your eyes just right, this solution is the same as the R-2R DAC one with the potentiometer replacing all but the most-significant bit of the R-2R DAC.)

Another tool for the toolbox. Thanks [Sam].

Bitbanging USB On Low Power ARMs

M0

With the Adafruit Trinket, the Digispark, and some very clever work with the smallest microcontroller Atmel offers, it looks like the ‘in’ thing to do for embedded software developers is to bitbang the USB protocol on hardware that shouldn’t support it. There are a lot of very small ARM chips out there without USB support, so it was only a matter of time before someone was able to bitbang USB on the ARM Cortex M0+.

The board above is based on an Energy Micro EFM32ZG, a very small 24-pin QFN device with up to 32 kB of Flash and 17 GPIOs. As with all the bitbanged USB hacks, the differential data lines are attached directly to the microcontroller. A 24 MHz crystal is needed, but the team behind the project is working on using the internal RC oscillator instead.

The code is portable with minimal changes between other manufacturer’s Cortex M0+ chips, and with a little work, this could become a very, very cheap USB-programmable ARM dev board, something the community could certainly use.

Building A Very Low Power, Full Featured Desktop

For a few years now, [mux] has been playing around with extremely efficient computation. In 2010, he built a fully featured MiniITX / Core 2 duo computer that only consumed 20 watts. Last year, [mux] managed to build an Intel i3-powered desktop that was able to sip a mere 8.3 watts at idle. He’s back at it again, and now his sights are set on a fully featured Intel i5-powered build with a built-in monitor that will draw less than 6 watts of power.

Like his previous 8 watt i3 build, [mux] reduces the power requirement of his build by carefully measuring the power draw of every component on his board. The power savings come from a simple fact of any power supply; when converting from AC to DC, or from one DC voltage to another, there’s always a little bit of power lost in the process.

[mux] reduces these power losses by removing a few voltage regulators and re-routing power lines across his motherboard. So far, the power draw on [mux]’s computer is more than half of what it was when the parts were stock, and we can’t wait for the finished build that includes a built-in monitor, UPS, and a proper case.

Zinc Sulfide Glow Power At Home

Further solidifying her mad-scientist persona, [Jeri Ellsworth] is making glow powder with household chemicals. When we saw the title of the video we though it would be fun to try it ourselves, but the first few minutes scared that out of us.

To gather the raw materials she puts some pennies in a bench motor and files them into powder. From there it’s trial and error with different cleaners and tools to create just the right dangerous reaction to get the chemical properties she’s looking for.

Check out her experiments after the break. And if you find you’re wanting more, go back and take a look at her EL wire fabrication process.

Continue reading “Zinc Sulfide Glow Power At Home”

Launchpad Takes Ultra Low Power To The Extreme

We’ve all known the MSP430s under the Launchpad are designed to be low power, but who wants to bet how long the chip can last on only 20F worth of capacitors? A couple of hours? A day at max? [Kenneth Finnegan] setup a MSP430 with supercaps to find out. To make sure the chip is actually running, [Kenneth] programmed it to count from 0 to 9 over a period of 10 seconds, and then reset. To get it ultra low power, the chip is in sleep mode most of the time, and a raw low current LCD is used to display the output. While [Kenneth] simply checks the chip every few hours to see if it’s still counting, a setup much like the Flash Destroyer, tracking a clock and then storing the current value would get a more exact time of death. Either way, it’s been over 3 weeks…and still counting. Video after the rift.

Continue reading “Launchpad Takes Ultra Low Power To The Extreme”