Repairs You Can Print: Fixing Pegboard Clips That Break Too Easily

Right now, we’re running the Repairs You Can Print Contest, where one lucky student and one lucky organization will win the fancy-schmancy Prusa i3 MK3, with the neato multi-extrusion upgrade. [Budiul] is a student, so he figured he would repair something with a 3D printer. Lucky for him, the pegboard in his workshop was completely terrible, or at least the pegboard hooks were. These hooks were made out of PVC, and after time, more and more hooks broke. The solution? Print his own, and make them stronger in the process.

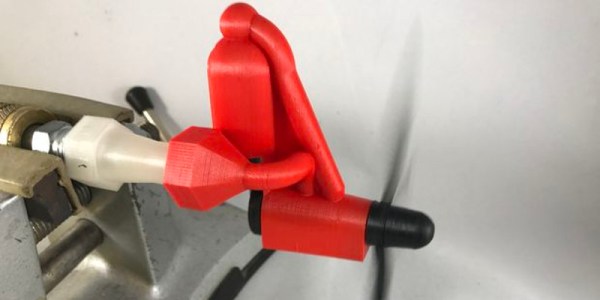
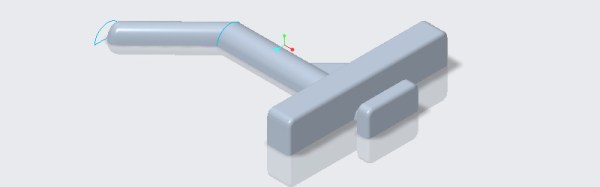
[Budiul] started his fix by taking the remaining, unbroken hooks on his pegboard wall organizer and measuring the relevant dimensions. These were modeled in Creo 4.0, printed out, and tested to fit. After many errors and failed models, he finally got a 3D printable version of his plastic pegboard hooks.

Of course, replacing PVC pegboard hooks with ABS hooks really isn’t that great of a solution. To fix this problem of plastic pegboard hooks for good, he printed the hooks in halves, with a channel running down the middle. This channel was filled with some steel wire and acetone welded together. The result is a fantastically strong pegboard hook that will hold up to the rigors of holding up some tools.

While printing out pegboard hooks might not seem like the greatest use of time, there are a few things going for this hack. Firstly, these aren’t the pegboard hooks made out of steel rod we all know and love; this is some sort of weird proprietary system that uses plastic molded hooks. If they’re made out of plastic anyway, you might as well print them. Secondly, being able to print your own pegboard hooks is a severely underrated capability. If you’ve ever tried to organize a workbench, you’ll know that you’ll never be able to find the right hook for the right spot. There is, apparently, a mystical superposition of pegboard hooks somewhere in the universe.

This is a great hack, and a great entry for the Repairs You Can Print contest. You can check out a video of the hack below.

Continue reading “Repairs You Can Print: Fixing Pegboard Clips That Break Too Easily”

Repairs You Can Print: Take A Deep Breath Thanks To A 3D Printed Fume Extractor

If you are a maker, chances are that you will be exposed to unhealthy fumes at some point during your ventures. Whether they involve soldering, treating wood, laser cutting, or 3D printing, it is in your best interest to do so in a well ventilated environment. What seems like sound advice in theory though is unfortunately not always a given in practice — in many cases, the workspace simply lacks the possibility, especially for hobbyists tinkering in their homes. In other cases, the air circulation is adequate, but the extraction itself could be more efficient by drawing out the fumes right where they occur. The latter was the case for [Zander] when he decided to build his own flexible hose fume extractor that he intends to use for anything from soldering to chemistry experiments.

Built around not much more than an AC fan, flex duct, and activated carbon, [Zander] designed and 3D printed all other required parts that turns it into an extractor. Equipped with a pre-filter to hold back all bigger particles before they hit the fan, the air flow is guided either through the active carbon filter, or attached to another flex duct for further venting. You can see more details of his build and how it works in the video after the break.

Workspace safety is often still overlooked by hobbyists, but improved air circulation doesn’t even need to be that complex for starters. There’s also more to read about fumes and other hazardous particles in a maker environment, and how to handle them.

Continue reading “Repairs You Can Print: Take A Deep Breath Thanks To A 3D Printed Fume Extractor”

Someone’s Made The Laptop Clive Sinclair Never Built

The Sinclair ZX Spectrum was one of the big players in the 8-bit home computing scene of the 1980s, and decades later is sports one of the most active of all the retrocomputing communities. There is a thriving demo scene on the platform, there are new games being released, and there is even new Spectrum hardware coming to market.

One of the most interesting pieces of hardware is the ZX Spectrum Next, a Spectrum motherboard with the original hardware and many enhancements implemented on an FPGA. It has an array of modern interfaces, a megabyte of RAM compared to the 48k of the most common original, and a port allowing the connection of a Raspberry Pi Zero for off-board processing. Coupled with a rather attractive case from the designer of the original Sinclair model, and it has become something of an object of desire. But it’s still an all-in-one a desktop unit like the original, they haven’t made a portable. [Dan Birch has changed all that, with his extremely well designed Spectrum Next laptop.

He started with a beautiful CAD design for a case redolent of the 1990s HP Omnbook style of laptop, but with some Spectrum Next styling cues. This was sent to Shapeways for printing, and came back looking particularly well-built. Into the case went an LCD panel and controller for the Next’s HDMI port, a Raspberry Pi, a USB hub, a USB to PS/2 converter, and a slimline USB keyboard. Unfortunately there does not seem to be a battery included, though we’re sure that with a bit of ingenuity some space could be found for one.

The result is about as good a Spectrum laptop as it might be possible to create, and certainly as good as what might have been made by Sinclair or Amstrad had somehow the 8-bit micro survived into an alternative fantasy version of the 1990s with market conditions to put it into the form factor of a high-end compact laptop. The case design would do any home-made laptop design proud as a basis, we can only urge him to consider releasing some files.

There is a video of the machine in action, which we’ve placed below the break.

Continue reading “Someone’s Made The Laptop Clive Sinclair Never Built”

Space Escape: Flying A Chair To Lunar Orbit

In the coming decades, mankind will walk on the moon once again. Right now, plans are being formulated for space stations orbiting around Lagrange points, surveys of lava tubes are being conducted, and slowly but surely plans are being formed to build the hardware that will become a small scientific outpost on our closest celestial neighbor.

This has all happened before, of course. In the early days of the Apollo program, there were plans to launch two Saturn V rockets for every moon landing, one topped with a command module and three astronauts, the other one containing an unmanned ‘LM Truck’. This second vehicle would land on the moon with all the supplies and shelter for a 14-day mission. There would be a pressurized lunar rover weighing thousands of pounds. This wouldn’t exactly be a Lunar colony, instead, it would be more like a small cabin in the Arctic used as a scientific outpost. Astronauts and scientists would land, spend two weeks researching and exploring, and return to Earth with hundreds of pounds of samples.

With this, as with all Apollo landings, came a risk. What would happen if the ascent engine didn’t light? Apart from a beautiful speech written by William Safire, there was nothing concrete for astronauts consigned to the deepest of the deep. Later in the Apollo program, there was a plan for real hardware to bring stranded astronauts home. This was the Lunar Escape System (LESS), basically two chairs mounted to a rocket engine.

While the LESS was never built, several studies were completed in late 1970 by North American Rockwell detailing the hardware that would return two astronauts from the surface of the moon. It involved siphoning fuel from a stricken Lunar Module, flying to orbit with no computer or really any instrumentation at all, and performing a rendezvous with an orbiting Command Module in less than one Lunar orbit.

Continue reading “Space Escape: Flying A Chair To Lunar Orbit”

This Portable Pi May Not Be What You Expect

In the years since the Raspberry Pi and other similar inexpensive Linux-capable single board computers came to the market, we have shown you a huge variety of projects using them at the heart of portable computers. These normally take the form of a laptop or tablet project, but today we have one that starts from a completely different perspective.

The “Kindleberry Pi Zero W” from [Ben Yarmis] does not attempt to create an enclosure or form factor for a portable computing solution. Instead it’s fair to say that it is more of a software hack than a hardware one, as he’s created something of an ad-hoc portable Raspberry Pi from other off-the-shelf pieces of consumer hardware.

The Zero W is a particularly useful computer for this application because of its tiny size, lowish power consumption, on-board Bluetooth, and wireless networking. He has taken a W and put it in the official Pi case, with a portable battery pack. No other connections, that’s his computer. As an input device he has a Bluetooth keyboard, and his display is a jailbroken Kindle Touch tied to the Pi using his Android phone as a WiFi router. We suspect with a little bit of configuration the Pi could easily serve that function on its own, but the phone also provides an Internet connection.

The result is a minimalist mobile computing platform which probably has a much longer battery life and higher reliability than portable Pi solutions using LCD displays, and certainly takes up less space than many others. Some might complain that there’s no hack in wirelessly connecting such devices, but we’d argue that spotting the possibility when so many others embark on complex builds has an elegance all of its own. It has the disadvantage for some users of providing only a terminal based interface to Raspbian, but of course we’re all seasoned shell veterans for whom that should present no problems, right?

Notable portable Pi solutions we’ve shown you before include this beautiful Psion-inspired project, and this one using the shell of an old laptop.

3D Printed Airplane Engine Runs On Air

One of the most important considerations when flying remote-controlled airplanes is weight. Especially if the airplane has a motor, this has a huge potential impact on weight. For this reason, [gzumwalt] embarked on his own self-imposed challenge to build an engine with the smallest weight and the lowest parts count possible, and came away with a 25-gram, 8-part engine.

The engine is based around a single piston and runs on compressed air. The reduced parts count is a result of using the propeller axle as a key component in the engine itself. There are flat surfaces on the engine end of the axle which allow it to act as a valve and control its own timing. [gzumwalt] notes that this particular engine was more of a thought experiment and might not actually produce enough thrust to run an airplane, but that it certainly will spark up some conversations among RC enthusiasts.

The build is also one of the first designs in what [gzumwalt] hopes will be a series of ever-improving engine designs. Perhaps he should join forces with this other air-powered design that we’ve just recently featured. Who else is working on air-powered planes? Who knew that this was a thing?

Continue reading “3D Printed Airplane Engine Runs On Air”

Rubik’s Cube Table Has A Hidden Surprise

[Nothorwitzer] built a pretty incredible Rubik’s Cube table with hidden storage. The coolest feature of this table is the way it opens. Twisting the top section of the cube causes two drawers to pop out from the sides. The further you turn the top, the more the drawers extend. As the top hits its rotational limit, the lid of the cube lifts up, revealing the entire top section is hollow.

[Nothorwitzer] built the table from plywood, hardboard, and MDF. Hiding inside the base is an old car wheel hub and bearing. The entire rotating system spins on this assembly. The drawers are actuated by an ingenious set of plywood cams which push the two opposing drawers out as the top assembly rotates. Two levers pop the top open.

The attention to detail here is amazing. [Nothorwitzer] build a set of hidden hinges that make the lid invisible, yet allows it to lift up and over the edge of the cube. A spring ensures that the heavy lid will pop open neatly. The lid fit is so close that air pressure ensures the top doesn’t slam down when it is dropped.

While the internal parts of the table are left in bare wood, that the external parts had to match a real Rubik’s Cube. [Nothorwitzer] scrambled a cube, then copied the colors. The panels are made of cut hardboard. Each panel is spray painted, then hot glued to the cube. The body is plywood which [Nothorwitzer] grooved with a router to match the profile of a real Rubick’s Cube.

The project doesn’t end here. [Nothorwitzer] has created a second cube, which is even more tricky. The lid pops by pressing in one section. The drawers operate in a similar way, but there is a lever to engage or disengage the drawer opening. This may be the perfect place to hide your retro gaming systems!

Continue reading “Rubik’s Cube Table Has A Hidden Surprise”