You turn the dial on your radio, and hear a powerful source of interference crackle in over the baseline noise. You’re interested as to where it might be coming from. You’re receiving it well, and the signal strength is strong, but is that because it’s close or just particularly powerful? What could it be? How would you even go about tracking it down?
When it comes to hunting down radio transmissions, Justin McAllister and Nick Foster have a great deal of experience in this regard. They came down to the 2024 Hackaday Superconference to show us how it’s done.
This latest installment gives us a glimpse at what’s involved for command and control of such a device, as what goes into simulation and testing. Much of the requisite mathematics is introduced, along with a long list of links to further reading. The whole solution is based entirely on free and open source (FOSS) software, in fact a giant stack of such software including planning and simulation software on top of glue like MQTT message queues.
The practical exercise for this installment was to have the arm trace out the shape of a heart, given as a mathematical equation expressed in Python code, and it fared quite well. Measurements were taken! Science was done!
We last brought you word about this project in October of 2024. Since then, the project name has changed from “ManiPilator” to “ManiPylator”. Originally the name was a reference to the Raspberry Pi, but now the focus is on the Python programming language. But all the bot’s best friends just call him “Manny”.
If you want to get started with your own 6DOF robotic arm, [Leo] has traced out a path for you to follow. We’d love to hear about what you come up with!
Growing up as a kid in the 1990s was an almost magical time. We had the best game consoles, increasingly faster computers at a pace not seen before, the rise of the Internet and World Wide Web, as well the best fashion and styles possible between neon and pastel colors, translucent plastic and also this little thing called Windows 95 that’d take the world by storm.
Yet as great as Windows 95 and its successor Windows 98 were, you had to be one of the lucky folks who ended up with a stable Windows 9x installation. The prebuilt (Daewoo) Intel Celeron 400 rig with 64 MB SDRAM that I had splurged on with money earned from summer jobs was not one of those lucky systems, resulting in regular Windows reinstalls.
As a relatively nerdy individual, I was aware of this little community-built operating system called ‘Linux’, with the online forums and the Dutch PC magazine that I read convincing me that it would be a superior alternative to this unstable ‘M$’ Windows 98 SE mess that I was dealing with. Thus it was in the Year of the Linux Desktop (1999) that I went into a computer store and bought a boxed disc set of SuSE 6.3 with included manual.
Fast-forward to 2025, and Windows is installed on all my primary desktop systems, raising the question of what went wrong in ’99. Wasn’t Linux the future of desktop operating systems?
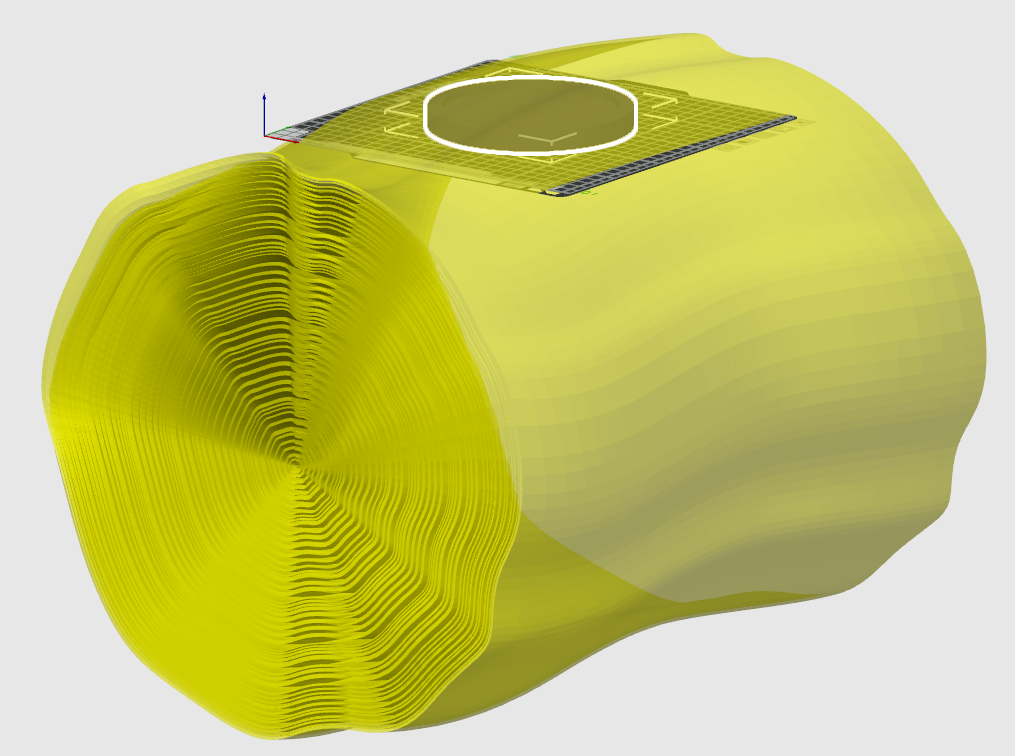
Adding textures is a great way to experiment with giving 3D prints a different look, and [PandaN] shows off a method of adding a wood grain effect in a way that’s easy to play around with. It involves using a 3D model of a log (complete with concentric tree rings) as a print modifier. The good news is that [PandaN] has already done the work of creating one, as well as showing how to use it.
The model of the stump — complete with concentric tree rings — acts as a modifier for the much-smaller printed object (in this case, a small plate).
In the slicer software one simply uses the log as a modifier for an object to be printed. When a 3D model is used as a modifier in this way, it means different print settings get applied everywhere the object to be printed and the modifier intersect one another.
In the case of this project, the modifier shifts the angle of the fill pattern wherever the models intersect. A fuzzy skin modifier is used as well, and the result is enough to give a wood grain appearance to the printed object. When printed with a wood filament (which is PLA mixed with wood particles), the result looks especially good.
In addition to the 3D models, [PandaN] provides a ready-to-go project for Bambu slicer with all the necessary settings already configured, so experimenting can be as simple as swapping the object to be printed with a new 3D model. Want to see that in action? Here’s a separate video demonstrating exactly that step-by-step, embedded below.
For most of us, mirrors are something we buy instead of build. However, [Unnecessary Automation] wanted to craft mirrors of his own for a custom telescope build. As it turns out, producing optically-useful mirrors is not exactly easy.
For the telescope build in question, [Unnecessary Automation] needed a concave mirror. Trying to get that sort of shape with glass can be difficult. However, there’s such a thing as a “liquid mirror” where spinning fluid forms into a parabolic-like shape. Thus came the idea to spin liquid resin during curing to try and create a mirror with the right shape.
That didn’t quite work, but it inspired a more advanced setup where a spinning bowl and dense glycerine fluid was used to craft a silicone mold with a convex shape. This could then be used to produce a resin-based mirror in a relatively stationary fashion. From there, it was just necessary to plate a shiny metal layer on to the final part to create the mirror effect. Unfortunately, the end result was too messy to use as a viable telescope mirror, but we learn a lot about what didn’t work along the way.
The video is a great journey of trial and error. Sometimes, figuring out how to do something is the fun part of a project, even if you don’t always succeed. If you’ve got ideas on how to successfully spin cast a quality mirror, drop them in the comments below. We’ve seen others explore mirror making techniques before, too.
For those of us who’ve spent far too long hammering rubber keys into submission, a glorious solution has arrived. [Lee Smith] designed the ZX Mechtrum Deluxe, the ultimate keyboard upgrade for your beloved ZX Spectrum 48k. Thanks to [morefunmakingit], you can see this build-it-yourself mechanical mod below. It finally brings a proper spacebar and Spectrum-themed Wraith keycaps into your retro life.
The Metrum Deluxe is a full PCB redesign: no reused matrices or clunky membrane adapters here. [Lee Smith] got fed up with people (read: the community, plus one very persistent YouTuber) asking for a better typing experience, so he delivered. Wraith keycaps from AliExpress echo the original token commands and BASIC vibe, without going full collector-crazy. Best of all: the files are open. You can download the case on Printables and order the PCB through JLCPCB. Cherry on top (pun intended): you’ll finally have a spacebar your thumbs can be proud of.
So whether you’re into Frankenstein rigs or just want your Spectrum to stop feeling like an air mattress, check this video out. Build files and link to the keycaps can be found on Youtube, below the video.
Tip: if you foster a secret love for keyboards, don’t miss the Keebin’ with Kristina’s series on all sorts of keyboards.
Have you ever heard of INTERCAL? If you haven’t, don’t feel bad. This relatively obscure language dates back to 1972 with the goal of being difficult to read and write. It is the intellectual parent of systems like brainf**k and other bad languages. Now, you can read the INTERCAL-72 source code thanks to a found printout. It will help if you can read SPITBOL, another obscure language that is a compiled version of SNOBOL (which is like an old-fashioned non-Unix awk program).
How strange it INTERCAL? Well, one of the statements is PLEASE. If you don’t use it enough, you’ll offend the interpreter, who will then ignore your program. But if you use it too much, then you are a suck up and, therefore, your program will be ignored again. If you think GOTO is a bad idea, you’ll just hate COME FROM, although that was from a later version of INTERCAL.