[TrendMicro] are reporting that yet another IoT botnet is emerging. This new botnet had been dubbed Persirai and targets IP cameras. Most of the victims don’t even realize their camera has access to the Internet 24/7 in the first place.
Trend Micro, have found 1,000 IP cameras of different models that have been exploited by Persirai so far. There are at least another 120,000 IP cameras that the botnet could attack using the same method. The problem starts with the IP cameras exposing themselves by default on TCP Port 81 as a web server — never a great idea.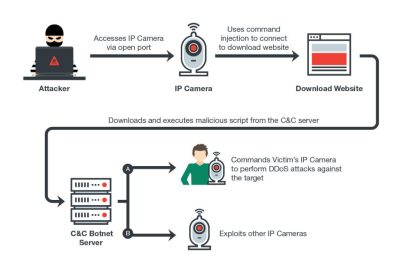
Most IP cameras use Universal Plug and Play, which allows them to open ports from inside the router and start a web server without much in the way of security checks. This paints a giant target in cyber space complete with signs asking to be exploited. After logging into a vulnerable device the attacker can perform a command injection attack which in turn points gets the camera to download further malware.
The exploit runs in memory only, so once it has been rebooted it should all be fine again until your next drive by malware download. Check your devices, because even big named companies make mistakes. IoT is turning into a battlefield. We just hope that with all these attacks, botnets, and hacks the promise of the IoT idea isn’t destroyed because of lazy coders.
Part of feature image from Wikipedia, Creative Commons license.