Instructables user [Roboro] had a Mad Catz Xbox steering wheel controller he hasn’t had much use for of late, so he decided to hack and use it as a controller for a robot instead.
Conceivably, you could use any RC car, but [Roboro] is reusing one he used for a robot sumo competition a few years back. Cracking open the controller revealed a warren of wires that were — surprise, surprise — grouped and labelled, making for a far less painful hacking process. Of course, [Roboro] is only using the Xbox button for power, the player-two LED to show the connection status, the wheel, and the pedals, but knowing which wires are which might come in handy later.
An Arduino Uno in the wheel and a Nano in the robot are connected via CC41-A Bluetooth modules which — despite having less functionality than the HM10 module they’re cloned from — perform admirably. A bit of code and integration of a SN754410 H-bridge motor driver — the Arduino doesn’t supply enough current to [Roboro]’s robot’s motors — and the little robot’s ready for its test drive.
What’s better than 1 string of LED lights? 96. That’s how many. Each string of the 96 has 60 ws2812b LEDs, for a total of 5760 individually addressable RGB LEDs. That’s not the cool part of [jaymeekae]’s Space Tunnel installation, the cool part is that they’re interactive.
Starting out with some PVC piping, dark cloth was used as a backdrop and the LED strips were attached to it. Several power supplies are used to supply the voltage necessary and each strip controlled by FadeCandy chips which connect to, in this case, a Windows PC via USB. Initially, computer power supplies were used, but they couldn’t supply the current necessary. [jaymeekae] used them for the first installation, but switched to better power supplies for further installations.
Once the lights were up and powered, [jaymeekae] started work on the interface to control them. Starting with a used bureau, [jaymeekae] cut out a section for the touchscreen, and installed the controlling computer in the bottom half. Processing is used to interface with the FadeCandy controllers and HTML is used for a user interface. Each mode runs a different Processing program for different effects, including audio visualization, a space tunnel mode (hence the name) and a cool drawing app where the user draws on the touchscreen and sees the results in the lights overhead.
Over several iterations, the Space Tunnel has evolved, with better power supplies and a better interface. It’s a great art installation and [jaymeekae] takes it to festivals, including one in Spain and one in the UK. There are some other LED string projects at Hack-a-Day, including this one with ping-pong balls, and this one that involves drinking a lot of beer first.
If you had a choice between going to your boss and asking for funds for a new piece of gear, would you rather ask for $3000 to buy off-the-shelf, or $200 for the parts to build the same thing yourself? Any self-respecting hacker knows the answer, and when presented with an opportunity to equip his lab with a new DIY syringe pump for $200, [Dr. D-Flo] rose to the challenge.
The first stop for [Dr. D-Flo] was, naturally, Hackaday.io, which is where he found [Naroom]’s syringe pump project. It was a good match for his budget and his specs, but he needed to modify some of the 3D printed parts a little to fit the larger syringes he intended to use. The base is aluminum extrusion, the drive train is a stepper motor spinning threaded rod and a captive nut in the plunger holders, and an Arduino and motor shield control everything. The drive train will obviously suffer from a fair amount of backlash, but this pump isn’t meant for precise dispensing so it shouldn’t matter. We’d worry a little more about the robustness of the printed parts over time and their compatibility with common lab solvents, but overall this was a great build that [Dr. D-Flo] intends to use in a 3D food printer. We look forward to seeing that one.
It’s getting so that that you can build almost anything for the lab these days, from peristaltic pumps to centrifuges. It has to be hard to concentrate on your science when there’s so much gear to make.
The MeArm Pi is a fantastic little robot kit that was the first place winner of the Enlightened Pi contest here on Hackaday. It’s crushing the Shitty Robots subreddit, and compared to the old MeArm kit, it’s much, much simpler to assemble. Ask me how I know. Now the MeArm Pi is a Kickstarter. This tiny robot arm is programmable in everything from Scratch to Perl. It’s highly recommended for children ages 8 to those wanting to recreate the opening scene of Pee Wee’s Big Adventure.
Almost a year ago, Lulzbot unveiled their latest 3D printer at the Midwest RepRap Festival. The Taz 6 is a great printer, but it’s a bit of a departure from their previous designs. The biggest change was the ‘brain box’, the controller box that encases the power supply, stepper drivers, and other associated electronics. Last year, Lulzbot said they would be selling this brain box by itself. It’s out now, ready for integration into your own self-built Taz, or a 3D printer of your own design.
Speaking of the Midwest RepRap Festival, it’s only a month away. It’s scheduled for March 25-26th at the Elkhart County 4-H Fairgrounds in Goshen, Indiana. Why the middle of nowhere? It ensures only the cool kids make it. For one weekend a year, Goshen, Indiana turns into the nexus of all things 3D printing. Don’t ask questions, just come. It’s free, although it would be cool if you kicked a few bucks over to the organizers.
[Clickspring] — the guy who built a fantastic clock in his home shop – is working on his second project. It’s an Antikythera Mechanism, and the latest episode is about building a gigantic gear. This is a unique approach to building an Antikythera Mechanism. [Clickspring] is still using modern tools, but he’s figuring out how this machine was built with tools available 2000 years ago.
Ogopogo, defeated by the Travelling Hacker Box.
Ogopogo. Champ is a picture of a log and Nessie is a toy submarine with a head made out of plastic wood. Ogopogo is a plesiosaur. Are you going to tell me a log – or at best a beaver – can kick the ass of a plesiosaur? Ogo. Pogo. Plesiosaur.The Travelling Hacker Box has conquered Ogopogo.
The ESP32 is quickly becoming the coolest microcontroller platform out there. You know what that means – Kickstarters! The FluoWiFi is Arduino-derived dev board featuring the ESP32 for WiFi, Bluetooth, and all the cool wireless goodies. This board also features an ATMega644p — basically the little sister to the ATMega1284p – for all your standard microcontroller Arduino stuff. It’s £25 for a board, which makes it pretty inexpensive for what you’re getting.
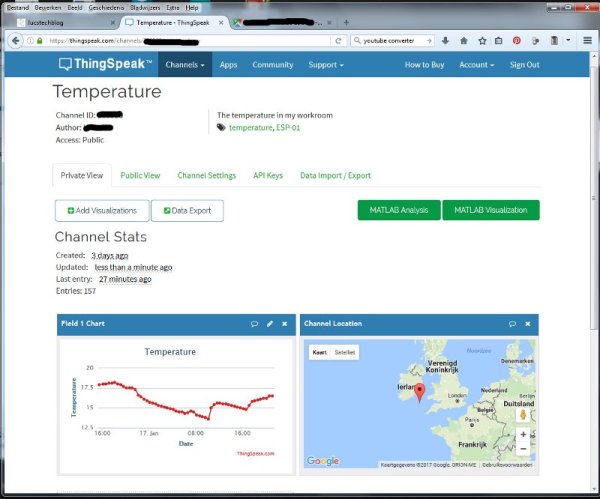
If only Marv and Harry were burglars today; they might have found it much easier to case houses and — perhaps — would know which houses were occupied by technically inclined kids by capitalizing on the potential vulnerability that [Luc Volders] has noticed on ThingSpeak.
As an IoT service, ThingSpeak takes data from an ESP-8266, graphs it, and publicly displays the data. Some of you may already see where this is going. While [Volders] was using the service for testing, he realized anyone could check the temperature of his man-cave — thereby inferring when the house was vacant since the location data also happened to be public. A little sleuthing uncovered several other channels with temperature data or otherwise tied to a location that those with nefarious intent could abuse.
At some point, most of us have learned a little of the ancient art of origami. It’s a fascinating art form, and being able to create a recognizable model by simply folding paper in the right order can be hugely satisfying. Most of us move on to other pursuits once we master the classic crane model, but the mathematics behind origami can lead some practitioners past the pure art to more practical structures, like this folding ballistic barrier for law enforcement use.
The fifty-pound Kevlar and aluminum structure comes from Brigham Young University’s College of Mechanical Engineering, specifically from the Compliant Mechanisms Research program. Compliant mechanisms move by bending or deflecting rather than joints between discrete parts, and this ballistic shield is a great example. The mechanism is based on the Yoshimura crease pattern, which can be quickly modeled with a piece of paper. Scaling that up to a full-sized structure, light enough to be fielded but strong enough to stop a .44 Magnum round, was no mean feat. But as the video below shows, the prototype has a lot of potential.
Now it’s your turn: what applications have you seen for compliant mechanisms? Potential applications range in scale from MEMS linkages for microinjecting cells to huge antennas that unfurl in orbit. We’ve featured a few origami-like structures before, like this self-assembling robot or a folding quadcopter, but neither of these really rates as compliant. This elegant parabolic satellite antenna is more like it, though. There are applications for designing origami and a mathematical basis for the field; has anyone tried using these tools to design compliant structures? Sound off in the comments below.
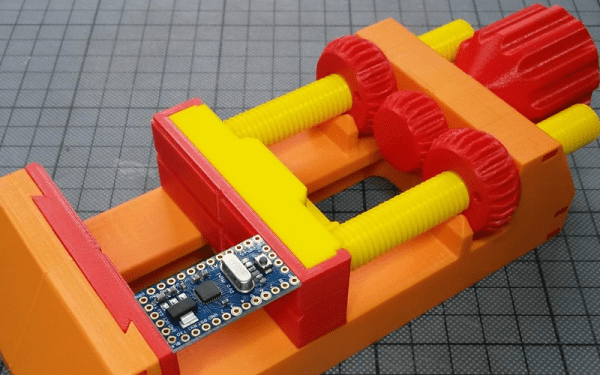
We often wonder how many people have 3D printers and wind up just printing trinkets off Thingiverse. To get the most out of a printer, you really need to be able to use a CAD package and make your own design. However, just like a schematic editor doesn’t make your electronic designs work, a CAD program won’t ensure you have a successful mechanical part.
[TheGoofy] has a 100% 3D printed vise that looks like it is useful. What’s really interesting, though, is the video (see below) where he explains how printing affects material strength and other design considerations that went into the vise.