Who’s Watching The Kids?

It wasn’t long ago that we saw the Echo bloom into existence as a standalone product from its conceptual roots as a smartphone utility. These little black columns have hardly collected their first film of dust on our coffee tables and we’re already seeing similar technology debut on the toy market, which causes me to raise an eye-brow.

There seems to be some appeal towards making toys smarter, with the intent being that they may help a child learn while they play. Fair enough. It was recently announced that a WiFi enabled, “Hello Barbie” doll will be released sometime this Fall. This new doll will not only be capable of responding to a child’s statements and questions by accessing the Internet at large, it will also log the likes and dislikes of its new BFF on a cloud database so that it can reference the information for later conversations. Neat, right? Because it’s totally safe to trust the Internet with information innocently surrendered by your child.

Similarly there is a Kickstarter going on right now for a re-skinned box-o-internet for kids in the shape of a dinosaur. The “GreenDino”, is the first in a new line called, CogniToys, from a company touted by IBM which has its supercomputer, Watson, working as a backbone to answer all of the questions a child might ask. In addition to acting as an informational steward, the GreenDino will also toss out questions, and upon receiving a correct answer, respond with praise.

Advancements in technology are stellar. Though I can see where a child version of myself would love having an infinitely smart robot dinosaur to bombard with questions, in the case of WiFi and cloud connectivity, the novelty doesn’t outweigh the potential hazards the technology is vulnerable to. Like what, you ask?

Whether on Facebook or some other platform, adults accept the unknown risks involved when we put personal information out on the Internet. Say for instance I allow some mega-corporation to store on their cloud that my favorite color is yellow. By doing so, I accept the potential outcome that I will be thrown into a demographic and advertised to… or in ten years be dragged to an internment camp by a corrupt yellow-hating government who subpoenaed information about me from the corporation I consensually surrendered it to.

The fact is that I understand those types of risks… no matter how extreme and silly they might seem. The child playing with the Barbie does not.

All worst case scenarios of personal data leakage and misuse aside, what happens when Barbie starts wanting accessories? Or says to their new BFF something like, “Wouldn’t we have so much more fun if I had a hot pink convertible?”

Ground Stations Are Just The Beginning: The SatNOGS Story

When you think of satellites, you may think of the Space Shuttle extending its robot arm with a huge piece of high-tech equipment waiting to pirouette into orbit. This misconception is similar to picturing huge mainframes when thinking about computers. The future (and arguably even the present) reality of satellites is smaller, cheaper, and more prolific. This future is also an “open” one if the Libre Space Foundation has anything to say about it.

This group that plans to make satellite communications available to anyone started out as a build at a hackerspace. One good idea, a shared set of skills and experience, and a little bit of time led them to accomplish amazing things. We are, of course, talking about the Grand Prize winners of the 2014 Hackaday Prize. The SatNOGS team built a working satellite ground station and laid the foundation for a data-sharing network to connect to it. But even this description can be a bit daunting, so come with me to learn what this is all about, and how it matters to you.

Continue reading “Ground Stations Are Just The Beginning: The SatNOGS Story”

Balancing A Ball With A Solar Cell

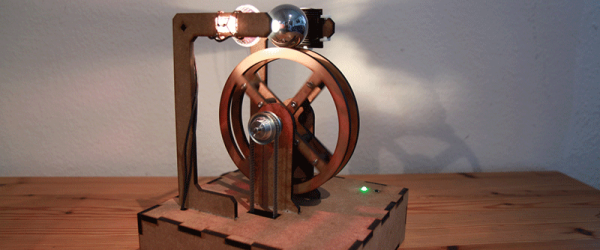
Go to any control systems class, and you’ll see a final project that demonstrates loops, integration, and everything else that can be learned in a semester or two of control theory. This project is not from one of those classes. It is, however, very cool: it balances a 40mm steel ball on the rim of a lasercut wood wheel using nothing more than a solar cell as a sensor.

[Manuel] was inspired to build this ball-balancing device after seeing a similar project at CCC about six years ago. He doesn’t remember who made it, and eschewed the PC/Matlab architecture of the original, but this build retains one interesting feature of its muse. The input to the control system is just a high intensity light bulb and a solar cell. The 40mm steel ball blocks the light reaching the solar cell most of the time. Slight variations in voltage go through the control system to keep this ball balanced on top of the wheel.

The only hardware for this build is a motor, a motor driver, and an ATMega644P. The first revision of the hardware was just a few breakout boards stuffed into a rat’s nest of wiring in the base of the build, but this has been fixed in version two with a new PCB. Video below.

Continue reading “Balancing A Ball With A Solar Cell”

PCB Manicure Wields Laser Cutter For Your Nails

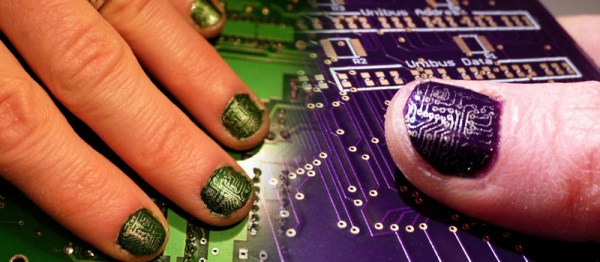
Wearable electronics is a hot topic these days. Although these fancy talons are only for show, they could lead to more in the future.

[Shelby] and [Colleen AF] showed people how to include a laser cutter in your nail care at a recent event at NYC Resistor. The technique used here starts off with a base coat of the background color before heading to the laser cutter. Now don’t worry, you don’t need to risk any of your digits. A type of reverse silk screen is made with the laser by deeply etching the artwork into a piece of flat acrylic sheet. Those voids are then filled with the secondary color for the circuit traces and the excess is removed with a squeegee. A sponge is then used to transfer the paint from the recesses in the acrylic to the nails.

Granted, PCB finger nails might not be your cup of tea, but it does make us wonder: What if conductive ink was used? Would it be possible to build a circuit on your own fingernail? Obviously you would want to use a sticky, conductive glue rather than solder. (Please don’t try to reflow solder your fingers at home.) What kind of power supply would fit? What could you build? We also see other possible applications of the process like labeling non-flat surfaces. Let us know what you think in the comments below.

UPDATE: [David Flint] points out in the comments that this is a type of offset gravure printing.

Hippie-Redneck Solar-Heated Swimming Pool Slash Hot Tub

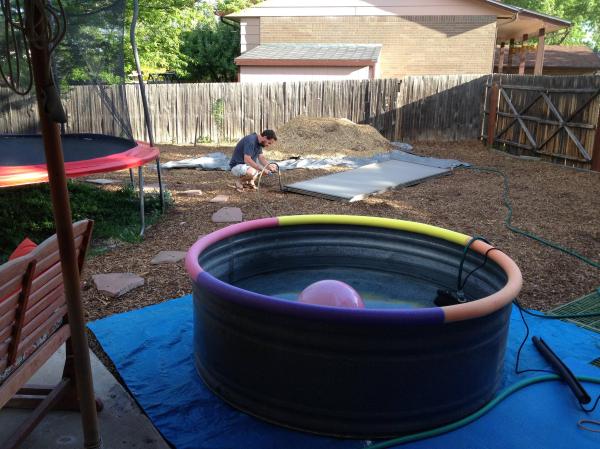
In need of a jacuzzi to complete your backyard but just don’t have the cash? Need a swimming pool for the little ones but tired of the cheap plastic ones popping and leaking all over the place? Look no further than [inexplorata]’s self-explanatory “Hippie-Redneck Solar-Heated Kiddo Swimmin’ Pool And Hot Tub“.

The pool uses a six-foot-diameter metal stock tank, provided by a neighbor. After some liberal use of JB Weld, the tank functions as a makeshift pool on the cheap, but the magic doesn’t end there. [inexplorata] found a solar thermal water heater that someone was getting rid of and snagged it to heat up the water, which is almost a necessity for most parts of the Northern Hemisphere right now.

A sump pump in a bucket handles water circulation, and [inexplorata] points out that the single water heater is more than enough to keep the water nice and warm (“hot enough to poach a rhino” is the scientific term used on the project page) so if you’ve got the means, this might be a welcome addition to the backyard! The build was posted on Reddit, the users of which had some helpful suggestions for improving the pool if you want to tackle this yourself. If you don’t have a solar thermal water heater, you could always make one of those too.

A Class D Amp Made From Scrap

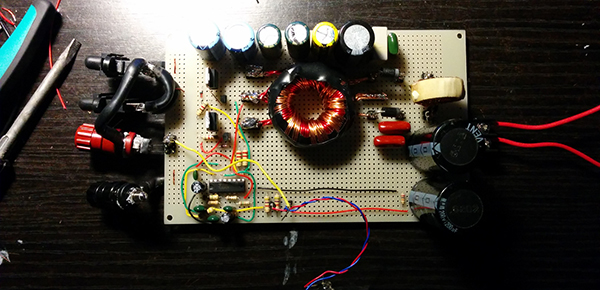
[Boolean90] needed an amplifier for a subwoofer, and had a lot of parts sitting around in a scrap bin. His project, a Class D sub amp made out of scrap, is a great example of what you can build with the right know-how and a very large pile of junk.

With digital logic and PWM chips, a Class D amp is one of the simpler ways to get a lot of amplification easily in an efficient package. It’s really not that complicated; an audio signal is turned into a PWM’d square wave, this is sent out to a Mosfet bridge, and finally out to the speaker.

Most Class D amps have a switching frequency of hundreds of kilohertz to the Megahertz range, but since this is an amplifier for a subwoofer that has a cutoff frequency of about 1kHz, the switching frequency doesn’t need to be quite as fast. [Boolean] is using a 50kHz carrier frequency; it’s more than high enough to recreate low frequencies.

With the completed project, [Boolean] has an extremely loud amplifier that has around 75-150W of output power. The subwoofer is only rated for 200W, but with the volume [Boolean] is getting, this isn’t an amp he’ll be rebuilding anytime soon.

How To Zip, Stick, And Screw Stuff Together

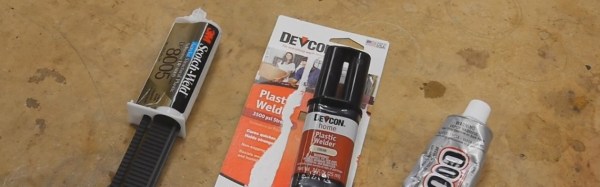
One of the first problems every new hacker/maker must solve is this: What’s the best way to attach part “A” to part “B”. We all have our go-to solutions. Hot glue, duck tape ( “duct tape” if you prefer) or maybe even zip ties. Super glue, epoxy, and if we’re feeling extra MacGyver-ish then it’s time for some bubble gum. For some Hackaday readers, this stuff will seem like old hat, but for a beginner it can be a source of much frustration. Even well versed hackers might pick up a few handy tips and tricks presented in this video after the break.

In part one of this series, [Ben Krasnow] shows us the proper use of just a few of the tools and techniques he uses in his shop. [Ben] starts out with a zip-tie tool which he loves in part because of a tension setting that ensures it’s tight but not overly. He moves on to advice for adhesive-vs-material and some tips on using threaded fasteners in several different circumstances. He also included a list of the parts and tools he uses so you don’t have to go hunting them down.

[Ben] is no stranger to us here at Hackaday. He does some epic science video. You can subscribe to his channel or follow his blog if you enjoy what you see.

Continue reading “How To Zip, Stick, And Screw Stuff Together”