Changing Poi Colors Based On Speed And Velocity

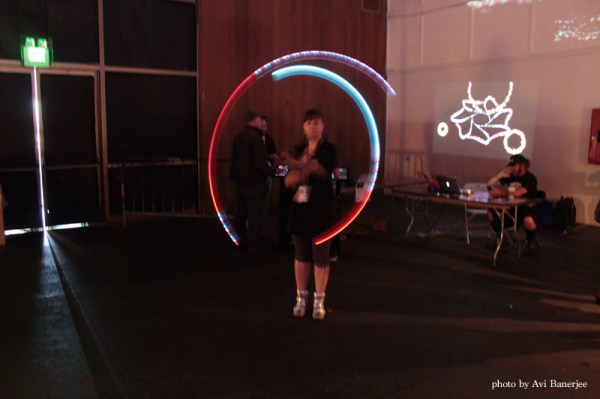
LED toys have become synonymous with the underground rave culture as party-goers gaze into vortexes of spinning light known as poi. Most of these objects come pre-programmed, but some can be custom coded. However, only a few tap into an accelerometer changing the colorful circles of energy depending on how fast they move through space. One stunning example is this LED device called the ‘Center Flee’ that translates accelerometer data into sequences of alternating RGB colors.

The LED values are ‘printed’ to the tethered objects at specific points in the rotational arc. The devices are controlled with an Arduino, and a XBee wireless module transmits data to a computer nearby, eliminating the need to manually remove an SD card after each spinning session.

When spun, the poi acts like a colorful, twirling extension of the performer that produces a mesmerizing, vibrant effect. It’s nice to see the progression of glow sticks tied to shoelaces into g-force sensing devices that can captivate surrounding audiences.

Other examples of similar types of ideas include this accelerometer poi that was cut with a CNC machine and these LED staffs for the ultimate portable rave.

Below is a video playlist of the Center Flee being tested out.

Continue reading “Changing Poi Colors Based On Speed And Velocity”

Homemade Omnidirectional Speakers In A Unique Enclosure

While studying acoustics in college (university for non-Americans), [Nick] had a great idea for an omnidirectional speaker. Some models available for purchase have a single speaker with a channel to route the sound in all directions, but [Nick] decided that a dodecahedron enclosure with 12 speakers would be a much more impressive route.

To accommodate the array of speakers, the enclosure needs twelve pentagons with a 58.3 degree bevel so that they fit together in a ball shape. After thinking about all of the complicated ways he could get this angle cut into the wood pentagons, he ended up using a simple circular saw!

Once the enclosure was painted [Nick] started wiring up the speakers. The equivalent impedance of the array of 8-ohm speakers works out to just around 10 ohms, which is easily driven by most amplifiers. The whole thing was hung from a custom-made galvanized pipe (all the weight adds up to about 15 kilograms, or 33 pounds for Americans, so the rig needed to be sturdy). We’ve featured other unique speaker builds, but this is the first 12-speaker omnidirectional speaker we’ve seen. [Nick] is happy to report that the speakers sound great, too!

Fail Of The Week: This Inanimate Titanium Rod

You saw [Chris] cast aluminium on the cheap using Kinetic Sand a few weeks ago, didn’t you? He recently got his meaty hands on some titanium through the magic of modern transactional methods and was bowled over by its strength, hardness, and poor heat transfer.

He thought he would cast it into a nice, strong bottle opener. As you can probably guess, that didn’t go so well. First off, it wasn’t easy to saw through the thin rod. Once he did get it split in twain, it was surprisingly cool to the touch except at the tip. This is nasty foreshadowing, no?

[Chris] takes a moment to help us absorb the gravity of what he’s about to do, which of course is to send several hundred amps through that poor rod using a DC arc welder. Special precautions are necessary due to the reaction between oxygen and heated titanium. His trusty graphite crucible is grounded to the bottom of a big aluminium tub, and a cozy blanket of argon from a TIG welder will shield the titanium from burnination.

Well . . . the titanium didn’t melt. Furthermore, the crucible is toast. On the up side, vise-enabled cross-sectional examination of the crucible proved that there was still gold in them there walls.

Do you have any (constructive, on-topic) suggestions for [Chris]? Let him know below.

Continue reading “Fail Of The Week: This Inanimate Titanium Rod”

file server

Antique Case For Custom File Server

Michigan Tech was throwing out a bunch of old electronic equipment, and [Evan] snagged quite a gem: a UHF signal generator built by Hewlett Packard circa 1955. He stripped all of the remaining electronics out of the case, but kept the slide-out trays and the front instrument panel to create this antique-looking file server.

The bottom tray was where the bulk of the electronics were housed, and since widespread adaptation of transistors for electronics wasn’t common at the time (the first silicon transistor wasn’t made until 1954), the original equipment was all vacuum tubes. This meant that there was just enough space for a motherboard, heat sink, and a couple of power supplies.

The hard drives are held in custom housings in the top portion of the case. The real magic, however, is with the front display panel. [Evan] was able to use the original meters, including a display for “megacycles” which is still technically accurate. The meters are driven by a USB-to-serial cable and a python script that runs on the server.

The antique case is a great touch for this robust file server. Make sure to put it in a prominent place, like next to your antique tube radio.

THP Quarterfinalist: Low-Cost Solid State Cosmic Ray Observatory

There are a number of crowdsourced projects to put data from around the world onto the Internet, tracking everything from lightning to aircraft transponders. [aelias36]’s entry for The Hackaday Prize is a little different. He’s tracking cosmic rays, and hopes to turn his low-cost hardware into the largest observatory in the world.

Cosmic rays are protons and other atomic nuclei originating far outside the solar system. They hit the very top of Earth’s atmosphere at a significant fraction of the speed of light, and the surface of the Earth is frequently sprayed with particles resulting from cosmic rays. Detecting this particle spray is the basis for all Earth-based cosmic ray observatories, and [aelias] has figured out a cheap way to put detectors in every corner of the globe.

The solution is a simple PIN diode. An op-amp amplifies the tiny signal created in the diode into something a microcontroller can use. Adding a GPS module and an Ethernet connection, this simple detector can send time, position, and particle counts to a server, creating a huge observatory with crowdsourced data.

The detectors [aelias] is working on isn’t great as far as cosmic ray detectors go; the focus here is getting a lot of them out into the field and turning a huge quantity of data into quality data. It’s an interesting project, and the only one with this scale of crowdsourcing we’ve seen for The Hackaday Prize.

You can check out [aelias]’ entry video below.


SpaceWrencherThe project featured in this post is a semifinalist in The Hackaday Prize.

Continue reading “THP Quarterfinalist: Low-Cost Solid State Cosmic Ray Observatory”

Canon Pixma Printer Frontpanel Library

Re-Using The LCD & Button Assembly From A Broken Inkjet Printer

Inkjet printers are a dime a dozen. You probably have taken old printers apart to scavenge parts like motors, pulleys, belts, switches, linear rods, power supply, etc. These parts are easy to reuse in other projects, unlike the controller portion of the printer which not as easy to make use of. [Blaupause] has done something very interesting, and it probably ranks in the ‘extreme difficulty’ category for most tinkerers. He has taken the front panel off an otherwise non-working Canon Pixma inkjet printer and has figured out a way to interface with it.

The front panel of this printer has the standard buttons that you would find on any ole printer, but the Pixmas also has a small LCD screen. [Blaupause] has written a library for the Olimexino microcontroller that can communicate with and make use of the repurposed front panel. And the neat part of this project is that the front panel’s on-board processor does the heavy lifting when it comes to displaying images on the LCD screen or checking button states which frees up your microcontroller to do whatever else. Right now, the LCD screen can display bitmaps and supports image transparency. The library can not display video as of yet, but that option is being worked on.

[Blaupause] makes all his hard work available to the public on the project’s Sourceforge page. In addition to the library, he also includes printer panel pinouts and detailed information on how to communicate with the buttons and LCD screen. Video after the break…

Continue reading “Re-Using The LCD & Button Assembly From A Broken Inkjet Printer”

The Walking Dead Survival Box For The Zombie Apocalypse 

When the world comes to an end and zombies run through the streets like a blood thirsty disease, it will be absolutely necessary to store a weapon (or five) away just in case an undead creature tries to get inside. In addition, stopping crooks from ransacking back up supplies will also be a primary concern as well as savage, brain-eating beasts take over the cities. Keeping objects safe with a lock box like this one would deter both undead creatures and mischievous thieves. Or at least that is what was going on in [Mattt Reamer’s] head when he took on this build.

[Matt] is a UX designer who drew inspiration from the wildly popular television series The Walking Dead. He even 3D printed the Walking Dead’s logo on the front of the blood stained box attributing the idea to the show.

The setup here uses an Arduino Uno which is powered by a 9-Volt battery. The fingerprint scanner unlocks the box by verifying the print against a reverence copy stored in the code. When the program authorizes the scan, a servo opens up the latch allowing the contents within to be retrieved. Video of the full system can be seen after the break.

Now all that comes next would be to protect those fingers.

Continue reading “The Walking Dead Survival Box For The Zombie Apocalypse “