Hackaday Prize Judge Elecia White Writes Tell-All Blog Post

The awarding of The Hackaday Prize is nearly upon us!  With just over a day left to go, Launch Judge Elecia White has decided to spill the beans and write a blog post about which of the five finalists she thinks should win. We don’t want to spoil the surprise… but what the heck, she wants them ALL to win.

ChipWhisperer because it brings high-end hardware security tools to the masses.

SatNOGS because it brings space to your back yard,

PortableSDR because of its great waterfall display,

ramanPi because come on, it’s a freaking spectrometer!

Open Source Science Tricorder because it uses sensors to help us see the science in the world around us.

Elecia knows how much time, effort, and passion went into these projects, and how each one embodies the open and connected spirit of The Hackaday Prize. Only one day remains before the big event in Munich, and the announcement of the winner.

Transmitting Data Long-Distance With Morse Code

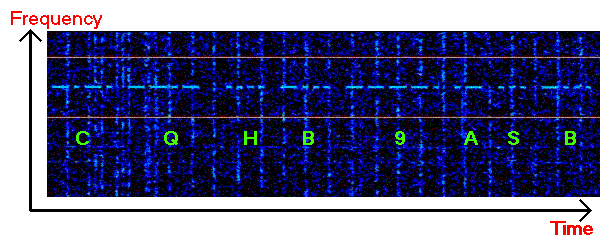
[Konstantinos] wrote in to tell us about his CDW project: a digital encoding scheme for ham radio that uses CW (continuous wave) Morse code for digital data transfer. [Link updated 1/5/16] CW operation with Morse code is great for narrow-bandwidth low-speed communication over long distances. To take advantage of this, [Konstantinos] developed a program that takes binary or text files, compresses them, and translates them to a series of letters and numbers that can be represented with Morse code.

The software translates the characters into sequences of Morse code pulses, and plays an audio stream of the result. His software doesn’t support decoding Morse from an audio stream, so [Konstantinos] recommends using one of many existing programs to get the job done. Alternatively those with a good ear and working knowledge of Morse can transcribe the characters by hand.

After receiving a broadcast, the user pastes received characters back in the software. The software re-assembles the binary file from the Morse characters and decompresses the result. [Konstantinos] also added a simple XOR encryption feature, but keep in mind that using encryption on ham radio bands is technically illegal.

2.5kW Of Beverage-Cooling Awesomeness

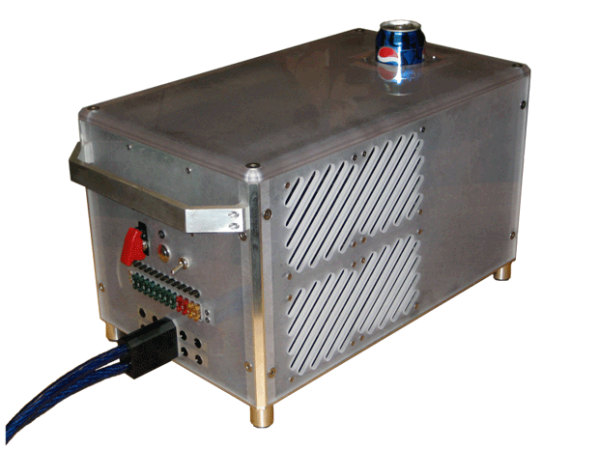
We’ve covered many thermoelectric beverage coolers in the past, but none come close to the insane power of the AbsolutZero. [Ilan Moyer] set out to design a beverage cooler that chills a drink from room temperature to 5 degrees Celsius as quickly as possible, and it looks like he succeeded. The AbsolutZero consumes around 2.5kW of power and runs 8 water-cooled thermoelectric modules to quickly chill a drink.

[Ilan] put his machinist skills to work and fabricated many custom parts for this build. He machined water blocks for each thermoelectric cooler out of solid copper which draw heat away from each thermoelectric cooler. He also fabricated his own bus bars to handle the 200A+ of current the system draws. To transfer heat from the beverage to the thermoelectric modules, he turned and milled a heat spreader that perfectly fits a can of any beverage.

[Ilan]’s design uses a closed-loop water cooling system and 4 radiators to dissipate all of the heat the system produces, which is quite a lot: thermoelectric modules are typically only 10-15% efficient. The whole design is buttoned up in a custom polycarbonate enclosure with a carrying handle so you can conveniently lug the massive setup wherever quickly chilled beverages are needed. Be sure to check out [Ilan]’s build photos to see his excellent machining work.

Thanks for the tip, [Stefan].

"Stomach Shot" lets you see through your zombie corpse.

“Stomach Shot” Halloween Costume

Halloween may have come and gone, but [Luis] sent us this build that you’ll want to check out. An avid Walking Dead fan, he put in some serious effort to an otherwise simple bloody t-shirt and created this see-through “stomach shot” gunshot wound.

The project uses a Raspi running the Pi Camera script to feed video from a webcam on the back of his costume to a 7″ screen on the front. [Luis] attached the screen to a GoPro chest harness—they look a bit like suspenders—to keep it centered, then built up a layer of latex around the display to hide the hard edges and make it more wound-like. Power comes from a 7.4V hobby Lipo battery plugged into a 5V voltage converter.

After ripping a small hole in the back of his t-shirt for the webcam and a large hole in the front for the screen, [Luis] applied the necessary liberal amount of fake blood to finish this clever shotgun blast effect.

IP camera hack

How To Backup And Restore Your IP Camera Firmware

[Filipe] has been playing around with custom firmware for inexpensive IP cameras. Specifically, he has been using cameras based on a common HI3815 chip. When you are playing around with firmware like this, a major concern is that you may end up bricking the device and rendering it useless. [Filipe] has documented a relatively simple way to backup and restore the firmware on these cameras so you can hack to your heart’s content.

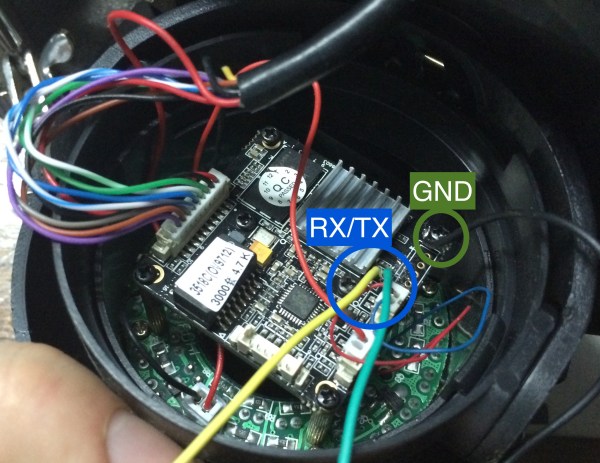
The first part of this hack is hardware oriented. [Filipe] cracked open the camera to reveal the PCB. The board has labeled serial TX and RX pads. After soldering a couple of wires to these pads, [Filipe] used a USB to serial dongle to hook his computer up to the camera’s serial port.

Any terminal program should now be able to connect to the camera at 115200 baud while the camera is booting up. The trick is to press “enter” during the boot phase. This allows you to log in as root with no password. Next you can reset the root password and reboot the camera. From now on you can simply connect to the phone via telnet and log in as root.

From here, [Filipe] copies all of the camera’s partitions over to an NFS share using the dd command. He mentions that you can also use FTP for this if you prefer. At this point, the firmware backup is completed.

Knowing how to restore the backup is just as important as knowing how to create it. [Filipe] built a simple TFTP server and copied the firmware image to it in two chunks, each less than 5MB. The final step is to tell the camera how to find the image. First you need to use the serial port to get the camera back to the U-Boot prompt. Then you configure the camera’s IP address and the TFTP server’s IP address. Finally, you copy each partition into RAM via TFTP and then copy that into flash memory. Once all five partitions are copied, your backup is safely restored and your camera can live to be hacked another day.

Retrotechtacular: How To Teletypewriter

This week, you’re going to learn the ins and outs of the AN/GRC-46 thanks to this army training film from 1963. What is the AN/GRC-46, you ask? Why it’s a complete mobile-tactical sheltered radio-teletypewriter rig capable of CW, voice, and teletype transmission.

The film covers the components that make up the AN/GRC-46, their functions, the capabilities of the system, and proper operation procedures. There’s a lot going on in the tiny 1400lb. steel shelter, so each piece will be introduced from the ground up.

You’ll become familiar with the voltage distribution system and the AN/GRC-46’s included accessories. This introduction will be followed by a short course in RF signal transmission and the Frequency-Shift Keying (FSK) that is performed by the modulator. The ranges of both the transmitter and receiver are discussed, along with the capabilities mentioned before: CW operation using the keyer, voice operation, teletype operation, and reperforation of teletype tape.

Finally, you’ll observe a seasoned operator make contact and send a teletype message with movements so careful and deliberate that they border on mesmerizing. When he’s not sending messages or taking long walks on the beach, he can usually be found cleaning and/or lubricating the transmitter filter.

Continue reading “Retrotechtacular: How To Teletypewriter”

Hackaday Printing Press Upgrade

There comes a time when your movable type becomes so over-used that you no longer get a legible print off of the printing press. For months now we’ve been at work on a new site design that maintains the essence of Hackaday while ejecting the 10-year-old dregs of the site. With each small success we’ve actually ruined ourselves on viewing the old design. It is with great relief that we unveil a site design built specifically for Hackaday’s needs.

The most notable change is in the content of our landing page. For ten years, loading Hackaday.com resulted in the most recent blog posts. The blog concept is proven, but provides little opportunity to highlight quality original content and information about upcoming events. We have tried the use of “sticky” posts but honestly I find them somewhat annoying. The solution to this is not immediately apparent, but I feel we have found the most efficient solution to our complex set of needs..

We have a lot of community members who participate in Hackaday in numerous ways. Changes found in this design are driven by that fact. The landing page will, from this point forward, be a somewhat more persistent collection of notable content from the blog, our community site (hackaday.io), as well as news regarding live events, store features, contest highlights, and more. Those hard-core fans — a label I also assign to myself — will find the same reading experience as always on the new blog URL: hackaday.com/blog.

Aesthetically, we hope that all will agree the new design far supersedes the old. There was a lot to fix, and the work of the Hackaday crew who designed and implemented this new interface is truly amazing. I hope you will take the time to leave a positive comment about their work. As with any major transition, there will be some bumps in the road. Right now most of our sidebar widgets have not been migrated but that and any other problems will be fixed soon.

In this design we strived to highlight the title and image of each post to immediately convey the core concepts of the projects shown here. The author by-line and comment count remain core to the presentation of the articles, and our link style continues to be immediately apparent in the body of each article. I think we have far surpassed the readability of the comments section, in addition to the content itself. We knew we could rebuilt it… we have the technology… long live articles worth reading.

UPDATE: We are working very hard to fix all the parts that don’t look quite right. Thanks for your patience!

UPDATE 2: Infinite scrolling isn’t a feature, it’s a regression. On our test server all the blog listings were paginated just like always. When our host, WordPress VIP, pushed live the infinite scrolling manifested itself. We’ve filed a ticket with them and are hoping for a solution shortly.

UPDATE 3: Infinite scrolling has now been fixed and the blog layout now paginates. The mouse-over zoom effect has been removed. Slideshow speed has been adjusted and if you hover you mouse over a feature it will pause the scrolling.