This may look like another DIY mechanical keyboard, but it’s hiding a secret. [Mx. Jack Nelson] has combined Halloween and keyboards in glorious, haunted fashion. Type a line, any line into this bad boy and you get a spooky, sort of cryptic response generated by AI.
Essentially, a Raspberry Pi Pico W does all the work, it handles the keyboard matrix, connects to Wi-Fi, sends the input to ChatGPT, and spits the response out on the screen wherever the cursor happens to be. Incidentally, it turns out [Mx. Jack Nelson] used ChatGPT to generate much of the CircuitPython code.
The layout is a custom 40% that is heavily influenced by the Akko 40%, with the Ctrl, Alt, and Win keys replaced by Ctrl, Cmd, and Opt. This was [Mx. Jack Nelson]’s first PCB, and you never forget your first. You don’t want to miss the demo video after the break.
Hackaday Supercon 2023 is almost upon us, and looking over the roster of fantastic talks gets us in the mood already. We hope that it has the same effect on you too.
Well now why would I want a single-button keyboard, you might be asking yourself. We say it all depends on how you build the thing, and how you program it. Would you believe that the MagiClick by [Modular] is capable of showing live weather information or the date and time, acting as animated dice, or being a stopwatch and Pomodoro timer? Now you’re beginning to understand.
Before we get much further, yes, this bad boy has two additional buttons on the sides. But the spirit of the thing is in the single large switch in the middle. It’s hiding beneath the 0.85″ 128×128 display, which is protected from pressure and fingerprints by that Pop-o-Matic bubble over the top. While the big button is the main operator used to access the function options, the side buttons are used as auxiliaries to exit and return to the home screen.
MagiClick is based on the ESP32-S3 and is designed to run on CircuitPython. In addition to everything else packed into this thing, there are blinkenlights and a small speaker inside, plus a GPIO expansion header around back. Everything is available on GitHub if you want to build your own.
Fibonacci numbers are seen in the natural structures of various plants, such as the florets in sunflower heads, areoles on cacti stems, and scales in pine cones. [HackerBox] has developed a Fibonacci Spiral LED Badge to bring this natural phenomenon to your electronics.
To position each of the 64 addressable LEDs within the PCB layout, [HackerBox] computed the polar (r,θ) coordinates in a spreadsheet according to the Vogel model and then converted them to rectangular (x,y) coordinates. A little more math translates the points “off origin” into the center of the PCB space and scale them out to keep the first two 5 mm LEDs from overlapping. Finally, the LED coordinates were pasted into the KiCad PCB design file.
An RP2040 microcontroller controls the show, and a switch on the badge selects power between USB and three AA batteries and a DC/DC boost converter. The PCB also features two capacitive touch pads. [HackerBox] has published the KiCad files for the badge, and the CircuitPython firmware is shared with the project. If C/C++ is more your preference, the RP2040 MCU can also be programmed using the Arduino IDE.
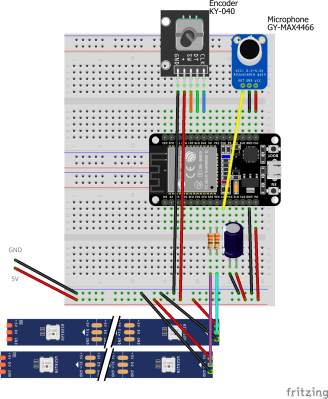
[Stephen Carey] wanted to spruce up his car with sound reactive LEDs but couldn’t quite find the right project online. Instead, he wound up assembling a custom bass reactive LED display using an ESP32.
The entirety of the build is minimal, consisting of a GY-MAX4466 electret microphone module, a KY-040 encoder for some user control and an ESP32 attached to a Neopixel strip. The only additional electronic parts are some passive resistors to limit current on the data lines and a capacitor for power line noise suppression. [Stephen] uses various enclosures from Thingiverse for the microphone, rotary encoder and ESP32 box to make sure all the modules are protected and accessible.
The magic, of course, is in the software, with the CircuitPythyon ulab library used to do the heavy lifting of creating the spectrogram and frequency filtering. [Stephen] has made the code is available on GitHub for those wanting to take a closer look.
It wasn’t very long ago that sound reactive LEDs used to be a heavy lift, requiring optimized FFT libraries or specialized components to do the spectrogram. With faster and cheaper microcontroller boards, we’re seeing many great projects, like the sensory bridge or Raspberry Pi driven LED spectrogram, that can now take spectrograms and Fourier transform calculations as basic infrastructure to build on top of them. We’re happy to see [Stephen] leverage the ESP32’s speed and various circuit Python libraries to create a very cool LED car hack.
Hackaday Berlin is just under two weeks away, and we’ve got news times three! If you don’t already have tickets, there are still a few left, so grab them while they’re hot. We’ll be rolling out the final full schedule soon, but definitely plan on attending a pre-party Friday night the 24th, followed by a solid 14-hour day of hacking, talks, and music on Saturday the 25th, and then a mellow Bring-a-Hack brunch with impromptu demos, workshops, and whatever else on Sunday from 10:30 until 14:00.
The Badge Round Two
Many Europeans weren’t able to make the flight to Supercon, so here’s your chance to get hands on Voja Antonic’s superb down-to-the-metal computer trainer-slash-retrocomputer on this side of the Atlantic. It’s been re-skinned for Berlin, with a couple hardware tweaks because nobody can leave a board revision alone, but it’s 100% compatible with the badge that took Supercon 2022 by storm.
If you want to read more about it, you should. We loved it, and so did the crowd. One of the coolest badge hardware hacks was a “punchcard” reader, but there was also a lot of work on the software side as well, and we got pull requests for most of the cool demos. If you’re coming, and if you’d like to start your badge hacking a bit early, you could start your research now.
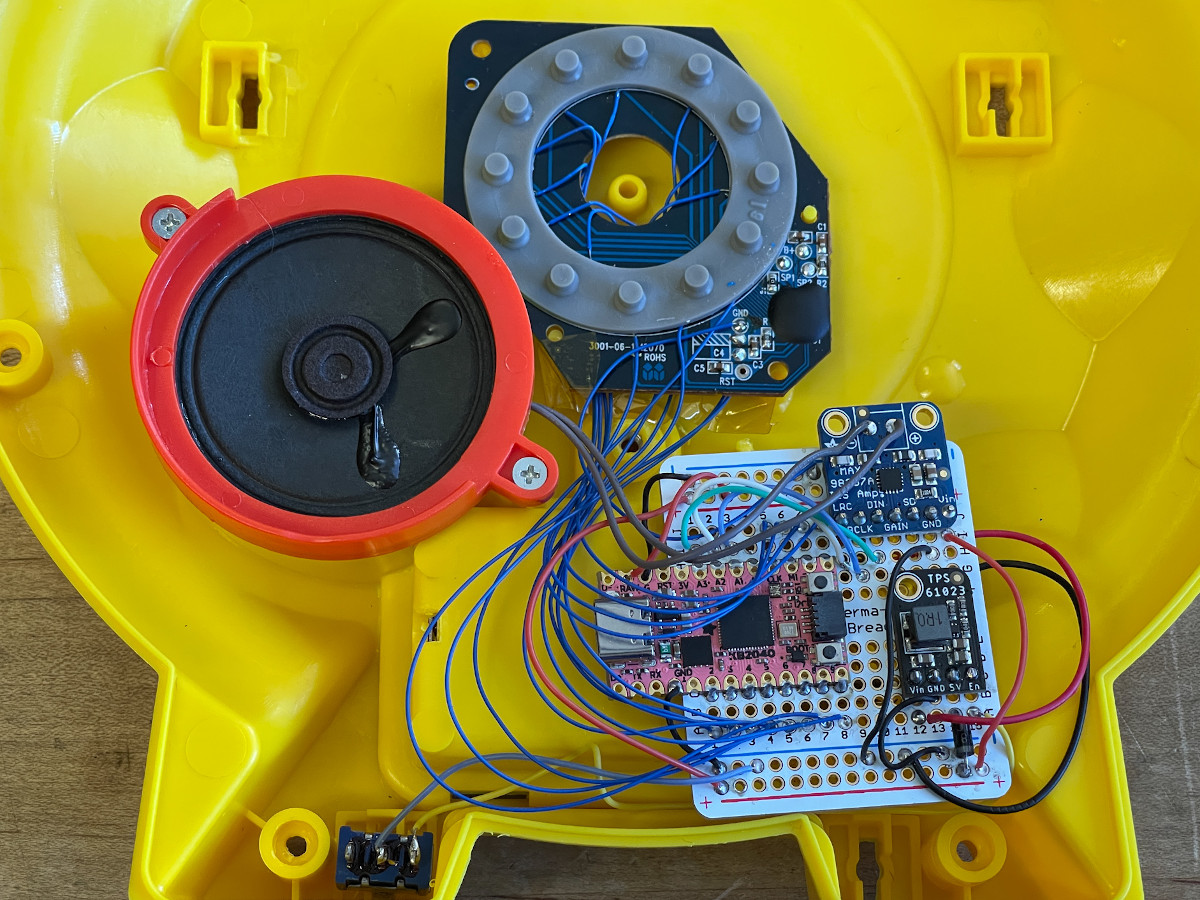
The Fisher-Price See ‘n Say was introduced back in 1964, and since then has helped teach countless children the different sounds made by farm animals. But what about our urban youth? If they’re going to navigate a concrete jungle, why not prepare them to identify the sound of a jackhammer or the chime that plays before an announcement goes out over the subway’s PA system?
That’s the idea behind this hacked See ‘n Say [John Park] put together for Adafruit. Now we should note up front that no vintage toys were sacrificed during the production of this gadget — it seems Fisher-Price (predictably) dropped the tiny record player these toys used to use for a cheap electronic board sometime in the 90s. A quick check with everyone’s favorite A-to-Z megacorp shows you can pick up one of these new-school models for around $25 USD.
The modern electronic version of the toy is easy to mod.
Cracking open the electronic version of the See ‘n Say reveals a circular PCB with a series of membrane buttons that are pressed by the mechanics of the spinning pointer. As it so happens, there are handy test points next to each of these buttons, which makes it simple to wire up to a microcontroller.
In this case, it’s Adafruit’s KB2040, which is connected to a MAX98357A amplifier board over I2S. A small boost converter module is used to wring 5 volts out of the toy’s pair of AA batteries. The original speaker is repurposed, though [John] adds a physical power switch to keep the boost converter from flattening the alkaline batteries when not in use.
On the software side, all you’ve got to do is load the MCU with your sounds and write a bit of code that associates them with the button being pressed on the PCB. [John] gets his city sounds from Freesound, a community-maintained database of Creative Commons Licensed sounds, and provides the CircuitPython code necessary to tie everything together.
The last step is the artwork. For this project, [Brian Kesinger] provided some swanky vintage-looking imagery that perfectly fits the See ‘n Say style. The art is available under the NonCommercial-ShareAlike Creative Commons license, so you’re free to use it in your own version. Though naturally, that assumes you’ve decided to use the same sounds as [John] — the beauty of this project is that you could easily load it up with whatever sounds you’d like Hacker Junior to learn. Possibly a well-known Australian YouTuber?
If anyone feels inclined to build a Hackaday-themed See ‘n Say based on this project, we’ve love to see it.