In this USB-C series, we’ve covered quite a bit of USB-C – things that are well known, things that should be better known, and a couple things that just appeared online for the first time. We’ve covered almost everything in some depth except USB Power Delivery. I’ve described the process a bit in the “Power” article, but that was mostly about how to use PD by simply buying the right solution. However, that’s not enough for a hacker. Let’s see if we can make our own PD trigger board. Continue reading “All About USB-C: Talking Low-Level PD”
An E-Ink Progress Bar For Your Unborn Child
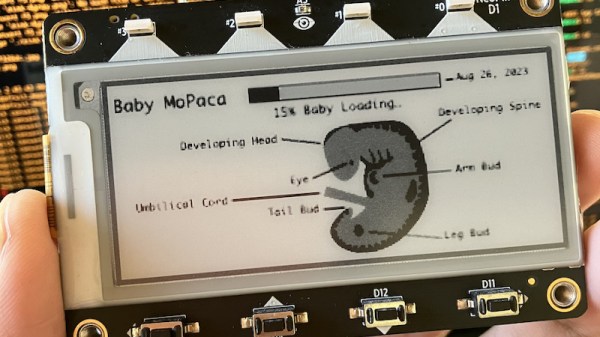
Having a child is a major milestone in a person’s life, and there’s a long list of things to get done before that little bundle of joy kicks and screams its way into the world. What better way to make sure you’ve still got time to paint the nursery and assemble the crib than to have an automated loading screen that shows just how far along the organic 3D printing process is?
This fetal development tracker was put together by [mokas] using Adafruit’s ESP32-S2 powered MagTag. As the name implies, the all-in-one electronic ink development board is designed so that it can be adhered to a metallic surface with integrated magnets. The idea is that you can pop a battery in the low-power device, stick it on your refrigerator, and have a regularly updated display of…well, whatever you want. Continue reading “An E-Ink Progress Bar For Your Unborn Child”
A Fun Low-Cost Start For Your Macropad Hobby
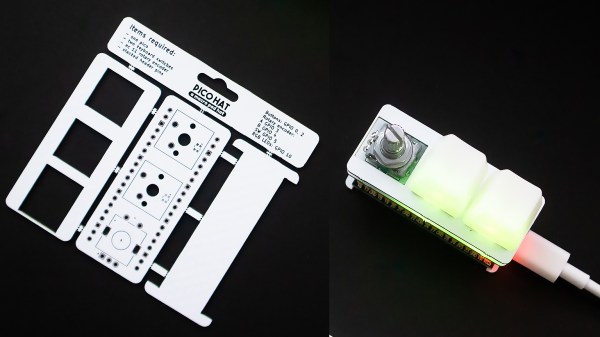
If you were ever looking for a small relaxing evening project that you could then use day-to-day, you gotta consider the Pico Hat Pad kit by [Natalie the Nerd]. It fits squarely within the Pi Pico form-factor, giving you two buttons, one rotary encoder and two individually addressable LEDs to play with. Initially, this macropad was intended as an under-$20 device that’s also a soldering practice kit, and [Natalie] has knocked it out of the park.
You build this macropad out of a stack of three PCBs — the middle one connecting the Pi Pico heart to the buttons, encoders and LEDs, and the remaining ones adding structural support and protection. All the PCBs fit together into a neat tab-connected panel — ready to be thrown into your favorite PCB service’s shopping cart. Under the hood, this macropad uses KMK, a CircuitPython-based keyboard firmware, with the configuration open-source. In fact everything is open-source, just the way we like it.
If you find yourself with an unexpected affinity for macropads after assembling this one, don’t panic. It’s quite a common side-effect. Fortunately, there are cures, and it’s no longer inevitable that you’ll go bananas about it. That said, if you’re fighting the urges to go bigger, you can try a different hand-wireable Pico-based macropad with three more keys. Come to find that one not enough? Here’s a 2×4 3D printable one.
Now, if you eventually find yourself reading every single Keebin’ With Kristina episode as soon as it comes out, you might be too far gone, and we’ll soon find you spending hundreds of dollars building tiny OLED screens into individual keys — in which case, make sure you document it and share it with us!
Continue reading “A Fun Low-Cost Start For Your Macropad Hobby”
2022 Hackaday Supercon: Joe [Kingpin] Grand Keynote And Workshops Galore
It’s our great pleasure to announce that Joe [Kingpin] Grand is going to be our keynote speaker at the 2022 Supercon!
If you don’t know Joe, he’s a hacker’s hacker. He’s behind the earliest DEFCON electronic badges, to which we can trace our modern #badgelife creative culture. He was at the l0pht when it became the most publicly visible hackerspace in the USA, at the dawn of what we now think of as cybersecurity. And moreover, he’s a tireless teacher of the art of hardware hacking.
Joe’s talk at DEFCON 22 about reverse engineering PCBs on a hacker budget is on our top-10 must watch playlist, and his JTAGulator debug-port enumeration device has been present at the start of countless hacking sessions. But again, it’s his enthusiasm for creating, his inspiring “what if I poke at this thing this way?” attitude, and overwhelming hacker spirit that make Joe a long-overdue speaker at Supercon! Continue reading “2022 Hackaday Supercon: Joe [Kingpin] Grand Keynote And Workshops Galore”
2022 Cyberdeck Contest: IP00-Minus, A Daring Wearable
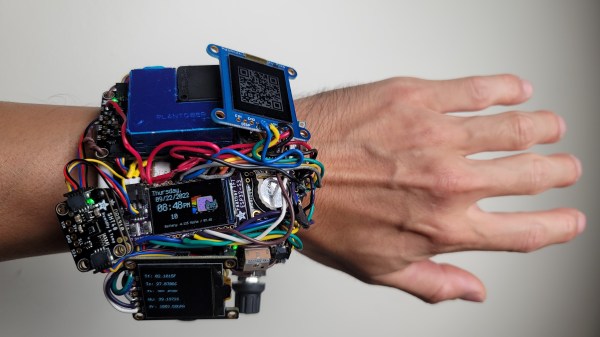
[Rob]’s IP00-Minus watch stands out on the Cyberdeck Contest project list page; it’s clear he decided to go a different path than most other hackers, and we can certainly see the advantages. For example, if there’s no case, there’s no need to redesign it each time you want to add a module — and [Rob] has added many, many modules to this watch.
Picking between regular LCD, memory LCD, and OLED displays can be a tricky decision to make when planning out your gadget, so he just added all three. The CircuitPython firmware initially attempted to resist the trio, but was eventually defeated through patching. Jokes aside, we can almost feel the joy that [Rob] must have felt after having put this watch on for the first time, and this project has some serious creative potential for a hacker.
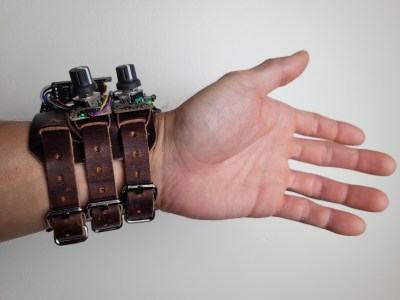 [Rob] has been focusing on day-to-day usability first and foremost, with pleasantly clicky encoders, impeccable performance of its watch duty, unparalleled expandability, and comfortable wrist fit — it provides a feeling no commercial wearable could bring.
Out of the myriad of sensors, the air quality sensor has been the most useful so far, letting him know when to open a window or leave a particularly crowded place. The ESP32-S3 powered watch has been quite a playground for [Rob]’s software experiments, and given the sheer variety of hardware attached, we’re sure it will bring unexpected synergy-driven ideas. Plus, it’s no doubt a great conversation starter in nerd and non-nerd circles alike.
Good things happen when you give hackers a wrist-worn watch full of sensors, whether it’s a particularly impressive event badge, a modified firmware for an open source smartwatch, or a custom piece that pushes the envelope of DIY hardware.
TRS-80 Model 100 Gets Arduino Heart Transplant
When [Stephen Cass] found himself with a broken Tandy TRS-80 Model 100 portable computer, the simplest solution was to buy another broken one and make one working computer from two non-working computers. However, this left him with a dilemma — what to do with the (now even more) broken one left over?
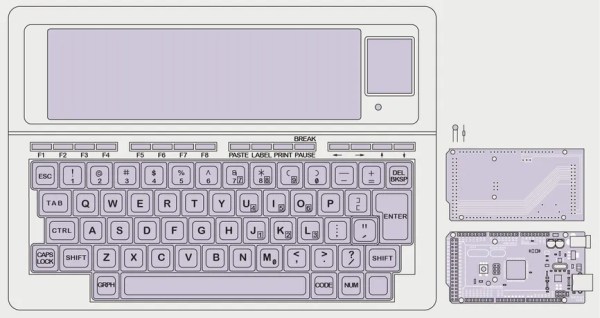
Naturally, he did what a lot of us would do and used modern hardware to interface with the original parts that still work. In this case it meant replacing the motherboard with an Arduino Mega 2560.
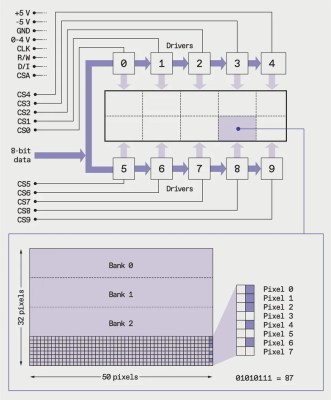
Luckily, the Model 100 has a substantial fanbase and there’s a lot of helpful information available online, including the detailed service manual, that helped [Stephen] to understand how to drive the unusual display. The LCD has a resolution of 240×64 pixels, which are broken down into eight zones of 50×32 pixels, and two zones of 40×42 pixels. Each zone is then further divided into four banks, eight pixels tall, so that each column of eight pixels corresponds to a single byte.
Every one of the ten zones is controlled by an individual HD44102 driver IC, connected to a 30-bit wide bus for selecting the correct chip, bank and column.
With the Arduino handling the data, the old LCD still needed a -5 V supply for contrast and an RC filter to smooth out the PWM signal [Stephen] is using to adjust the viewing angle.
With the new interface, [Stephen] is able to access all of the pixels on the original display, and to use modern graphics libraries such as displayio. With the display issue solved, he intends to use a separate Teensy 4.1 to connect with the keyboard matrix and provide a VT100 terminal interface.
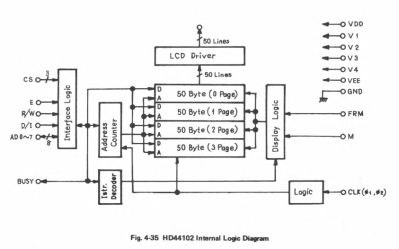
Upcycling old, broken hardware can be a lot of fun and is always educational. Understanding why certain design decisions were made at a time when the engineering trade-offs were different can lead to insights that are directly relevant to modern designs when resources get tight. In this case, the quirky LCD drivers were a response to making the display of text as efficient as possible, so as not to overburden the processor.
The TRS-80 computers are ripe for hacking, with their “built-for-service” designs, and we’ve featured a few in the past. Some have replaced the motherboard with something newer, like [Stephen], whereas others have also replaced the display, or connected them to the cellphone network.
Have you found new ways to get old hardware working? Tell us in the comments below or send us a message on the Hackaday tips line.
Thanks to [nb0x0308] for the tip!
Mechanical Color Picker Types Hex Codes For You
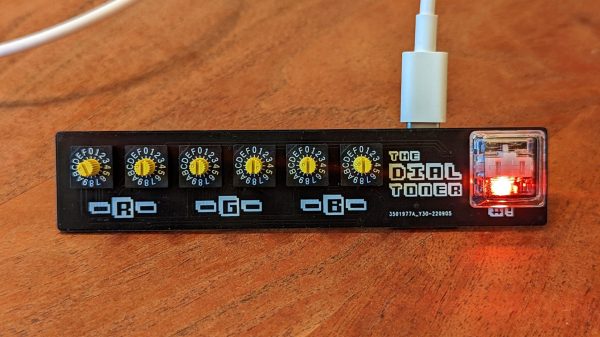
Hex codes are a simple, unambiguous way to designate colors in digital media. However, going from a color in your head to a hex code can be difficult for the unpracticed. [Guy Dupont] built a little gadget by the name of the Dial Toner to do it for him (Nitter).
The Dial Toner has two dials for each color channel – Red, Green, and Blue. By turning the dials, one can choose a given color in the 8-bit RGB color space, and that color is then displayed on the device’s included RGB LED. Once selected, the button can be pressed to type the selected color’s hex code into a text box. The Dial Toner runs on a Xiao RP2040 microcontroller board, and is coded in CircuitPython.
[Guy] hopes to sell the Dial Toner on Etsy in future, and is even working on a CMYK version for print addicts. We’ve featured [Guy]’s work here before, too, in the form of his extended-play HitClips cartridges. Video after the break.
Continue reading “Mechanical Color Picker Types Hex Codes For You”


