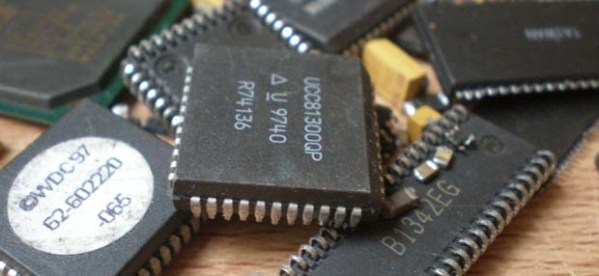
Voice Controlled Chess Robot

voice-controlled-chess-robot

[Ben Yeh] wrote in to tell us about this voice-controlled chess robot he built along with three others as a final project for their Georgia Tech ECE 4180 Embedded Systems Design class.

To handle the speech recognition they grabbed an EasyVR board. This is a fine solution because it prevents the need for a computer to process voice commands (remember, it’s an embedded systems class). This concept breaks down when you find out that the desktop computer next to the robot is where the chess game is running. Perhaps that can be moved to a microcontroller by the next set of 4180 students.

The robot arm portion of the project is shown off well in the clip after the break. Normally we’d expect to see stepper motors driving the axes of a CNC machine but in this case they’re using servo motors with built-in encoders. The encoders are i2c devices which feed info back to the main controller. There was a parts ordering snafu and the z axis motor doesn’t have an encoder. No problem, they just added a distance sensor and a reflector to measure the up and down movement of the claw.

Continue reading “Voice Controlled Chess Robot”

Everything You Need To Know To Make A Laser Engraver From Scrap

make-a-laser-engraver-from-scrap

Check out the Einstein head which [Sebastian Müller] etched on the cover of his calculator using a laser engraver he made from scratch. We think he did a great job with the build, but we’re even more impressed with the work he put into sharing the techniques he used to salvage and repurpose all the components. It’s a perfect resource that should be pretty easy to adapt to different model/manufacturer source hardware.

He used an old scanner and an old printer for the bulk of the parts. These both originally included stepper-motor actuated gantries, which pull together to form the x and y axes in his Frankenstein Laser Engraver. As the parts came together he started in on the control electronics which include a couple of EasyDriver stepper motor boards and an Arduino.

At this point he took the machine for a test-run, attaching a marker to the carriage to use it as a pen plotter. After putting in a solid performance at this [Sebastian] moved on to adding in the laser diode. He covers how to drive the diode, as well as focal point alignment in great detail. It seems like his webpage post has the same content as the Instructable linked above but we wanted to leave the link just in case.

Raspberry Pi Housed Inside A Computer Monitor

rpi-inside-a-computer-monitor

Behold, something we’ve always wanted. [Matthieu] mounted his Raspberry Pi board inside of a computer monitor. His work makes for the cheapest smart-TV modification we can possibly think of.

The image above shows the monitor’s driver board on the left, with the Raspberry Pi mounted on the back plastic cover. [Matthieu] used a short HDMI cable to connect the two. The HDMI connector plugs into the RPi directly. The other end has been cut off and the wires soldered to the DVI pins on the monitor’s PCB. This is not a problem since HDMI and DVI use electrically identical protocols. The one thing missing is audio. But if you were pulling off the same hack with a device that had HDMI (like a television) it would just be a matter of also soldering in the audio connections. While he had his iron hot he also connected a 5V source from the monitor board to the RPi. He completes his hack by cutting a slot in the monitor case to allow access to the SD card.

We’ve long wanted an XBMC computer we could velcro to the back of the TV and the RPi turned out to be just the thing. Now we’ve got to consider cracking open the TV to replicate this internalization hack!

HDMI Color Processing Board Used As An FPGA Dev Board To Mine Bitcoins

fpga-eeColor-bitcoin-mining

The blue board seen above is the guts of a product called the eeColor Color3. It was designed to act as a pass-through between your television and HDMI source device. It boasts the ability to adjust the color saturation to suit any viewing conditions. But [Taylor Killian] could care less about what the thing was made for, he tore it open and used the FPGA inside for his own purposes.

The obvious problem with this compared to a proper dev board is that the pins are not all broken out in a user-friendly way. But he got his hands on it for free after a mail-in-rebate (you might find one online for less than $10 if you’re lucky) and it’s got an Altera Cyclone IV chip with 30k (EP4CE30F23C6N) gates in it so he’s not complaining. The first project he took on with his new toy was to load up an open source Bitcoin mining program. The image above shows it grinding away at 15 megahashes per second while consuming only 2.5 watts. Not bad. Now he just needs to make a modular rack to hold a mining farm.

Beautiful Modded NES For The 25th Anniversary Of Mega Man, Plus Bonus Interview!


Today I had the pleasure of interviewing [PlatinumFungi] about this fantastic NES mod he did. This year is the 25th anniversary of the first Mega Man video game. Unhappy with the current celebratory actions of capcom, [PlatinumFungi] set out to create something he felt was worthy. He managed to pull that off pretty well.

The NES you can see in the video is fantastic looking. It has a beautiful shiny automotive finish, supplied by [Custom NES Guy] and a pixel perfect backlit Mega Man on top. Additional enhancements are stylized decals on the front of the game bay and matching labels on the sides and back. The cartridge is even illuminated while it is in place.

Check out some pictures after the break!

Continue reading “Beautiful Modded NES For The 25th Anniversary Of Mega Man, Plus Bonus Interview!”

Trashed LCD Monitor Turned Into A Light Box

light-box-from-lcd-monitor[x2jiggy] was given a non-functioning LCD monitor. He made a small effort to trouble-shoot its inability to display anything on the screen but couldn’t get it working again. When that failed he decided to repurpose it as light box instead of just sending it off for recycling.

Monitor manufacturers put in a lot of effort to make sure the back lights distribute brightness as evenly as possible and that will make this a pretty good light box. [x2jiggy] starts off the conversion by removing the case. While it was off he gave it a new coat of paint. The LCD panel, the PCB that drives it, and the light diffuser sheets were all removed, leaving just the backlight and inverter PCB. A bit of probing with the multimeter and he even found a place to connect a toggle switch to actuate the inverter’s power. You can see the silver switch he added to the bezel in the image above. The full build video is embedded after the break.

Continue reading “Trashed LCD Monitor Turned Into A Light Box”

RedBull Creation Contest Entries Revealed!

rbc

The Redbull Creation contest is underway and the entries into the first stage have been submitted. As a judge, it is my duty to watch every single one of these and cast my vote on who should continue to round two. I won’t be sharing my vote with you, but I thought you might enjoy watching the entries yourself! Remember that the rules for this round were simply “build something amazing using this box full of cool stuff we sent you.”.

I have to say that the entrants really kicked things up a notch this year. These projects are so amazing that choosing 3 to be the “most awesome” is proving quite difficult. I’d also like to take yet another opportunity to mention that we think that this is such a wonderful method of promotion. RedBull could be making sappy commercials about polar bears drinking their beverage, but instead, they are encouraging people to make AWESOME things(yes, they have commercials too). Other companies should take note, like Oreo did!

You can view all the entries here.