The Vectrex was a unique console from the early 1980s. Developed by a company you’ve probably never heard of—Smith Engineering—it was put into production by General Consumer Electronics, and later sold by Milton Bradley. It was an outright commercial failure, but it’s remembered for its sharp vector display and oddball form factor.
The Vectrex was intended for tabletop use in a home environment. However, [Jeroen Domburg], also known as [Sprite_tm], decided to set about building a portable version. This wasn’t easy, but that just makes the development process a more interesting story. Thankfully for us, [Sprite_tm] was kind enough to tell the tale at the 2023 Hackaday Supercon.
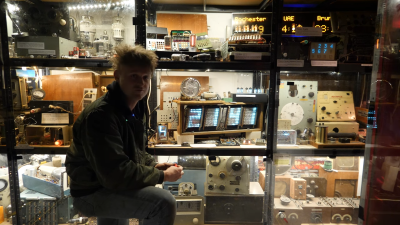
[Sam Battle] is no stranger to these pages, nor is his Museum is not Obsolete. The museum was recently gifted an enormous Nixie tube created by Dalibor Farný, a B-grade (well, faulty) unit that could not be used in any of their commissioned works but was perfectly fine for displaying in the museum’s retro display display. This thing is likely the largest Nixie tube still being manufactured; although we read that it’s probably not the largest ever made, it’s still awesome.
Every hacker should have their own museum.
It is fairly simple to use, like all Nixie tubes, provided you’re comfortable with relatively high DC voltages, albeit at a low current. They need a DC voltage because if you drive the thing with AC, both the selected cathode digit plate and the anode grid will glow, which is not what you need.
Anyway, [Sam] did what he does best, clamped the delicate tube in some 3D printed mounts and hooked up a driver made from stuff he scraped out of a bin in the workshop. Obviously, for someone deeply invested in ancient electromagnetic telephone equipment, a GPO (British General Post Office, now BT) uniselector was selected, manually advanced with an arcade-style push button via a relay. This relay also supplies the ~140 V for the common anode connection on the Nixie tube. The individual digit cathodes are grounded via the uniselector contacts. A typically ancient GPO-branded snubber capacitor prevents the relay contacts from arcing over and ruining the display unit. There isn’t much more to it, so if you’re in the Ramsgate, UK, area anytime soon, you can pop in and play with it for yourself.
The software and hardware worlds have overlaps, and it’s worth looking over the fence to see if there’s anything you missed. You might’ve already noticed that we hackers use PCB modules and devboards in the same way that programmers might use libraries and frameworks. You’ll find way more parallels if you think about it.
Building blocks are about belonging to a community, being able to draw from it. Sometimes it’s a community of one, but you might just find that building blocks help you reach other people easily, touching upon common elements between projects that both you and some other hacker might be planning out. With every building block, you make your or someone else’s next project quicker, and maybe you make it possible.
Sometimes, however, building blocks are about being lazy.
Over at the University of Wisconsin’s Undergraduate Projects Lab (UPL) there’s been a way to check whether this room is open for general use by CS undergraduates and others practically for most of the decades that it has existed. Most recently [Andrew Moses] gave improving on the then latest, machine vision-based iteration a shot. Starting off with a historical retrospective, the 1990s version saw a $15 camera combined with a Mac IIcx running a video grabber, an FTP server and an HP workstation that’d try to fetch the latest FTP image.
As the accuracy of this system means the difference between standing all forlorn in front of a closed UPL door and happily waddling into the room to work on some projects, it’s obvious that any new system had to be as robust as possible. The machine vision based version that got installed previously seemed fancy: it used a Logitech C920 webcam, a YOLOv7 MV model to count humanoids and a tie into Discord to report the results. The problem here was that this would sometimes count items like chairs as people, and there was the slight issue that people in the room didn’t equate an open door, as the room may be used for a meeting.
Thus the solution was changed to keeping track of whether the door was open, using a sensor on the two doors into the room. Sadly, the captive-portal-and-login-based WiFi made the straightforward approach with a reed sensor, a magnet and an ESP32 too much of a liability. Instead the sensor would have to communicate with a device in the room that’d be easier to be updated, ergo a Zigbee-using door sensor, Raspberry Pi with Zigbee dongle and Home Assistant (HA) was used.
One last wrinkle was the need to use a Cloudflare-based tunnel add-on to expose the HA API from the outside, but now at long last the UPL door status can be checked with absolute certainty that it is correct. Probably.
Featured image: The machine vision-based room occupancy system at UoW’s UPL. (Credit: UPL, University of Wisconsin)
What does it take to make decent tires for your projects? According to this 3D printed tire torture test, it’s actually pretty easy — it’s more a question of how well they work when you’re done.
For the test, [Excessive Overkill] made four different sets of shoes for his RC test vehicle. First up was a plain PLA wheel with a knobby tread, followed by an exact copy printed in ABS which he intended to coat with Flex Seal — yes, that Flex Seal. The idea here was to see how well the spray-on rubber compound would improve the performance of the wheel; ABS was used in the hopes that the Flex Seal solvents would partially dissolve the plastic and form a better bond. The next test subjects were a PLA wheel with a separately printed TPU tire, and a urethane tire molded directly to a PLA rim. That last one required a pretty complicated five-piece mold and some specialized urethane resin, but the results looked fantastic.
Non-destructive tests on the tires included an assessment of static friction by measuring the torque needed to start the tire rolling against a rough surface, plus a dynamic friction test using the same setup but measuring torque against increasing motor speed. [Overkill] threw in a destructive test, too, with the test specimens grinding against a concrete block at a constant speed to see how long the tire lasted. Finally, there was a road test, with a full set of each tire mounted to an RC car and subjected to timed laps along a course with mixed surfaces.
Results were mixed, and we won’t spoil the surprise, but suffice it to say that molding your own tires might not be worth the effort, and that Flex Seal is as disappointing as any other infomercial product. We’ve seen other printed tires before, but hats off to [Excessive Overkill] for diving into the data.
[Sebastian Mihai] is a prolific programmer and hacker with a particular focus on retrocomputing and period games, and this latest hack, adding new gameplay elements to Capcom’s Street Fighter II – Champion Edition, is another great one. [Sebastian] was careful to resist changing the game physics, as that’s part of what makes this game ‘feel’ the way it does, but added some fun extra elements, such as the ability to catch birds, lob barrels at the other player, and dodge fire.
The proposed AAPowerLink transmission line between Darwin (Australia) and Singapore. (Credit: Sun Cable)
Recently Singapore’s Energy Market Authority (EMA) granted Sun Cable conditional approval for its transmission line with Australia. Singapore has been faced for years now with the dilemma that its population’s energy needs keep increasing year-over-year, while it has very little space to build out its energy-producing infrastructure, least of all renewables with their massive footprints. This has left Singapore virtually completely dependent on natural gas-burning thermal plants. Continue reading “Singapore’s 4300 Km Undersea Transmission Line With Australia Clears Regulatory Hurdle”→