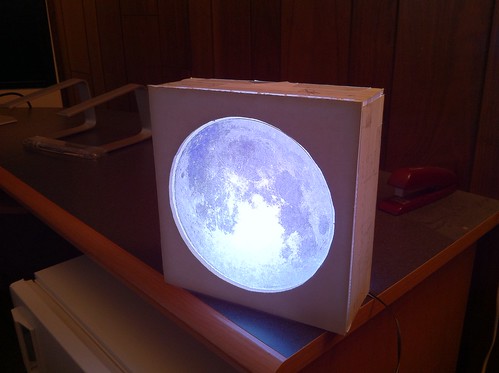
Didn’t See The Lunar Eclipse, Make One!

Lunar eclipse simulator

Last night was a lunar eclipse meaning that most people would have been out gazing up at the sky watching it. For some the eclipse evaded them using cloud cover, but instead of giving up, they got innovative. [Garrett] decided to build a moon simulator to keep track of the eclipse using a few spare parts and some quick code. The parts that were required for this project includes an Arduino UNO, a singular ShiftBrite Shield, a ShiftBar, ChronoDot and a Satellite Module 001. This is the perfect project for the Arduino to be used in because he had to toss it together very quickly and it is meant to be a temporary solution. If he were to make this permanent, we would guess that he would make a smaller and more cost effective version of the electronics.  He documents his experience on Macetech.com in more detail and the outcome is pretty amazing. Code is yet to be posted but hopefully it is forthcoming soon as well as a video of the simulator working.

Bi-color LED Matrix Clock Uses Point-to-point Construction

[Daniel] wanted his child to stay in bed until a semi-decent time each morning. The problem is the kid doesn’t know how to read a clock, so [Daniel] built him a clock. Yeah, doesn’t make much sense to us either, but we’ve used our own shaky premises for projects so who are we do judge?

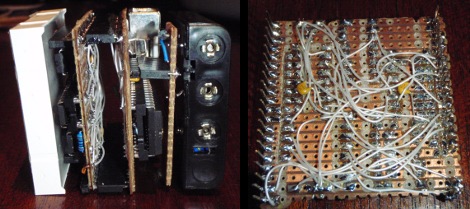
He used a bi-color 8×8 LED matrix as the clock display. What caught our eye is the point-to-point soldering he used for the three strip boards that make up the device. Note the use of a drill-bit to break the traces when needed. Each board has its own purpose; the matrix drive, the logic board, and the power board. A PIC 18F4550 lets [Daniel] control the clock via USB, and takes care of lighting up the hour as a red number when it’s time to sleep, and a green one when it’s okay to arise. There’s a flashing pixel for seconds, and a binary readout of minutes along the bottom.

We’ve asked [Daniel] to post a schematic and an image of the clock face when displaying the time. No word yet but we’ll keep our eye on it. In the mean-time, check out this clock that uses an RGB 8×8 LED matrix.

Add Explosive Power To Your Hi-five

It’s been a while since there was any advances made in the field if celebratory high-five-ing. [Eli Skipp] just finished her contribution, moving the art forward by adding the sound of explosions to her high-fives. Ignore the audio sync problems in the video after the break to see her Arduino and Wave Shield based offering. It uses a flex sensor to detect a high-five and has a bit of software filtering to avoid misfires when moving your hand or setting it down on a flat surface. It may look a bit ridiculous right now because of the bulk, but we could see a sleeker, cheaper version hitting toy and novelty stores everywhere.

Less useful than a sign-language translating glove, but easier to code and some would say more fun too. Continue reading “Add Explosive Power To Your Hi-five”

Alarm And Wake Up Light

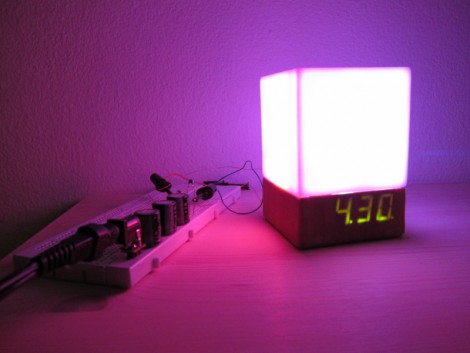
On the shortest day of the year wouldn’t it be nice to wake up to a bright room? This alarm clock with an integrated wake-up light is one way to do just that. It has some nice features, like a wood veneer that allows the seven-segment display to shine through, but hides it when the display is turned off. There’s also a feature to adjust the color based on ambient room temperature (another way to dwell on how cold it is in your bedroom).

A CC1101 RF chip came to the party, but we can’t figure out what it’s purpose is in this circuit. If you can shed some light on its involvement please do so in the comments.

[Thanks Eric]

Clamp Sensor Power Monitoring

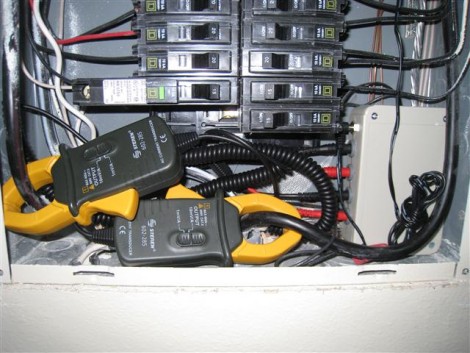
[Bill Porter] has joined in the pursuit of an inexpensive yet effective way to monitor his power usage. He calls his project the Not So Tiny Power Meter, and shared both his successes and follies involved in seeing it through to implementation. There are problems; sizing issues with enclosures and his PCB, issues with noise when measuring low-current signals with the clamps, and even some wireless communications issues. But it looks like he’s got the system running despite these hurdles. Right now it streams data wirelessly so that he can display the current energy consumption, but he plans to add Google Power Meter functionality next.

We’ve seen commercial units using the same sensing principles that have been hacked to show data online.

This Hack Really Pushes Our Buttons

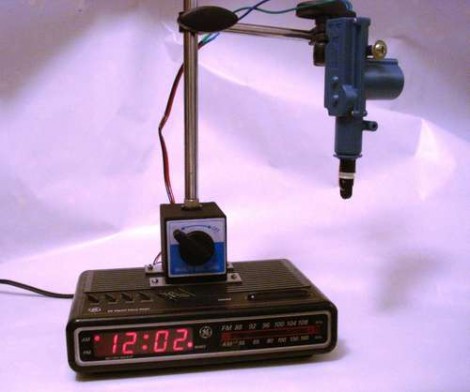
Yep, if you’ve got a button that needs pushing, this is one way to do it. [Travis] combined an old alarm clock with a car door-lock actuator and minimal logic circuitry to make this happen. When the alarm time is reached, the adjustable actuator comes down to press whichever button has been placed under it. In the video after the break he’s using it to schedule the start time for his Roomba, make his coffee, heat his pizza, or pointlessly press the clock’s own snooze button (classic). We think this is just begging to be used with a Rube-goldberg setup, perhaps to topple to dominos that other robot took the time to set up. Oh wait… that shows up in the video too. Fantastic!

Continue reading “This Hack Really Pushes Our Buttons”

Macro Photos Using An Under-light Rig

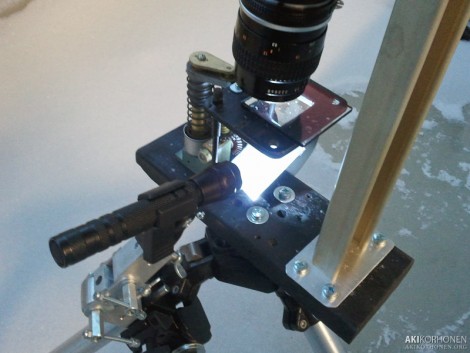
[Aki Korhonen] wanted to tighten up his macro photography setup. He already had the camera for the job, but wanted a fully adjustable target platform that he could easily light. What he came up with is a jig to hold the camera and fine tune the subject of each photo. It uses a frame with a piece of glass whose distance from the lens is adjusted by turning a knob. Below the glass a reflective surface redirects light from an LED flashlight up through the platform, lighting the snowflakes he’s shooting. A fixed LED source is in the plans for the next rendition.

Take a look at the overview of his setup in the quick clip after the break.

Continue reading “Macro Photos Using An Under-light Rig”