Preserving Locomotives With 3D Laser Scanning And 3D Printing

[Chris Thorpe] is a model railroading aficionado, and from his earliest memories he was infatuated with the narrow gauge locomotives that plied their odd steel tracks in northern Wales. Of course [Chris] went on to create model railroads, but kit manufacturers such as Airfix and Hornby didn’t take much interest in the small strange trains of the Ffestiniog railway.

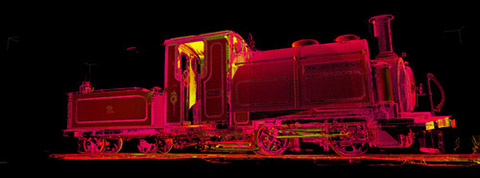
The days where manufacturing plastic models meant paying tens of thousands of dollars in tooling for injection molds are slowly coming to an end thanks to 3D printing, so [Chris] thought it would be a great idea to create his own models of these small locomotives with 3D laser scanners and high quality 3D printers.

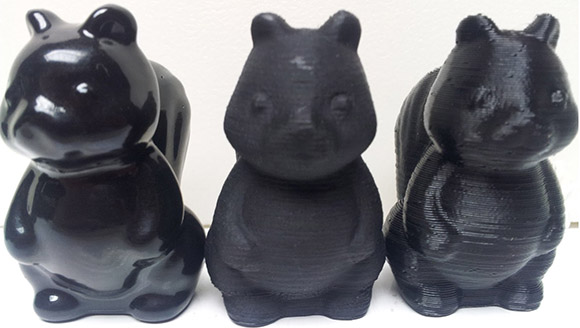
[Chris] started a kickstarter to fund a 3D laser scanning expedition to the workshop where the four oldest locomotives of the Ffestiniog railway were being reconditioned for their 150th anniversary. The 3D printed models he’s able to produce with his data have amazing quality; with a bit of paint and a few bits of brass, these models would fit right in to any model railway.

Even better than providing scale narrow gauge engines to model railway enthusiasts around the world is the fact that [Chris] has demonstrated the feasibility of using modern technology to recreate both famous and underappreciated technological relics in plastic for future generations. There’s a lot that can be done with a laser scanner in a railway or air museum or [Jay Leno]’s garage, so we’d love to see more 3D printed models of engineering achievements make their way onto Kickstarter.

More Acetone-vapor Polishing Experiments

acetone-vapor-polishing-experiments

If you’re thinking of trying the acetone-vapor polishing process to smooth your 3D printed objects you simply must check out [Christopher’s] experiments with the process. He found out about the process from our feature a few days ago and decided to perform a series of experiments on different printed models.

The results were mixed. He performed the process in much the same way as the original offering. The skull seen above does a nice job of demonstrating what can be achieved with the process. There is a smooth glossy finish and [Christopher] thinks there is no loss of detail. But one of the three models he tested wasn’t really affected by the vapor. He thinks it became a bit shinier, but not nearly as much as the skull even after sending it through the process twice. We’d love to hear some discussion as to why.

There is about eight minutes of video to go along with the project post. You’ll find it after the jump.

Continue reading “More Acetone-vapor Polishing Experiments”

Soluble Support Structure Can Be Used With Any Extruder-based 3D Printer

One of the issues with extruder-based 3D printing is that it can be very difficult to print objects that have voids in them. You simply must have something to deposit the soft material on until it has a chance to harden. [Matt] found a solution which should work for any extruder-based printer (with one caveat we’ll get to in a minute). He prints a support structure out of HIPS then later dissolves it using Limonene. The image on the left shows the object soaking for 24 hours. The final project is seen beside it.

The only real problem with this technique is that it requires a second extruder. Since printers build objects by layers, switching material in a single print head isn’t an option. HIPS stands for High-Impact Polystyrene. It extrudes at the same temperature as the ABS (235C) and adheres well to a heated bed kept at 115C. ABS will be unaffected by the hydrocarbon solvent Limonene, except for the residual smell of citrus.

3D Printed HOG Drive

3d-printed-hog-drive

Here’s a 3D printed Hemispherical Omnidirectional Gimballed Drive system which you can make at home. That’s a mouthful which is why it is commonly referred to as a HOG drive. Never heard of one? Well you need to keep up with your Hackaday because about 20 months ago we featured this amazing robot project that uses one. The design is a tricycle orientation with the HOG drive as the only powered ‘wheel’. But it’s not really a wheel, it’s a half-sphere (a hemisphere which is not pictured above but attaches to the motor spindle) which can provide thrust in any direction depending on which way the motor is spinning a how the gimbal bracket is oriented.

Unfortunately [Dan] isn’t showing off a vehicle that is powered by the device just yet. But from what we’ve seen in the demo after the jump it is fully functional. His target project for the system is a line-following robot which we hope to post as a follow-up when he reaches that goal.

Continue reading “3D Printed HOG Drive”

Making A Violin Mold With A 3D Printer

IMG104

Some people see 3D printers as expensive and slow devices for replicating bracelets, whistles, and Yoda heads. Until the world transitions to a plastic octopus-based economy, those of us with 3D printers will have to find something useful for these tools. Bayesian Empiritheurgy out of Halifax, Nova Scotia wanted to do something useful with their 3D printer for the large-scale, distributed hackerspace competition, The Deconstruction. They ended up using their printer to make molds for a paper mache violin, and ended up being fairly successful at it.

The basic idea behind their paper mache violin was to create a plastic mold for exactly half a violin body. This block was covered in newspaper drenched in wheat paste. Once the paste was dry, the violin half was pulled off the mold and another half was created. These were stitched and glued together, resulting in a violin body.

The bridge, tailpiece, tuners, and fingerboard were 3D pprinted and held together with epoxy. The epoxy flexed a lot, so every time a string was tuned it threw out the tuning of the other three strings. In the video after the break, you can check out the paper mache and plastic violin being played. It’s not much for the eyes or ears, but everyone had fun, and the team completed the proof of concept for a fiberglass or carbon fiber violin we’d suggest they try next.

Continue reading “Making A Violin Mold With A 3D Printer”

Giving 3D Printed Parts A Shiny Smooth Finish

No matter how good a 3D printer gets, you’re always going to have visible print layers. Even with very high-quality prints with sub-0.1mm layer height, getting a shiny and smooth finish of injection molded plastic is nearly impossible. That is, of course, until you do some post-print finishing. [Neil Underwood] and [Austin Wilson] figured out a really easy way to smooth out even the jankiest prints using parts you probably already have lying around.

The technique relies on the fact that ABS plastic and acetone don’t get along together very well. We’ve seen acetone used to smooth out 3D printed objects before – either by dunking the parts in an acetone bath or brushing the solvent on – but these processes had mixed results. [Neil] and [Austin] had the idea of using acetone vapor, created in a glass jar placed on top of a heated build plate,

The process is pretty simple. Get a large glass jar, put it on a heated build plate, add a tablespoon of acetone, and crank the heat up to 110C. Acetone vapor will form in the jar and react with any printed part smoothing out those layers. The pic above shows from right to left a 3D printed squirrel at 0.35 mm layer height, 0.1 mm layer height – the gold standard of high-end repraps – and another print with 0.35 layer height that was run through a vapor bath for a few minutes. Amazing quality there, and cheap and easy enough for any 3D printer setup.

You can check out the tutorial video after the break along with a video showing exactly how dangerous this is (it’s not, unless you do something very, very dumb).

Continue reading “Giving 3D Printed Parts A Shiny Smooth Finish”

Laser Kaleidoscope Uses More 3D Printing And Less Scavenging

laser-kaleidoscope

At first we thought that [Pete Prodoehl] was using the wrong term when calling his project a Laser Kaleidoscope. We usually think of a kaleidoscope as a long tube with three mirrors and some beads or glass shards in one end. But we looked it up and there’s a second definition that means a constantly changing pattern. This fits the bill. Just like the laser Spirograph from last week, it makes fancy patterns using spinning mirrors. But [Pete] went with several 3D printed parts rather than repurposing PC fans.

In the foreground you can see the potentiometers which adjust the motor speeds. The knobs for these were all 3D printed. He also printed the mounting brackets for the three motors and the laser diode. A third set of printed parts makes mounting the round mirrors on the motor shaft quite easy. All of this came together with very tight tolerances as shown by the advanced shapes he manages to produce in the video after the break. Continue reading “Laser Kaleidoscope Uses More 3D Printing And Less Scavenging”