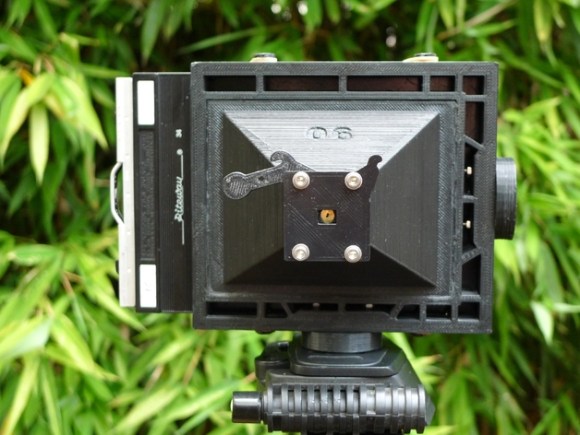
Using Electrical Conduit For A 3D Printer Frame

electrical-conduit-for-cnc-frame

We’re always on the lookout for parts that can be source locally and that don’t cost a bundle. This hack fits both of those criteria. [Lee Miller] came up with a way to use steel electrical conduit as a 3D printer frame. He recently finished building the device seen above, and has been showing it off at Solid State Depot, a Hackerspace in Boulder, Colorado where he is a member.

Look closely at the corners of the frame in this image and you’ll see the 3D printed parts that make up the clamping mechanism. Each has three components that screw together. The two gaps in between each have a rubber ‘O’ ring. When the plastic clamps are screwed together they squeeze the rings which hold the electrical conduit firmly. This also has the side benefit of dampening vibrations.

It’s certainly easy to find this type of conduit which is sold at every home store (and most hardware stores). Just make sure that you check that a piece is straight when you pick it out. The SCAD files for the parts are available from his Github repo.

Continue reading “Using Electrical Conduit For A 3D Printer Frame”

3D Printed Hand-cranked Digital Computer

What a beautiful thing it is to see this digital computer in action. [Chris Fenton] did an amazing job of designing and printing this mechanical digital computer. If you’re interested in one to call your own check out the source files he published this week.

[Chris’] design inspiration came from some research into Victorian Era mechanical looms. He adjusted the concept to build a punch card reader, starting with a capacity of three holes and moving to this design which can read ten holes. It provides just enough bits to address all three of the counters pictured above. Program the computer by inserting a punch card that is the size of a business card and crank away. The video below shows the process from afar… hopefully he’ll post a follow-up video with closer views of each piece in action.

This isn’t his first basic computing machine. Check out the electromechanical version from last year.

Continue reading “3D Printed Hand-cranked Digital Computer”

An Interview With Shapeways

shape

It seems [Andrew] is an up and coming historian for the world of 3D printing. We’ve seen him interview the creator of Slic3r, but this time around he’s headed over to Eindhoven, Netherlands to interview the community manager for Shapeways, [Bart Veldhuizen].

Unlike the RepRaps, Ultimkers, and Makerbots, Shapeways is an entirely different ecosystem of 3D printing. Instead of building a machine that requires many hours of tinkering, you can just upload a model and have a physical representation delivered to your door in a week. You can also upload objects for others to buy. Despite these competing philosophies, [Bart] doesn’t see Shapeways as encroaching on the homebrew 3D printers out there; they serve different markets, and competition is always good.

Unfortunately, [Andrew] wasn’t allowed to film on the Shapeways factory floor. Proprietary stuff and whatnot, as well as a few certain ‘key words’ that will speed your customer support request up to the top of the queue.

As for how Shapeways actually produces hundreds of objects a day, [Andrew] learned that individual orders are made in batches, with several customer’s parts made in a single run. While most of the parts made by Shapeways are manufactured in-house, they do outsource silver casting after making the preliminary positive mold.

As for the future, a lot of customers are asking about mixed media, with plastic/nylon combined with metal being at the top of the list. It’s difficult to say what the future of 3D printing will be, but [Bart] makes an allusion to cell phones from 10 years ago. In 2003, nobody had smartphones, and now we have an always-on wireless Internet connection in our pockets. Given the same rate of technological progress, we can’t wait to see what 3D printing will be like in 10 years, either.

60,000 RPM Vacuum Powered Rotary Tool Was 3D Printed

vacuum-powered-rotary-tool

The whining of the turbines in the 3D printed pneumatic rotary tool might make your teeth hurt. When [Axodus] tipped us off about it he mentioned it sounded like a 747 taking off. But we hear a dentist’s drill when watching the demo video.

[Richard Macfarlane] published his design if you want to try building one for yourself. But you will need to do some machining in addition to printing the enclosure and the pair of turbines. The shaft of the tool needs to fit the bearings precisely. It accepts a center blue spacer with a red turbine on either side. This assembly is encapsulated in the two-part threaded blue body which has a flange to friction fit with the shop vacuum hose. The business end of the machined shaft was designed and threaded to accept the collet from a Dremel or similar rotary tool.

We wonder how much work it would be to re-engineer this to act as a PCB drill press?

Continue reading “60,000 RPM Vacuum Powered Rotary Tool Was 3D Printed”

Smoothing PLA Printed Parts

We’ve seen a few advances in the finishing processes of 3D prints over the last few months that result in some very attractive parts that look like they were injection molded. Smoothing ABS prints is now a necessary skill for anyone looking to produce professional parts, but those of us using PLA for our RepRaps have been left in the cold. After some experimentation, the guys over at protoparadigm have come up with a way to smooth out those PLA prints, using the same technique and a chemical that’s just as safe as acetone.

Instead of acetone, the guys at protoparadigm are using tetrahydrofuran, or THF, as a solvent for PLA. Other PLA solvents aren’t friendly to living organisms or are somewhat hard to obtain. THF has neither of these qualities; you still need to use it in a well ventilated area with nitrile gloves, but the same precautions when using acetone or MEK still apply. It’s also easy to obtain, as well: you can grab some on Amazon, even.

The process for smoothing PLA prints with THF is the same as smoothing ABS prints with acetone. Just suspend the print in a glass container, pour in a tiny amount of the solvent, and (gently) heat it. The evaporated solvent will smooth all the ridges out of the print, leaving a shiny and smooth surface. You can, of course, hand polish it by dedicating a lint-free cloth and a pair of gloves to the task.

GoPro Panning Time-lapse With Ikea Egg Timer

ikea-go-pro-time-lapse

[Sebastian Schuster’s] weekend project was to turn his GoPro camera into a panning time-lapse rig. You’ll notice it’s in a waterproof case as his demo for the hack was an outdoor session and the weather’s not the best right now. He put this together quickly, easily, and on-the-cheap thanks to the Ikea egg timer and a 3D printed camera mount.

An egg timer is a popular choice for panning hacks. Any type that includes a dial that spins on the horizontal axis will do. The Ikea Stam egg timer has that raised handle which is easily gripped by the 3D printed part. You can get a hold of the design files through a web service which is new to us. [Sebastian] used Tinkercad for the design, and shared it in his project post linked above.

This is just one more tool in his collection of camera hacks. A couple years back we looked at a motorized pan and tilt platform he built.

Continue reading “GoPro Panning Time-lapse With Ikea Egg Timer”

Delta-type 3D Printer Built Using Extruded Rails

delta-3d-printer-extruded-rail

From concept to completion this delta-style 3D printer (translated) is a sweet build. The quality of the work comes as no surprise. We’re familiar with [Arkadiusz Spiewak’s] craftsmanship from that H-bot type 3D printer we saw from him back in April.

Planning started off with a render of the design using Blender 3D. Not only did this give him a 3D model to use as his building reference, but the animation framework allowed him to test the kinematics of the design. After ordering an extruded rail system and assembling the frame he found the pillars had too much flex to them due to the rails used on the top and bottom. The fix was to mill a top and bottom plate to stiffen things up. After testing out the motors and the extruder head mount he made one final design change. He exported his Blender design as dxf files to cut and weld an aluminum replacement for the extruder mounting platform. As you can see in this video, the preliminary results are looking good!

Continue reading “Delta-type 3D Printer Built Using Extruded Rails”