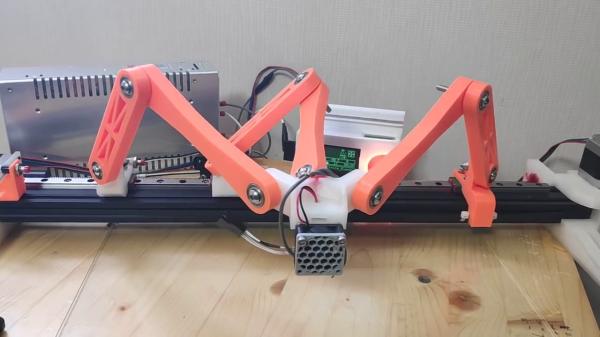
Art of 3D printer in the middle of printing a Hackaday Jolly Wrencher logo

3D Printering: Getting Started Is (Still) Harder Than It Needs To Be

Stop me if this sounds familiar. You are interested in 3D printing but lacked a clear idea of what was involved. Every time you looked into it, it returned to the back burner because after spending your limited free time researching, it still looked like a part time job just to get up to speed on the basics. If this is you, then you’re exactly the reason I say the following: despite 3D printing being more accessible than ever, getting started remains harder than it needs to be. It’s a shame, because there are smart, but busy, people just waiting for that to change.

A highly technical friend and colleague of mine had, off and on, been interested in 3D printing for some time. He had questions, but also didn’t have a very good understanding of the basics because it’s clumsy and time-consuming to research something when one doesn’t even know the right terms.

I told him to video call me. Using my phone I showed him the everyday process, from downloading a model to watching the first layer get put down by the printer. He had researched getting started before, but our call was honestly the first time he had ever seen a 3D printer’s actual workflow, showing hands-on what was involved from beginning to end. It took less than twenty minutes to give him a context into which he could fit everything else, and from where he felt comfortable seeking more information. I found out later, when I politely inquired whether he had found our talk useful, that he had ordered a Prusa MK3S printer later that same day.

It got me thinking. What from our call was important and useful, but not available elsewhere? And why not?

Continue reading “3D Printering: Getting Started Is (Still) Harder Than It Needs To Be”

Blister Pack With Jet Fighter Toy Is A Business Card

In the world of business cards, it seems that for some people a white rectangle of card just doesn’t cut it any more. A card isn’t simply a means to display your contact details, instead it can be a way to show off your work and demonstrate to the world your capabilities. For [agepbiz] those are the skills of a 3D design specialist, so what better way to proceed than by distributing a 3D-printed example of his work? How to render that into a business card? Put it in a retail-style blister pack, of course. Take a look at the video below the break.

It’s an interesting process to follow, because  there are certainly readers who will have toyed with the idea of selling their work, and this makes an attractive way to display a small assembly while still keeping it safe from damage. The toy – a small 3D-printed jet fighter with working swing wings that’s a masterpiece in itself – is laid on a backing card and a custom blister is glued over it. The manufacture of the printed backing card with a CNC card cutter is shown, followed by that of the blister with a custom SLA-printed mould being used to vacuum-form a sheet of clear plastic. Surprisingly the whole is assembled with just a glue stick, we’d have expected something with a bit more grab. The result is a professional-looking blister packed product of the type you wouldn’t bat an eyelid over if you saw it in a shop, and one of those things that it’s very useful to have some insight into how one might be made..

It’s possible this card might be a little bulky to slip in your wallet, but it’s hardly the only novelty card we’ve brought you over the years. Some of our most recent favourites run Linux or play Tetris.

Continue reading “Blister Pack With Jet Fighter Toy Is A Business Card”

Procedurally Generating Marble Runs

Marble runs are somehow incredibly soothing to play with and watch, with the gentle clack of the marbles and the smooth, predictable motion. Sadly for some, they never quite got enough time to enjoy them in school. Luckily, [Fernando Jerez] is here with a way to procedurally generate marble runs you can actually play with!

[Fernando] does a great job of explaining the mathematical process of generating the marble runs, using the method of random space filling curves. A maze is drawn on a grid, with points on the grid acting as walls. Each grid cell is then given a value based on points on its corners, and these values then translate into directions of travel. This creates a path through the maze. Scaling this path along the Z-axis, and then replacing the path with a marble track creates the run. It’s then a simple matter of adding a shaft to the loop with a screw to drive marbles back to the top of the run, and you’re all set!

With both animated explanations and actual 3D printed marble runs, [Fernando] demonstrates the concept well. We’d love to print a few runs of our own, and we can’t help but think there’s other great applications for the mathematics behind this concept. If you’re wise to it, drop it in the comments. Otherwise, check out these exquisite creations we’ve featured before!

DIY Monochrome LCD Hack Doesn’t Go As Planned

Manufacturers of low-cost 3D printers that use the masked stereolithography (MSLA) process are able to build their machines so cheaply because they’re using repurposed smartphone or tablet LCD panels to mask off the UV backlight. Considering the quality you get out of even the entry-level MSLA resin printers, we certainly aren’t complaining about this bit of thrift. But as [Jan Mrázek] explains in a recent blog post, there’s certainly room for improvement.

The problem is that those repurposed LCD panels are, as you’d expect, color displays. After all, even the bottom of the barrel mobile devices moved away from monochrome displays decades ago. But in this case, that’s not what you really want. Since the printer operates on a single wavelength of light, the color filters inside the LCD are actually absorbing light that could otherwise be curing the resin. So an MSLA printer with a monochrome screen would use less energy and print faster. There’s only one problem: it’s not very easy to find high-resolution monochrome displays in the year 2020.

So [Jan] decided to see if he could take a replacement screen intended for his Elegoo Mars MSLA printer and convert it from color to monochrome by disassembling it and manually removing the color filters. If this sounds a bit crazy, that’s because it is. Turns out taking apart an LCD, modifying its internal layout, and putting it all back together in working order is just as difficult as you’d think.

But it was still worth a try. [Jan] pulls the display apart, removes the liquid crystals, scrapes off the color filters, and then puts it all back together again. His first attempt got him a monochrome display that actually worked, but with debris trapped inside the screen, the image was too poor to be useful. He tried again, this time trying harder to keep foreign material out of the crystals. But when he got it back together a second time, he found it no longer functioned. He thinks it’s possible that his attempt to clean up the inside of the display was too aggressive, but really there are so many things that could go wrong here it’s hard to pin down just one.

Long story short, manually creating monochrome displays for low-cost MSLA printers might not be a viable option. Until a better solution comes along, you might be interested in seeing some slightly less invasive ways of improving your resin print quality.

A 3D-Printed Bass Guitar

A visit to the hardware hacking area of the recent Hacker Hotel hacker camp in the Netherlands would bring plenty of interesting pieces of hardware to delight the eye. Among them though was one to delight the ear, and on hearing it we asked whether its creator could put it online so we could share it with you. [XDr4g0nX]’s bass guitar is 3D printed, and while it still contains some non-3D-printed parts it’s still a very effective musical instrument.

This is not the first model he’s produced, he told us, an earlier guitar was entirely 3D-printed but proved not to be rigid enough. Tuning such an instrument merely resulted in its bowing out of shape and becoming unplayable as well as out of tune. This one has hefty steel bars for rigidity, though it uses a Yamaha neck rather than 3D-printing the whole instrument.  The main body of the instrument has to be printed in multiple parts and epoxied together, which he’s done without some of the ugly seams that sometimes disfigure prints of this nature.

Having heard it, we’d be hard pressed to tell it wasn’t a more traditional guitar, but then again since people have made guitars from all kinds of scrap it’s not the first home build we’ve encountered.

$80 Dual Extrusion Kit Might Work With Your 3D Printer

[Teaching Tech] sprung about $80 or a kit to add dual extrusion to his 3D printer, plus another $20 for an accessory kit. He did get it to work well, but it wasn’t without problems which he covers in the video below.

The design of the head uses a servo to swing two hot ends to — in theory — the same point. Each hot end has an ooze shield, so you don’t need to deal with that in your G-code by building a priming tower. However, there are some requirements for your printer.

Continue reading “$80 Dual Extrusion Kit Might Work With Your 3D Printer”

OpenAstroTracker Turns Your DSLR Into An Astronomy Instrument

If you want to take beautiful night sky pictures with your DSLR and you live between 15 degrees and 55 degrees north latitude you might want to check out OpenAstroTracker. If you have a 3D printer it will probably take about 60 hours of printing, but you’ll wind up with a pretty impressive setup for your camera. There’s an Arduino managing the tracking and also providing a “go to” capability.

The design is over on Thingiverse and you can find code on GitHub. There’s also a Reddit dedicated to the project. The tracker touts its ability to handle long or heavy lenses and to target 180 degrees in every direction.

Continue reading “OpenAstroTracker Turns Your DSLR Into An Astronomy Instrument”