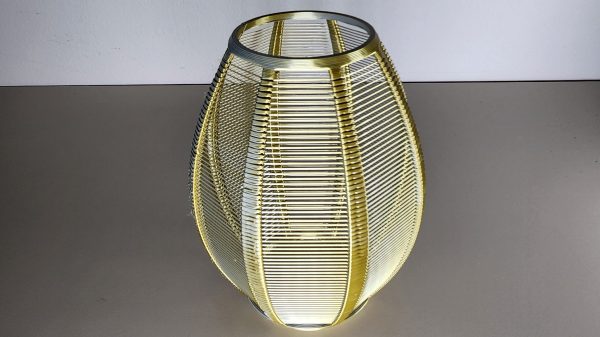
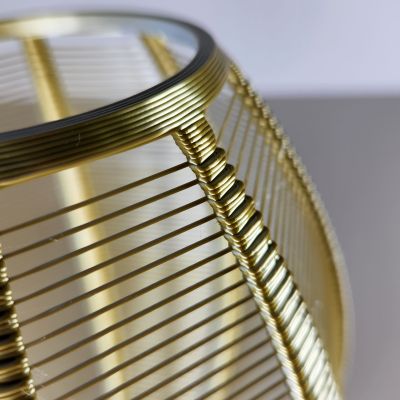
3D-Printed Desiccant Container Exploits Infill

Desiccant is common in 3D printing because the drier plastic filament is, the better it prints. Beads of silica gel are great for controlling humidity, but finding a porous container for them that is a convenient size is a little harder. 3D printing is a generally useful solution for custom containers, but suffers from a slight drawback in this case: printing dense grills or hole patterns is not very efficient for filament-based printers. Dense hole patterns means lots of stopping and starting for the extruder, which means a lot of filament retractions and longer print times in general.

The green model is used as a modifier to the orange container (of which only the corners are left visible here)

[The_Redcoat]’s solution to this is to avoid hole patterns or grills altogether, and instead print large wall sections of the container as infill-only, with no perimeter layers at all. The exposed infill pattern is dense enough to prevent small beads of desiccant from falling through, while allowing ample airflow at the same time. The big advantage here is that infill patterns are also quite efficient for the printer to lay down. Instead of the loads of stops and starts and retractions needed to print a network of holes, infill patterns are mostly extruded in layers of unbroken lines. This translates to faster print speeds and an overall more reliable outcome, even on printers that might not be as well tuned or calibrated as they could be.

To get this result, [The_Redcoat] modeled a normal, flat-walled container then used OpenSCAD to create a stack of segments to use as a modifier in PrusaSlicer. The container is printed as normal, except where it intersects with the modifier, in which case those areas get printed with infill only and no walls. The result is what you see here: enough airflow for the desiccant to do its job, while not allowing any of the beads to escape. It’s a clever use of both a high infill as well as the ability to use a 3D model as a slicing modifier.

There’s also another approach to avoiding having to print a dense pattern of holes, though it is for light-duty applications only: embedding a material like tulle into a 3D print, for example, can make a pretty great fan filter.

If You Can Measure It, You Must Display It

When can you be sure that you’re logging enough data? When you’re logging all of the data! Of course there are exceptions to the above tongue-in-cheek maxim, but it’s certainly a good start. Especially since data storage on, for instance, an SD card is so easy and cheap these days, there’s almost no reason to not record most every little bit of data that your project can produce. Even without an SD card, many microcontrollers have enough onboard flash, or heck even RAM, to handle whatever you throw at them. The trick, then, is to make sense out of that data, and for me at least, that often means drawing pretty pictures.

I was impressed this week by a simple but elegant stepper motor diagnosis tool hacked together by [Zapta]. Essentially, it’s a simple device: it’s a “Black Pill” dev board, two current sensors, an EEPROM for storing settings, and a touchscreen. Given that most of us with 3D printers rely on stepper motors to get the job done, it’s certainly interesting to do some diagnostics.

By logging voltage and current measurement on each phase of a stepper motor, you can learn a lot about what’s going on, at least if you can visualize all that data. And that’s where [Zapta]’s tool shines. It plots current vs motor speed to detect impedance problems. Tuning the current in the first place is a snap with Lissajous patterns, and it’ll track your extruder’s progress or look out for skipped steps for you across an entire print job. It does all this with many carefully targeted graphs.

I was talking to [Niklas Roy] about this, and he said “oh check out my hoverboard battery logger“. Here we go again! It sits inline with the battery and logs current and voltage, charging or discharging. Graphs let you visualize power usage over time, and a real-time-clock lets you sync it with video of using the hoverboard to help make even more sense of the data.

So what are you waiting for? Sensors are cheap, storage is cheap, and utilities to graph your data after the fact are plentiful. If you’re not logging all the relevant data, you’re missing out on some valuable insights. And if you are, we’d love to see your projects! (Hint, hint.)

3D Printer Control Board Packs A Raspberry Pi Compute Module 4

Traditionally, 3D printer control boards have used simplistic 8-bit microcontrollers to command the stepper drivers and ultimately move the machine where it needs to go. Newer boards have switched over to 32-bit microcontrollers, but they’re still relatively limited computationally. Because of this, a Raspberry Pi running OctoPrint is usually used to provide more complex features such as remote management and live video.

Looking to combine these different devices into a single all-in-one board, [pkElectronics] developed the Sigmoid S7P. With an STM32 microcontroller, TMC2209 stepper drivers, a Raspberry Pi Compute Module 4, and plenty of room for expansion, it promises to be a drop-in upgrade for essentially any 3D printer running on an open source firmware that could be ported over.

An earlier concept for the Sigmoid

According to [pkElectronics], the idea for the Sigmoid had been floating around for several years, but never got off the ground due to the difficulties in dealing with the SO-DIMM interface used by previous iterations of the Compute Module. But with the switch to smaller and denser connector for the CM4, the board finally started to take shape.

Whether you just used it as a convenient way to integrate OctoPrint into your printer, or want to get into something more advanced like Klipper, the Sigmoid S7P looks like a very exciting project. [pkElectronics] says they are considering producing the board commercially if there’s interest, so if you want one of these for your own custom 3D printer build, let them know.

This DIY Split-Flap Display Does Both Time And Weather

With little more than four economical stepper motors, a Raspberry Pi Zero, and a 3D printer, [Thomas Barlow] made himself an awfully slick Smart Flip Clock that can display not only the time, but also weather data as well. This is done by adding a few extra graphics to some of the split-flaps, so numbers can also be used to indicate temperature and weather conditions succinctly. Displaying the time has to do without a colon (so 5:18 displays as 518), but being able to show temperature and weather conditions more than makes up for it.

32 degrees and a mix of sun and cloud

According to the project’s GitHub repository, it looks as though each split-flap has thirteen unique positions. The first ten are for numerals 0 through 9, and the rest are either blank, or used to make up a few different weather icons with different combinations. A Python script runs on the Raspberry Pi and retrieves weather data from OpenWeather, and the GPIO header drives the display via four geared stepper motors and driver boards. The rest of the hardware is 3D printed, and [Thomas] helpfully provides CAD models in STEP format alongside the STL files.

The basic design of a split-flap display is really quite versatile, and enterprising hackers have been putting delightful new twists on them for years. There has been a split-flap display used as a kind of flip-book animation, and we’ve also had the pleasure of seeing an entire Tarot deck used for esoteric, automated readings.

An Attempt At 3D Printing A Hybrid Rocket Engine

Liquid fuelled engines are throttleable and monstrously powerful, but highly complex. Meanwhile, solid rocket engines are simple and cheap, but once you light them, they’re going full-bore until burnout. Hybrid rocket engines offer perks from both worlds, with simple solid fuel and the ability to throttle down by regulating oxidizer flow. Naturally, [Integza] decided he should try and 3D print one.

The build came about somewhat by accident, as the 3D printed casing of one of [Integza’s] liquid-fuelled rockets continued burning once the fuel was turned off. This prompted the realization that he could 3D print rocket fuel, and simply supply oxygen, creating a hybrid rocket. Thus ensued much experimentation, going so far as to create custom sugar-loaded resin for more power and experimenting with ABS as a potential fuel.

Most of the rockets self-destructed within a few seconds and thrust was minimal, but the basic concept should be a goer. As always, [Integza] is struggling with the thermal limitations of plastics, but we fully expect he’ll one day get to a flight ready engine. His previous experiments show he certainly doesn’t give up. Video after the break.

Continue reading “An Attempt At 3D Printing A Hybrid Rocket Engine”

Print Your Own Wireless 2.1 Speaker System

Buying a set of stylish bookshelf speakers is a perfectly reasonable thing to do, and remains legal in most free countries around the world. However, if you really want to impress with a pretty pair to crank out your tunes, you might consider designing and printing your own. [EH_Design] did just that with a stylish 2.1 Bluetooth audio system.

The 2.1 designation refers to the use of two stereo channels plus a subwoofer. It’s a popular setup as human perception means it’s not as necessary to have stereo imaging for low frequency content. The build uses a Texas Instruments TPA3116D2 Class D amplifier with a Bluetooth input, with the efficient design allowing the build to be more compact without the need for as much heat sinking. A 24 V supply delivering up to 3 A is specified, providing plenty of volume when needed. The speakers themselves consist of 3″ drivers mounted in attractive 3D-printed shells, with the “subwoofer” consisting of a pair of 5″ woofers paired up in a special isobaric enclosure that enables a smaller volume to acoustically act like one double the size.

The result is a futuristic-looking set of bookshelf speakers that remind us of some of the fancier high-end sets often seen in hi-fi magazines. Of course, if 3D printing enclosures isn’t enough for you, you could always consider 3D printing the actual speaker driver itself. When you do, let us know how it goes!


Texture Adds Stiffness To 3D Parts

[Stefan] is always looking for a way to make stronger and better 3D prints. His latest experiments involve using a texture on thin plastic parts to increase stiffness. You can see the texture pattern in the banner above and the video below.

While a lot of people looked at IdeaMaker’s new texturing feature as something for cosmetics, [Stefan] thought of sheet metal products that often use bead patterns to increase stiffness and strength. Can patterned plastic be stiffer than ordinary printed plastic? Turns out, the answer is yes.

Continue reading “Texture Adds Stiffness To 3D Parts”