Change The Jingle In Your Makita Charger Because You Can

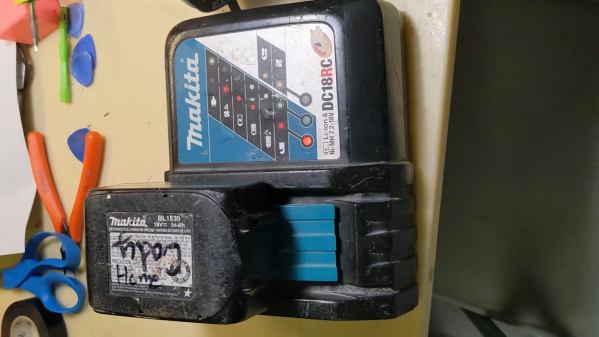
Lots of things beep these days. Washing machines, microwaves, fridge — even drill battery chargers. If you’re on Team Makita, it turns out you can actually change the melody of your charger’s beep, thanks to a project from [Real-Time-Kodi].

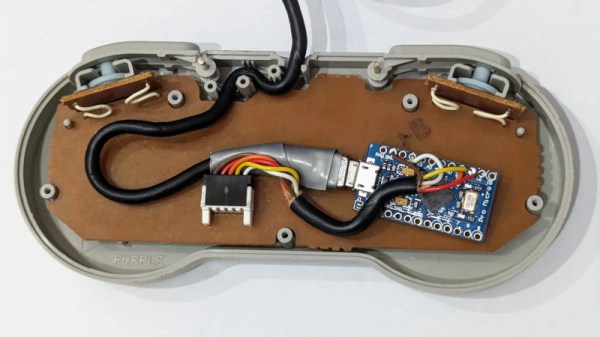
The hack is for the Makita DR18RC charger, and the implementation of the hack is kind of amusing. [Real-Time-Kodi] starts by cutting the trace to the buzzer inside the charger. Then, an Arduino is installed inside the charger, hooked up to the buzzer itself and the original line that was controlling it. When it detects the charger trying to activate the buzzer, it uses this as a trigger to play its own melody on the charger instead. The Arduino also monitors the LEDs on the charger in order to determine the current charge state, and play the appropriate jingle for the situation.

It’s an amusing hack, and one that could certainly confuse the heck out of anyone expecting the regular tones out of their Makita charger. It also shows that the simple ways work, too — there was no need to dump any firmware or decompile any code.

Continue reading “Change The Jingle In Your Makita Charger Because You Can”

Arduino Provides No Fuss SNES-To-USB Conversion

Even for those of us who are fans of retrocomputing, it’s fair to say that not everyone plays their old-school games on real old-school hardware. The originals are now fragile and expensive, and emulators are good enough that if the gaming experience is all you’re after there’s little point in spending all that cash.

There’s one place in which the originals sometimes have the edge though, the classic controllers are the personal interface with the game. So when [Dome] found a SNES controller in an Akibahara shop, of course he picked it up. How to make it talk to a PC? Tuck an Arduino Pro Micro inside it, of course!

What we like about this project is that instead of ripping out the original electronics it instead hooks the Arduino board onto the original serial interface. We might have made a Nintendo socket to USB box to keep the original cable, but either way, the SNES (technically Super Famicom, because it’s a Japanese market unit) original stays true to its roots. The Arduino polls the clock line at the speed of the console, reads the result, and translates it to a USB interface for the computer. There’s a full run-down of the code and how it was made, should you wish to try.

Of course, if you don’t always have a PC handy, you could also put the whole computer in the controller.

Don’t Panic: A Cooperative Bomb Defusing Game

[Heath Paddock] wanted to confound his friends with a game that mimics an escape room in a box. About six months after starting, he had this glorious thing completed. It’s a hardware version of a game called Keep Talking and Nobody Explodes where players have five minutes to defuse a suitcase bomb. This implementation requires at least two players, one with the box-bomb itself, and one who holds all the knowledge but can’t see the box-bomb to defuse it.

The wiring of the Mastermind module.

[Heath]’s version has twice as many modules as the original game, each hand-wired one driven by an Arduino. One of the modules is an LED maze. There are two green anchor LEDs in one of six configurations, and and blue and a red LED.

The object is to move the blue LED next to the red one without touching any walls. Of course, the box-holder can’t see the walls and must describe the configuration of the anchor LEDs to their partner in order to get started.

All of the modules are quite different, which likely makes for an extremely fun and challenging five minutes. [Heath] reports that getting inter-module communication down was a long road. Eventually, [Heath] settled on a mesh network configuration and connected everything in a big loop. Be sure to check out the walk-through video after the break.

This isn’t the first time we’ve seen a hardware implementation of this game. Here’s one that uses a Raspberry Pi.

Continue reading “Don’t Panic: A Cooperative Bomb Defusing Game”

Arduino, Virtually

While simulating an Arduino isn’t a new idea, a recent project by [LRusso] provides an open source JavaScript simulator that runs in your browser. You can try it out live or host it yourself if you prefer.

The simulator looks much like the standard IDE, so there isn’t much to learn. You can select from several targets, including a UNO R3, a MEGA 1280, a MEGA 2560, or a NANO V3. At the bottom of the screen, you’ll see the correct number of digital pins, analog pins, and the serial monitor. The code is relatively new, and we noticed that the digital and output pins seem to work only for outputs. There is no way to modify any of the values from the user interface. You can, however, enter things into the serial monitor.

You can run a canned demo that uses digital and analog output. There is also another sample that uses the serial port. Unlike some other simulators, you can’t really add much external circuitry but, for some purposes, that isn’t a problem.

If you are looking for more, there is Simulide, which is also free. Falstad can do mixed signal simulations with Arduino code. There’s also Wokwi, which we’ve covered a few times before.

Remote-Control Kinetic Sand Table Uses A Single Arduino

There’s nothing fun about a Sisyphean task unless you’re watching one being carried out by someone or something else. In that case, it can be mesmerizing like this Arduino-driven kinetic sand table.

What you can’t see. Image via [thang010146] on YouTube
Like many of these builds, it all started with an ordinary coffee table from the hacker’s favorite furnitüre store. [NewsonsElectronics] opened it up and added a 3mm-thick board to hold the sand and another to hold the rails and magnets.

After designing some pieces to connect the rails and pulleys together, [NewsonsElectronics] let the laser cutter loose on some more 3mm stock. A pair of stepper motors connected to a CNC shield do all of the work, driving around a stack of magnets that causes the ball bearing to trudge beautifully through the sand.

Be sure to check out the videos after the break. The first is a nice demonstration, and the second is the actual build video. In the third video, [NewsonsElectronics] explains how they could write the world’s smallest GRBL code to swing this with a single Arduino. Hint: it involves removing unnecessary data from the g-code generated by Sandify.

Don’t have a laser cutter? Here’s a sand table built from 3D printer parts.

Continue reading “Remote-Control Kinetic Sand Table Uses A Single Arduino”

The ScottoKatana Keyboard Is Cutting-Edge

The lovely thing about a hobby like keyboard building is that the melting pot of designs manages to never turn into a nasty porridge. Rather, it remains a tasty chili that keeps getting more flavorful with time. It’s a simple recipe, really; someone becomes dissatisfied enough with their peripherals to do something about it, often trying various designs until they either settle on one, or come up with yet another awesome variant that suits their needs — and possibly someone else’s down the line.

The inimitable [Joe Scotto] has happened upon the katana layout, which has an inverse left-hand row stagger that lends symmetry to the design, and Scotto-ized it into a 33-key build that he says is the best-sounding one yet with lubed Gateron Milky Yellows.

The case and the keycaps are both 3D-printed, and as with all Scotto builds, it is beautifully hand-wired. This one uses an RP2040 Pro Micro, but an ATMega Pro Micro will work, too.

Everything is available on GitHub, and [Joe] promises a typing test soon, as well as a gasket version that foregoes the integrated plate.

Do you need a fast keyboard? Like, ridiculously fast? Then you should use an FPGA.

Via KBD and Make:

CH32 RISC-V MCUs Get Official Arduino Support

Like many of you, we’ve been keeping a close eye on the CH32 family of RISC-V microcontrollers from WCH Electronics. You can get the CH32V003, featuring 2 kB RAM and 16 kB of flash for under fifteen cents, and the higher-end models include impressive features like onboard Ethernet. But while the hardware is definitely interesting, the software side of things has been a little rocky compared to what we’ve come to expect from modern MCUs.

Things should start looking up a bit though with the release of an Arduino core for the CH32 direct from WCH themselves. It’s been tested on Windows, Linux, and Mac, and supports the CH32V00x, CH32V10x, CH32V20x, CH32V30x, and CH32X035 chips. Getting it installed is as easy as adding the URL to the Arduino IDE’s Boards Manager interface, though as the video below shows, running it on Linux does require an extra step or two.

So far, we’ve seen several projects, like this temperature sensor or this holiday gizmo that use [cnlohr]’s open-source toolchain. But there’s no question that plenty of hobbyists out there feel more comfortable in the Arduino environment, and if those folks are now able to pick up a CH32 and do something cool, that means more people jumping on board, more libraries developed, more demo code written…you get the idea.

Just like the ESP8266’s popularity exploded when it was added to the Arduino IDE, we’ve got high hopes for the CH32 family in the coming months.

Continue reading “CH32 RISC-V MCUs Get Official Arduino Support”