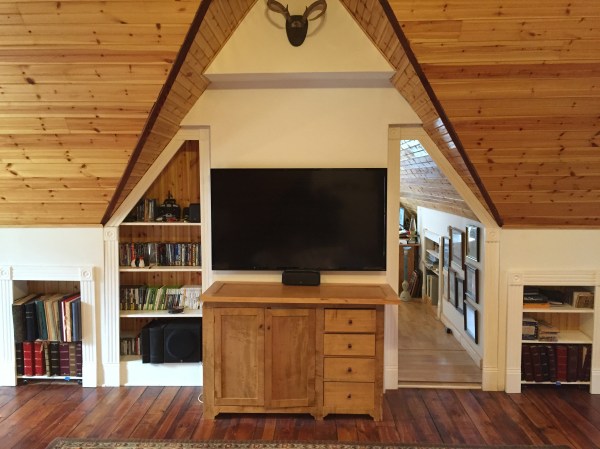
Strobe Remote

Reverse Engineering A Wireless Studio Lighting Remote

If you want to take a photograph with a professional look, proper lighting is going to be critical. [Richard] has been using a commercial lighting solution in his studio. His Lencarta UltraPro 300 studio strobes provide adequate lighting and also have the ability to have various settings adjusted remotely. A single remote can control different lights setting each to its own parameters. [Richard] likes to automate as much as possible in his studio, so he thought that maybe he would be able to reverse engineer the remote control so he can more easily control his lighting.

[Richard] started by opening up the remote and taking a look at the radio circuitry. He discovered the circuit uses a nRF24L01+ chip. He had previously picked up a couple of these on eBay, so his first thought was to just promiscuously snoop on the communications over the air. Unfortunately the chips can only listen in on up to six addresses at a time, and with a 40-bit address, this approach may have taken a while.

Not one to give up easily, [Richard] chose a new method of attack. First, he knew that the radio chip communicates to a master microcontroller via SPI. Second, he knew that the radio chip had no built-in memory. Therefore, the microcontroller must save the address in its own memory and then send it to the radio chip via the SPI bus. [Richard] figured if he could snoop on the SPI bus, he could find the address of the remote. With that information, he would be able to build another radio circuit to listen in over the air.

Using an Open Logic Sniffer, [Richard] was able to capture some of the SPI communications. Then, using the datasheet as a reference, he was able to isolate the communications that stored information int the radio chip’s address register. This same technique was used to decipher the radio channel. There was a bit more trial and error involved, as [Richard] later discovered that there were a few other important registers. He also discovered that the remote changed the address when actually transmitting data, so he had to update his receiver code to reflect this.

The receiver was built using another nRF24L01+ chip and an Arduino. Once the address and other registers were configured properly, [Richard’s] custom radio was able to pick up the radio commands being sent from the lighting remote. All [Richard] had to do at this point was press each button and record the communications data which resulted. The Arduino code for the receiver is available on the project page.

[Richard] took it an extra step and wrote his own library to talk to the flashes. He has made his library available on github for anyone who is interested.

Atmel And Arduino Announce Wi-Fi Shield 101 At World Maker Faire

Atmel and Arduino teamed up at World Maker Faire to introduce the Wi-Fi shield 101. [Gary] from Atmel gave us the lowdown on this new shield and its components. The shield is a rather spartan affair, carrying only devices of note: an Atmel WINC1500 WiFi module, and an ATECC108 crypto chip.

The WINC1500 is a nifty little WiFi module in its own right. WINC handles IEEE 802.11 b/g/n at up to 72 Mbps. 72Mbps may not sound like much by today’s standards, but it’s plenty fast for most embedded applications. WINC handles all the heavy lifting of the wireless connection. Connectivity is through SPI, UART or I2C, though on the Arduino shield it will be running in SPI mode.

The ATECC108 is a member of Atmel’s “CryptoAuthentication” family. It comes packaged in an 8-pin SOIC, and is compatible with serial I2C EEPROM specifications. Internally the similarities to serial EEPROMs end. The ‘108 has a 256-bit SHA engine in hardware, as well as a Federal Information Processing Standards (FIPS) level random number generator. Atmel sees this chip as being at the core of secure embedded systems. We think it’s pretty darn good, so long as we don’t hear about it at the next DEFCON.

The Wi-Fi shield 101 and associated libraries should be out in January 2015. We can’t wait to see all the new projects (and new ways to blink an LED) the shield will enable.

Tetris on your wrist!

Ardubracelet Lets You Play Tetris On Your Wrist!

Making your own Tetris game is almost a rite of passage for hackers — [Kevin] has stepped up the game a little by making this awesome-flexible-triple-displayed-Tetris-watch dubbed the Ardubracelet.

At the recent Maker Faire SF our head editor [Mike] got a chance to meet with [Kevin] from Arduboy who told us about some of his upcoming projects — this wearable was one of them!

It features three super bright OLED screens on a flexible circuit board with conductive touch buttons to continue with the minimalist design. Instead of a wrist strap he’s actually made the ends magnetic to hold it in place — did we mention the battery also lasts for over 10 hours?

At the heart of the flexible circuit board is an Atmega328p, which is the same chip used in the Arduboy (a credit card sized GameBoy). This is just the first prototype but he’s planning on making it even better in the future complete with Bluetooth and some 3D printed parts to make it look a bit nicer.

Continue reading “Ardubracelet Lets You Play Tetris On Your Wrist!”

Push-Button Degaussing For An Arcade CRT

[Ed] was tasked with adding push-button degaussing to an arcade cabinet’s CRT console. The display can be rotated to portrait mode for games that require it, but each time this is done, the magnetic fields get out of whack.

Fortunately, the schematics arrived with the display. [Ed] found that the degauss coil is connected in series with a PTC fuse in an odd arrangement that he didn’t agree with. He decided to use an SSR to switch the coil, and after making lots of transistor-based designs on paper, grabbed a nearby Arduino.

[Ed] took off the PTC and soldered in two wires to its pads for the SSR. He added a wire to the power supply decoupling cap to power the new deguassing circuit and connected the SSR to the Arduino as an open collector input. There was just enough space available to mount the relay to the frame’s base and the Arduino on the side. [Ed] wrote a short method to trigger the SSR and reconnected the PTC fuse. Now it degausses at power up as well as on demand.

MOT Spot Welder

A Professional Spot Welder Made Out Of A Microwave Transformer

Spot welders are one of the very few pieces of metal working equipment that are actually very much cheaper to build yourself than to buy commercially. In fact, between salvaging a transformer out of an old microwave and buying some of the other components, it’s doable for under $100USD in most cases.

We’ve shared this hack quite a few times before, but [Albert van Dalen] has really taken the cake on creating a very detailed and extensive guide to not only building his, but how to properly use it for various purposes.

[Albert] designed it in a way that allows it to be configured in both opposed and series electrode positions which means besides being able to spot weld sheet metal together, you can also spot weld battery tabs while on cells!

Continue reading “A Professional Spot Welder Made Out Of A Microwave Transformer”

A DIY MIDI Wind Controller

MIDI is more than just keyboards and a matrix of buttons that plays samples; there are MIDI controllers for virtually every instrument that has ever existed, from guitars to harps and even woodwinds. [J.M.] didn’t like the features found in existing wind MIDI controllers, so he’s building his own with features that put it far beyond any commercial offering.

Woodwind MIDI controllers are relatively simple; put a pressure sensor in the mouthpiece and turn that data into note on and note off commands. A few buttons, or in [J.M.]’s case, resistive touch sensors, are easily mapped to different fingerings and notes for the instrument. An Arduino Nano takes care of all this hardware, and a 2.4 GHz radio module to communicate wirelessly to a base station.

Once at the base station, the MIDI data can be output to any number of synths and computers, but [J.M.] added a MIDI codec chip right in the device to play with only a set of headphones. It doesn’t sound great – about the same as an old Sound Blaster card – but with the mod and expression control a wind controller offers, it’s more than passable as a real woodwind.

Videos below.

Continue reading “A DIY MIDI Wind Controller”

A Proof Of Concept Project For The ESP8266

It’s hardly been a month since we first heard of the impossibly cheap WiFi adapter for micros, the ESP8266. Since then orders have slowly been flowing out of ports in China and onto the workbenches of tinkerers around the world. Finally, we have a working project using this module. It might only be a display to show the current weather conditions, but it’s a start, and only a hint of what this module can do.

Since the ESP8266 found its way into the storefronts of the usual distributors, a lot of effort has gone into translating the datasheets both on hackaday.io and the nurdspace wiki. The module does respond to simple AT commands, and with the right bit of code it’s possible to pull a few bits of data off of the Internet.

The code requests data from openweathermap.org and displays the current temperature, pressure, and humidity on a small TFT display. The entire thing is powered by just an Arduino, so for anyone wanting a cheap way to put an Arduino project on the Internet, there ‘ya go.