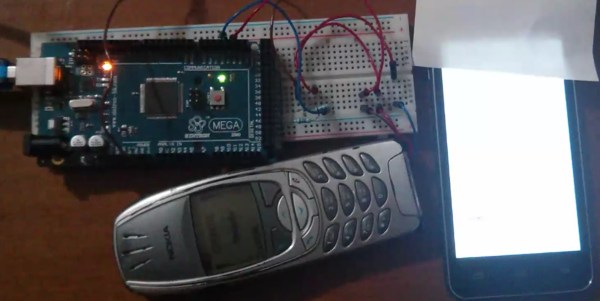
DIY Optoisolator

MacGyvered Optoisolator Is A Great Introduction

Sometimes the best way to learn about a technology is to just build something yourself. That’s what [Dan] did with his DIY optoisolator. The purpose of an optoisolator is to allow two electrical systems to communicate with each other without being electrically connected. Many times this is done to prevent noise from one circuit from bleeding over into another.

[Dan] built his incredibly simple optoisolator using just a toilet paper tube, some aluminum foil, an LED, and a photo cell. The electrical components are mounted inside of the tube and the ends of the tube are sealed with foil. That’s all there is to it. To test the circuit, he configured an Arduino to send PWM signals to the LED inside the tube at various pulse widths. He then measured the resistance on the other side and graphed the resulting data. The result is a curve that shows the LED affects the sensor pretty drastically at first, but then gets less and less effective as the frequency of the signal increases.

[Dan] then had some more fun with his project by testing it on a simple temperature controller circuit. An Arduino reads a temperature sensor and if the temperature rises above a certain value, it turns on a fan to cool the sensor off again. [Dan] first graphed the sensor data with no fan hooked up. He only used ambient air to cool things down. The resulting graph is a pretty smooth curve. Next he hooked the fan up and tried again. This time the graph went all kinds of crazy. Every time the fan turned on, it created a bunch of electrical noise that prevented the Arduino from getting an accurate analog reading of the temperature sensor.

The third test was to remove the motor circuit and move it to its own bread board. The only thing connecting the Arduino circuit to the fan was a wire for the PWM signal and also a common ground. This smoothed out the graph but it was still a bit… lumpy. The final test was to isolate the fan circuit from the temperature sensor and see if it helped the situation. [Dan] hooked up his optoisolator and tried again. This time the graph was nice and smooth, just like the original graph.

While this technology is certainly not new or exciting, it’s always great to see someone learning by doing. What’s more is [Dan] has made all of his schematics and code readily available so others can try the same experiment and learn it for themselves.

Open-source BLDC motor driver

Brushless Motor Controller Shield For Arduino

Brushless motors are ubiquitous in RC applications and robotics, but are usually driven with low-cost motor controllers that have to be controlled with RC-style PWM signals and don’t allow for much customization. While there are a couple of open-source brushless drivers already available, [neuromancer2701] created his own brushless motor controller on an Arduino shield.

[neuromancer2701]’s shield is a sensorless design, which means it uses the back-EMF of the motor for feedback rather than hall effect sensors mounted on the motor. It may seem strange to leave those sensors unused but this allows for less expensive sensorless motors to work with the system. It also uses discrete FETs instead of integrated driver ICs, similar to other designs we have covered. Although he is still working on the back-EMF sensing in his firmware, the shield successfully drives a motor in open-loop mode.

The motor controller is commanded over the Arduino’s serial interface, and will support a serial interface to ROS (Robot Operating System) in the future. This shield could be a good alternative to hobby RC controllers for robots that need a customizable open-source motor controller. The PCB design and source code are available on GitHub.

Continue reading “Brushless Motor Controller Shield For Arduino”

arduino browser

Web Browser Pushes Arduino’s Limits

Some projects that we build fulfill a genuine need for a new piece of hardware or software that will make life easier or fix a common problem. Other projects, on the other hand, we do just because it’s possible to do. [Gilchrist] has finished work on a project that fits squarely in the second category: a web browser that runs exclusively on an Arduino Uno with an ethernet shield.

The Arduino can serve plain-text web pages to an attached LCD and can follow hyperlinks. User input is handled by a small joystick, but the impressive part of the build is on the software side. The Arduino only has 2KB of RAM to handle web pages, and the required libraries take up 20KB of memory, leaving only about 12 KB for the HTML parser/renderer and the LCD renderer.

The Arduino browser is a work in progress, and [Gilchrist] mentions that goals for the project include more robustness to handle poor HTML (the Hackaday retro edition loads flawlessly though), a terminal, and WiFi capabilities. To that end, maybe a good solution would be using the new ESP8266 chip to keep things small and inexpensive?

Light Controlled Musical Instrument

Illumaphone Uses Light To Make Music

Move aside Theremin,  we have another crazy instrument that relies on its musicians to frantically wave their arms around to produce a beat. This is the Illumaphone.

[Bonnie Eisenman] recently took a course on Electronic Music, and for her final project she was allowed to basically do whatever she wanted — so she chose to create a custom musical instrument. It’s fairly simple on the hardware side, making use of coffee cups, an Arduino Uno, six photo-resistors, some alligator clips and a whole bunch of cardboard — but don’t let the lackluster parts list fool you, it actually works quite well for what it is!

Each coffee cup is a different note, and the amount of light that gets into the cup determines its volume and vibrato. It even auto-calibrates to the ambient light levels when it is first setup! The light level data is interpreted by the Arduino which then sends it to a laptop standing by, which uses a software called ChucK to synthesize the notes for output.

Continue reading “Illumaphone Uses Light To Make Music”

Vodka dispenser

Arduino Drink Dispenser Turns Quarters Into Liquid Courage

Ever feel the need to have your very own alcohol vending machine at home? Well if you do, [Ben] and [Dan] have just the Arduino based machine for you!

It was actually part of a school assignment for product design at Brunel University – the whole thing was designed and built in just over a week. The machine accepts and counts coins giving you a total readout on the LCD screen. When the correct amount is inserted you can select your shot and the machine will pour you a stiff one.

The thing we like about this vending machine — we’re not sure if it actually qualifies as a barbot — is that it doesn’t have any fancy pumps. In fact, it just uses two inexpensive solenoid valves and gravity to dispense the drink, much like a typical bar bottle dispenser.

Continue reading “Arduino Drink Dispenser Turns Quarters Into Liquid Courage”

The ESP8266 Becomes A Terrible Browser

The ESP8266 are making their way over from China and onto the benches of tinkerers around the world for astonishing web-enabled blinking LED projects and the like. [TM] thought he could do something cooler with his WiFi to UART module and decided to turn one into a web browser.

There’s no new code running on the ESP8266 – all the HTML is being pushed through an Arduino Mega, requesting data from a server (in this case our fabulous retro edition), and sending the data to the Arduino serial console. The connection is first initiated with a few AT commands to the ESP module, then connecting to the retro server and finally dumping everything received to the console.

It’s not much – HTML tags are still displayed, and images are of course out of the question. The result, however, isn’t that much different from what you would get from Lynx, meaning now the challenge is open for an Arduino port of this ancient browser.

Simple Photo Flash Trigger For Water Balloon Photography

Water Balloon Photography

There have been countless projects to make custom photo flash trigger circuits. Usually the circuits react to sound, triggering the camera flash at the moment a certain sound is triggered. That type of trigger can be used to detect the popping of a balloon or shattering of glass. Other triggers detect motion, like a projectile crossing a laser beam for example. [Udo’s] friend had a fun idea to take photos of water balloons popping. Unfortunately neither of those trigger methods would be well suited for this situation. That’s when [Udo] had to get creative.

[Udo] built a unique trigger circuit that uses the water inside the balloon as the trigger. The core component of the circuit is an Arduino. One of the Arduino’s analog pins is configured to enable the internal pull-up resistor. If nothing else is connected to the pin, the Arduino will read 5 volts there. The pin is connected to a needle on the end of a stick. There is a second needle on the same stick, just a short distance away from the first. When these needles pierce the balloon’s skin, the water inside allows for a brief moment of conductivity between the two pins. The voltage on the analog pin then drops slightly, and the Arduino can detect that the balloon has popped.

[Udo] already had a flash controller circuit. He was able to trigger it with the Arduino by simply trying the flash controller’s trigger pin to one of the Arduino’s pins. If the Arduino pulls the pin to ground, it closes the switch on the flash controller and the flash is triggered. Both circuits must share a common ground in order for this to work.

All of the code for [Udo’s] project is freely available. With such spectacular photographs, it’s only a matter of time before we see more of these floating around.