DIY Metal Detector

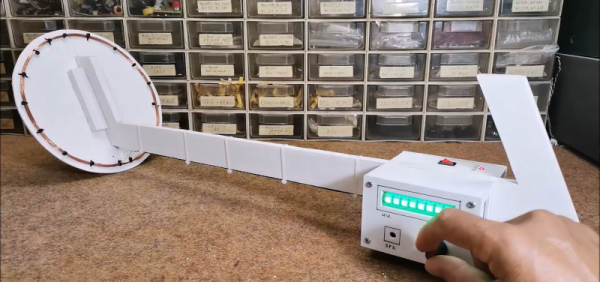
If you want to get rich by hunting with a metal detector, you might want to consider how much you invested in the hardware to start with. Finding a tin can with a $200 detector might not make economic sense. But building a metal detector yourself doesn’t have to be hard, as [Mirko] shows in a recent post. His STM32-based pulse induction metal detector looks good and works well, as you can see in the video below.

[Mirko] reports that the device can detect a coin at 30 cm and a large metal object at more than 80 cm. The project uses the Arduino IDE and a Blue Pill STM32 module. The project looks good with an LED module and a rotary encoder to set sensitivity.

Continue reading “DIY Metal Detector”

Picture of the miniJen structure on a presentation desk

A Jenkins Demo Stand For Modern Times

Once you’re working on large-scale software projects, automation is a lifesaver, and Jenkins is a strong player in open-source automation – be it software builds, automated testing or deploying onto your servers. Naturally, it’s historically been developed with x86 infrastructure in mind, and let’s be fair, x86 is getting old. [poddingue], a hacker and a Jenkins contributor, demonstrates that Jenkins keeps up with the times, with a hardware demo stand called miniJen, that has Jenkins run on three non-x86 architectures – arm8v (aarch64), armv7l and RISC-V.

There’s four SBCs of different architectures involved in this, three acting as Jenkins agents executing tasks, and one acting as a controller, all powered with a big desktop PSU from Pine64. The controller’s got a bit beefier CPU for a reason – at FOSDEM, we’ve seen it drive a separate display with a Jenkins dashboard. It’s very much a complete demo for its purpose, and definitely an eyecatcher for FOSDEM attendees passing by the desk! As a bonus, there’s also a fascinating blog post about how [poddingue] got to running Jenkins on RISC-V in particular.

Even software demonstrations get better with hardware, and this stood out no doubt! Looking to build a similar demo, or wondering how it came together? [poddingue] has blog posts on the demo’s structure, a repo with OpenSCAD files, and a trove of videos demonstrating the planning, design and setup process. As it goes with continuous integrations, we’ve generally seen hackers and Jenkins collide when it comes to build failure alerts, from rotating warning lights to stack lights to a Christmas tree; however, we’ve also seen a hacker use it to keep their firmware size under control between code changes. And, if you’re wondering what continuous integration holds for you, here’s our hacker-oriented deep dive.

New Product: The Raspberry Pi Debug Probe

It’s fair to say that among the new product launches we see all the time, anything new from the folks at Raspberry Pi claims our attention. It’s not that their signature Linux single-board computers (SBCs) are necessarily the best or the fastest hardware on paper, but that they’re the ones with meaningful decade-plus support. Add to that their RP2040 microcontroller and its associated Pico boards, and they’re the one to watch.

Today we’ve got news of a new Pi, not a general purpose computer, but useful nevertheless. The Raspberry Pi Debug Probe is a small RP2040-based board that provides a SWD interface for debugging any ARM microcontroller as well as a more generic USB to UART interface.

The article sums up nicely what this board does — it’s for bare metal ARM coders, and it uses ARM’s built-in debugging infrastructure. It’s something that away from Hackaday we’ve seen friends using the 2040 for as one of the few readily available chips in the shortage, and it’s thus extremely convenient to have readily available as a product.

So if you’re a high level programmer it’s not essential, but if you’re really getting down to the nuts-and-bolts of an ARM microcontroller then you’ll want one of these. Of course, it’s by no means the first SWD interface we’ve seen, here’s one using an ESP32.

Nucleo-F429ZI development board with STM32F429 microcontroller

Epic Guide To Bare-Metal STM32 Programming

[Sergey Lyubka] put together this epic guide for bare-metal microcontroller programming.  While the general concepts should be applicable to most any microcontroller, [Sergey]s examples specifically relate to the Nucleo-F429ZI development board featuring the ARM-based STM32F429 microcontroller.

In the realm of computer systems, bare-metal programming most often refers to programming the processor without an intervening operating system. This generally applies to programming BIOS, hardware drivers, communication drivers, elements of the operating system, and so forth. Even in the world of embedded programming, were things are generally quite low-level (close to the metal), we’ve grown accustomed to a good amount of hardware abstraction. For example, we often start projects already standing on the shoulders of various libraries, boot loaders, and integrated development tools.

When we forego these abstractions and program directly on the microprocessor or microcontroller, we’re working on the bare metal. [Sergey] aptly defines this as programming the microcontroller “using just a compiler and a datasheet, nothing else.” His guide starts at the very foundation by examining the processor’s memory map and registers including locations for memory mapped I/O pins and other peripherals.

The guide walks us through writing up a minimal firmware program from boot vector to blinking an LED connected to an I/O pin. The demonstration continues with setup and use of necessary tools such as the compiler, linker, and flasher. We move on to increasingly advanced topics like timers, interrupts, UART output, debuggers, and even configuring an embedded web server to expose a complete device dashboard.

While initially more time consuming, working close to the metal provides a good deal of additional insight into, and control over, hardware operations.  For even more on the subject, you may like our STM32 Bootcamp series on bare-metal STM32 programming.

An iPhone sits in a users hand open to the YouTube app. What is unusual is that the iPhone is bent in an L shape and is still functioning properly.

First Folding IPhone Doesn’t Come From Apple

Folding phones are all the rage these days, with many of the major smartphone manufacturer’s having something in this form factor. Apple has been conspicuously absent in this market segment, so [KJMX] decided to take matters into their own hands with the “iPhone V.” (YouTube – Chinese w/subtitles via MacRumors).

Instead of trying to interface an existing folding phone’s screen with the iPhone, these makers delaminated an actual iPhone X screen to use in the mod. It took 37 attempts before they had a screen with layers that properly separated to be both flexible and functional. Several different folding phones were disassembled, and [KJMX] found a Motorola Razr folding mechanism would work best with the iPhone X screen. Unfortunately, since the iPhone screen isn’t designed to fold, it still will fail after a relatively small number of folds.

Other sacrifices were made, like the removal of the Taptic Engine and a smaller battery to fit everything into the desired form factor. The “iPhone V” boasts the worst battery life of any iPhone to date. After nearly a year of work though, [KJMX] can truly claim to have made what Apple hasn’t.

Curious about other hacks to let an iPhone do more than Apple intended? Check out how to add USB-C to an iPhone, try to charge it faster, or give one a big memory upgrade.

A terminal window with a search for "Guineau Pig Olympics" is inset on a photo of an ortholinear keyboard attached by a yellow USB cable to a 70s aluminum and plastic Super 8 film editor/viewer. The device has a large screen on the right hand side, a silver grate on the left, and a tray at the bottom for slotting in film.

Super 8 Film Editor Reborn As A YouTube Terminal

We love hacks that give new life to old gadgets, and [edwardianpug]’s YouTube Terminal certainly fits the bill by putting new hardware inside a Super 8 film editor.

[edwardianpug] could have relegated this classy-looking piece of A/V history to a shelf for display, but instead she decided to refresh its components so it could display any YouTube video instead of just one strip of film at a time. The Boost-Box keeps the retrofuturistic theme going by using the terminal to search for and play videos via Ytfzf.

The original screen has been replaced by an 800×600 LCD, and the yellow USB cord gives a nice splash of color to connect the ortholinear keyboard to the device. Lest you think that this “ruined” a working piece of retro-tech, [edwardianpug] says that 20 minutes would get this device back to watching old movies.

Are you looking for more modern and retro mashups? Check out these Dice Towers Built In Beautiful Retro Cases, a Vacuum Tube and Microcontroller Ham Transmitter, or this Cyberdeck in a Retro Speaker.

Continue reading “Super 8 Film Editor Reborn As A YouTube Terminal”

ARM Programming By Example

The ARM processor is popping up everywhere. From Raspberry Pis, to phones, to Blue Pill Arduino-like boards, you don’t have to go far to find an ARM processor these days. If you program in C, you probably don’t care much or even think about it. But do you know ARM assembly language? Well, if you look at it one way, it can’t be too hard. The CPU only has about 30 distinct operations — that’s why it is called RISC. Of course, sometimes fewer instructions actually make things more difficult. But you can get a great starting tutorial with the 21 programs on the ARM Assembly by Example website.

You need a 32-bit ARMv6 or better — so Raspberry Pi will work here. The compiler, of course, is gcc and all the associated tools. if you have the right hardware, there are sections on using the floating point unit and the NEON co-processor, too.

Continue reading “ARM Programming By Example”