Facebook Marketplace provides you with a free grain silo, so what do you do with it? If you are [saveitforparts], you mix it with other materials and produce a retro-style rocket ship prop. Art project? Sure, we’ll call it that.
We have to admit, we also see rockets in everyday objects, and the silo does look the part. He also had some junk that looked like a nose cone, some tanks, and other assorted trash.
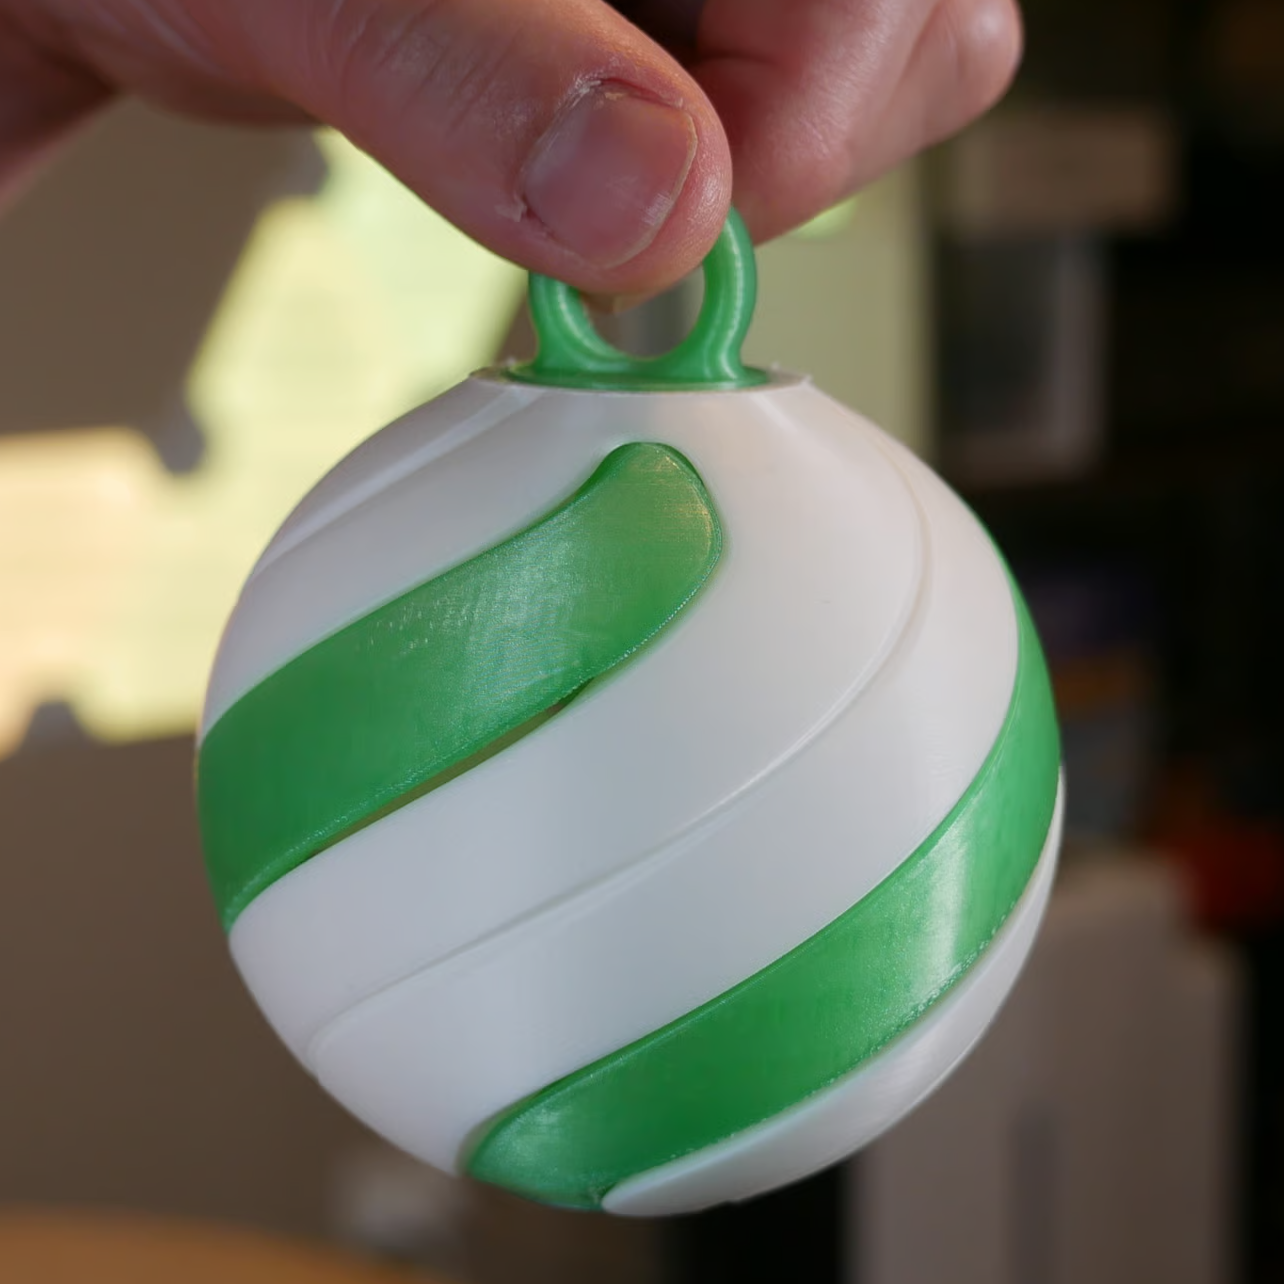
If you need something clever for a gift, consider this two-part 3D-printed Christmas ornament that has a small secret compartment. But there’s a catch: the print is a challenging one. So make sure your printer is up to the task before you begin (or just mash PRINT and find out).
Want a challenging print that’s also useful? This two-piece ornament has a small gift area inside, and prints without supports.
This design is from [Angus] of [Maker’s Muse] and it’s not just eye-catching, but meticulously designed specifically for 3D printing. In fact, [Angus]’s video (embedded under the page break) is a great round-up of thoughtful design for manufacture (DFM) issues when it comes to filament-based 3D printing.
The ornament prints without supports, which is interesting right off the bat because rounded surfaces (like fillets, or a spherical surface) facing the build plate — even when slightly truncated to provide a flat bottom — are basically very sharp overhangs. That’s a feature that doesn’t generally end up with a good surface finish. [Angus] has a clever solution, and replaces a small section with a flat incline. One can’t tell anything is off by looking at the end result, but it makes all the difference when printing.
There are all kinds of little insights into the specific challenges 3D printing brings, and [Angus] does a fantastic job of highlighting them as he explains his design and addresses the challenges he faced. One spot in particular is the flat area underneath the hang hole. This triangular area is an unsupported bridge, and because of its particular shape, it is trickier to print than normal bridges. The workable solution consists of countersinking a smaller triangle within, but [Angus] is interested in improving this area further and is eager to hear ideas on how to do so. We wonder if he’s tried an approach we covered to get better bridges.
Want to print your own? 3D files are available direct from [Angus]’s site in a pay-what-you-like format. If your 3D printer is up to it, you should be able to make a few before Christmas. But if you’d prefer to set your sights on next year with something that uses power and hardware, this tiny marble machine ornament should raise some eyebrows.
This is one of those fun hacks that come about from finding a product and going “I wonder if I could…” — in this case, artist/YouTuber [Wesley Treat] found out his favourite vendor makes spray cans in CYMK colours– that is the Cyan, Yellow, Magenta and blacK required for subtractive printing. Which got him wondering: can I make full-colour prints with this paint?
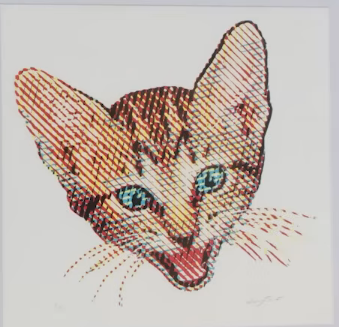
The MDF-based print, with naive half-tone dots.
His answer was “yes”, and the process to do so is fairly simple. First, split the image into colour channels, generate a half-tone pattern for each one, and carve it out of MDF on the laser. Then spray the MDF with the appropriate colour spray paint. Press the page against each block in turn, and voila! A full colour print block print, albeit at very low DPI compared to your average inkjet.
Now, you might be wondering, why half-tone instead of mixing? Well, it turns out that these CYMK paints are too opaque for that to work in a block-printing process. At least with a naive spray technique; [Weseley] does admit a very fine mist might be able to make that work. The second question is why not just hook the rattle cans into a CNC machine for a paint-based mega inkjet? That’s a great question and we hope someone tries it, but [Weseley] evidently likes block-printing so he tried that first.
The Mylar stencil print, with a more artistic half-tone pattern.
Laser-ablating enough MDF away to make decent print blocks took too long for [Weseley]’s tastes, however, so he switched to using mylar stencils. Instead of spraying a block and pressing onto it, the paint is sprayed through the stencil. The 10 mil Mylar not only cuts faster, but can support finer detail. Though the resulting prints lose some of the artistic flair the inconsistencies block printing brings, it probably looks better.
If you prefer to skip the manual paint-can-handling, perhaps we can interest you in a spray-can plotter. If you do like manually flinging paint, perhaps you could try this dot-painting spray can attachment, for a more self-directed half-tone.
We love a good clock project, and [byeh_ in] has one with a design concept we don’t believe we have seen before. The Trace Line Clock has smooth lines and a clean presentation, with no sockets or visible mechanical fixtures.
Reading the clock is quite straightforward once one knows what is going on. At its heart, the unmarked face is much like any other analog clock face, and on the inside is a pretty normal clock movement. The inner recessed track on the face represents hours, and the outer is minutes. The blue line connects the two, drawing a constantly changing line.
[Voria Labs] has created a whole bunch of artworks referred to as Lumanoi Interactive Light Sculptures. A new video explains the hardware behind these beautiful glowing pieces, as well as the magic that makes their interactivity work.
The basic architecture of the Lumanoi pieces starts with a custom main control board, based around the ESP-32-S3-WROOM-2. It’s got two I2C buses onboard, as well as an extension port with some GPIO breakouts. The controller also has lots of protection features and can shut down the whole sculpture if needed. The main control board works in turn with a series of daisy-chained “cell” boards attached via a 20-pin ribbon cable. The cable carries 24-volt power, a bunch of grounds, and LED and UART data that can be passed from cell to cell. The cells are responsible for spitting out data to addressable LEDs that light the sculpture, and also have their own microcontrollers and photodiodes, allowing them to do all kinds of neat tricks.
The major objects in our solar system orbit along the plane of the ecliptic, plus or minus few degrees, and it turns out most exoplanet systems are the same — pretty flat, with maybe one highly-inclined outlier. But at [The 5439 Workshop], they don’t care about these details: [5439] has come up with a mechanism to drive inclined orbits in an orrery, and he’s going to use it. The star is exploding, too, because why wouldn’t it be?
While the cinematography of this build video might not be to everyone’s taste, it’s worth watching to see the details of the project. The sliding mechanism to “explode” the star by sliding plates across each other is quite well-done, although perhaps not much not designed for assembly (we’re quite impressed he got it together). It isn’t quite the iris we had expected, as there’s a double-ratchet inside to drive the slow collapse/fast expansion dynamic [5439] is going for. It looks more like the breathing mode of a cepheid variable star than an explosion to us, but it’s still a fascinating piece of laser-sintered aluminum.
The driving mechanism for the inclined orbits is fairly simple, but also worth examining, as we’re not aware of anyone having used it before. The gear rings holding the planets are tilted, and are driven by straight vertical shafts via gears that pivot on knuckle joints. It’s not a revolutionary design, but it’s a big part of what makes this build unique. Since the solar system is very flat, clockwork orreries tend not to bother showing orbital inclination at all. Given the way planets are believed to form from a protoplanetary disk, a system with this many planets in such differing orbital planes seems unlikely to occur naturally, but it certainly adds visual interest.
Over on YouTube, [Ben Eater] pursues that classic 8-bit sound. In this video, [Ben] integrates the MOS Technology 6581 Sound Interface Device (SID) with his homegrown 6502. The 6581 SID was famously used in the Commodore line of computers, perhaps most notably in the Commodore 64.
The 6581 SID supports three independent voices, each consisting of a tone oscillator/waveform generator, an envelope generator, and an amplitude modulator. These voices are combined into an output filter along with a volume control. [Ben] goes into detail concerning how to configure each of these voices using the available facilities on the available pins, referencing the datasheet for the details.
[Ben]’s video finishes with an 8-bit hit from all the way back in October 1985: Monty on the Run by Rob Hubbard. We first heard about [Ben’s] musical explorations back in June. If you missed it, be sure to check it out. It seems hard to imagine that demand for these chips has been strong for decades and shows little sign of subsiding.