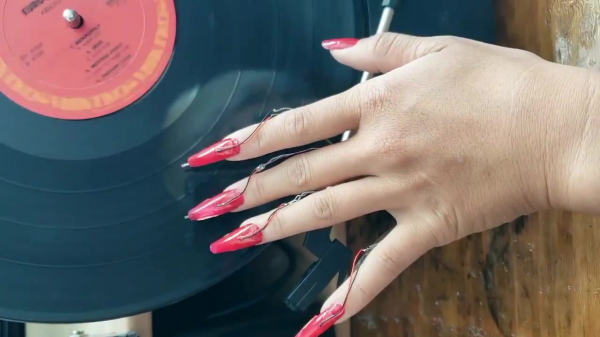
Moon moving from inside a large glass sphere into screens of two vintage television sets

Blending Pepper’s Ghost, Synths, And Vintage TVs

We were recently tipped off to the work of [Joshua Ellingson], and digging in, we found an extensive collection of art and ongoing experiments, with synthesizers deforming and driving old black-and-white clips played on vintage television sets, objects jumping from screens into the real world and back, and cathode ray tube oscilloscopes drawing graphics in the air (loud sound!) (nitter). It’s recommended that you check out the short showcase videos we embedded below before you continue reading, because transcribing these visuals into words won’t do them justice.

In case you’re not up for a video, however, we shall try transcribing them anyway. Animals, shapes and figures appear in the real world, bound by glass spheres and containers, using the technique known as Pepper’s Ghost. A variety of screens used for creating that illusion – sometimes it’s a tablet, and sometimes it’s an old television set rested upside down on top of a glass aquarium. Vintage television sets are involved quite often in [Ellingson]’s experiments, typically found playing movie scenes and clips from their appropriate eras, or even used as one of the locations that a Pepper’s Ghost-enchanted object could move into — firmly a part of the same imaginary world turned real.

It’s not always that things move from a TV screen into their glass boundary, gaining an extra dimension in the process, but when it happens, the synchronization is impeccable. All of that is backed by — and usually controlled by — Moog synthesizer sounds, knob turns driving video distortions or aspects of an object movement. Not all of his clips have synthesizers, old TVs, or Pepper’s Ghost illusion in them, but every experiment of his contains at least two out of these three, working in unison to create impressions. And as much as the art value is undeniable, [Ellingson] also adds a whole lot of hacker value for us to take away!

[Ellingson] understands what goes into building optical illusions like Pepper’s Ghost — using a variety of different glassware, from Erlenmeyer flasks to teapots, producing a consistent and ongoing stream of new ideas with unique spins on them. His aim is to share and create beyond what his art can achieve, which is why he encourages us to try it out ourselves — with this one minute video of a quick Pepper’s Ghost build, using nothing but a generic tablet, an emptied-out plastic snow globe and a piece of cheap transparency film used for school projectors. If you want to go beyond, he’s made an extensive tutorial on illusions of the kind he does, their simplicities and complexities, and all the different ways you can build one.

We all benefit when an artist finds a technology and starts playing with it, closing the divide between technology and art – and by extension, the divide between technology and nature. Sometimes, it’s flowing light art installations where you are a boulder in route of plankton’s movement, other times, it’s through-hole component-packed printed circuit birds that sing not unlike the non-printed-circuit ones, or manipulation of CRT displays with function generator-driven coils to offset the beam and turn the image into a pattern of lines.

Continue reading “Blending Pepper’s Ghost, Synths, And Vintage TVs”

The Deadliest Project On The Internet?

Before deciding whether the headline of this article is clickbait, please take a moment to watch the excellent video by [BigClive] below the break. And then, go to your local search engine and search the phrase “fractal burning death”. We’ll wait.

With that out of the way, we have to admit that when we saw the subject “The most deadly project on the Internet” on [bigclivedotcom]’s YouTube channel, we were a bit skeptical. It’s a big claim. But then we watched the video and did some googling. Sadly, there are over 30 documented cases of this project killing people, and more cases of permanent grievous injury.

The results of Fractal Wood Burning with High Voltage

Fractal Burning is a hobby where wood is burned by slathering wood in a conductive slurry and then applying high voltage to either side of the wood, usually using something not rated for high voltage, such as jumper cables. The High Voltage is supplied by an unmodified Microwave Oven Transformer. Other projects using MOT’s typically rip out the high voltage secondary windings and re-wind them as low voltage, high amperage transformers, and are using in Spot Welders and even arc welders.

As laid out by [BigClive], the voltages coming from an unmodified MOT, ranging from 2-3 KV (That’s between two and three thousand Volts) at a very low impedance are right up there in the “Don’t go near it!” territory.

Continue reading “The Deadliest Project On The Internet?”

Building An Edge Lit Sign From The Scrap Pile

Whether in a shop window or mounted to the top of consoles in NASA’s Mission Control Center, edge lit acrylic is a popular choice for making high visibility signs. Partly because of their striking hologram-like appearance, but also because they’re exceptionally cheap and easy to produce. Just how cheap and easy? Take a look at this recent video from [Hack Modular] for a perfect example.

Now you might think you’d need something like a CNC router to produce a sign like this, and for more complex images, that’s arguably the case. But if you’re only concerned with text, and have a fairly steady hand, you can pull off the etching step with nothing more exotic than a printed template and a razor blade. Of course, the LCD style font that [Hack Modular] picked for this sign is particularly well suited to hand cutting — if you’re interested in edge lit calligraphy, this method probably isn’t what you’re looking for.

This linear LED provides a more consistent light.

With the text carved into the acrylic, the only missing ingredient is light. For that, [Hack Modular] is using a 12 volt linear LED strip light. That is, instead of being dotted with individual LEDs like traditional strips, it provides a continuous band of light that’s perfect for this application. That gets stuck down to a scrap piece of wood, and a rusty angle bracket from an old Meccano set is used to hold the acrylic right on the center-line. If you think the final product looks like something that was created from trash, don’t feel bad, that was the intent.

The end result looks great. In fact, if we’re being honest, it’s a lot better than we would have thought was possible using hand tools. Granted the choice of font has a lot to do with that, but then again, we wouldn’t mind if all our edge lit acrylic signs ended up looking like big seven-segment displays either.

Continue reading “Building An Edge Lit Sign From The Scrap Pile”

The octagonal wooden box described in the project. On the left, outer surface of the box is shown, with "Say Friend And Come In" inscription, as well as a few draings (presumably from Lord of The Rings) and two metallic color stars that happen to serve as capacitative sensor electrodes. On the right, underside of the lid is shown, with all the electronics involved glued into CNC-machined channels.

Say Friend And Have This Box Open For You

Handcrafted gifts are special, and this one’s no exception. [John Pender] made a Tolkien-inspired box for his son and shared the details with us on Hackaday.io. This one-of-a-kind handcrafted box fulfills one role and does it perfectly – just like with the Doors of Durin, you have to say ‘friend’ in Elvish, and the box shall unlock for you.

This box, carefully engraved and with attention paid to its surface finish, stands on its own as a gift. However, with the voice recognition function, it’s a project complicated enough to cover quite a few fields at once – woodworking, electronics, and software. The electronics are laid out in CNC-machined channels, and LED strips illuminate the “Say Friend And Come In” inscriptions once the box is ready to listen. If you’re wondering how the unlocking process works, the video embedded below shows it all.

Two solenoids keep the lid locked, and in its center is a Pi Zero, the brains of the operation. With small batteries and a power-hungry board, power management is a bit intricate. Two capacitive sensors and a small power management device are always powered up. When both of the sensors are touched, a power switch module from Pololu wakes the Pi up. It, in turn, takes its sweet time, as fully-fledged Linux boards do, and lights up the LED strip once it’s listening.

Continue reading “Say Friend And Have This Box Open For You”

Thermal printer with a loop of thermochromic foil inserted in it, printing digits of Pi on the loop.The digits gradually disappear from the foil as it exits the printer.

Celebrating The Infinity Of Pi Day With Thermochromic Foil

It might take you some time to understand what’s happening in the video that Hackaday alum [Moritz Sivers] shared with us. This is [Moritz]’s contribution for this year’s Pi Day – a machine that shows digits of Pi in a (technically, not quite) infinite loop, and shows us a neat trick we wouldn’t have thought of.

The two main elements of this machine are a looped piece of thermochromic foil and a thermal printer. As digits are marked on the foil by the printer’s heating element, they’re visible for a few seconds until the foil disappears from the view, only to be eventually looped back and thermally embossed anew. The “Pi digits calculation” part is offloaded to Google’s pi.delivery service, a π-as-a-Service endpoint that will stream up to 50 trillion first digits of Pi in case you ever need them – an ESP8266 dutifully fetches the digits and sends them off to the thermal printer.

This machine could print the digits until something breaks or the trillions of digits available run out, and is an appropriate tribute to the infinite nature of Pi, a number we all have no choice but to fundamentally respect. A few days ago, we’ve shown a similar Pi Day tribute, albeit a more self-sufficient one – an Arduino calculating and printing digits of Pi on a character display! We could’ve been celebrating this day for millennia, if Archimedes could just count a little better.

Continue reading “Celebrating The Infinity Of Pi Day With Thermochromic Foil”

A Fractal Papercraft Tree

Sometimes there are projects that we introduce with a bit of context, some background, and other times as with [RayP2]’s fractal papercraft tree, we introduce them simply because they are beautiful.

It’s a deceptively simple design of a repeating pattern of the same shape getting ever smaller with each iteration, and terminating in a tetrahedron with branches from each of its faces. It’s not origami, instead it’s a cut-and-glue design, and its construction is a surprisingly involved affair with some lateral thinking required to bend the tabs on the smaller branches. The design was first prototyped with plain paper, before a final version was made with card stock. The part that makes it exceptional is that he used shiny gold card stock with the gold side on the inside, meaning that when lit from the trunk the end of each branch glows attractively. Fitting the light required a modification to the trunk design, but this doesn’t take away from the whole.

The result is an attractive sculpture, a talking point, and something with a mathematical angle to boot, which we like. It’s certainly not been the first papercraft ptoject we’ve shown you, though perhaps these paper retrocomputers are a little less artistic.

3D Printed Molds For Casting Rose’s Metal

Have you ever played with Rose’s metal? It’s a fusible alloy of bismuth, lead, and tin with a low melting point of around 100 °C. Historically, it’s been used as a solder for cast iron railings and things, and as a malleable pipe filler material to prevent crimping while a pipe is bent.

[Ben Healey] has been playing around with Rose’s metal and some PETG printed molds, making everything from Star Wars Imperial credits to chess pieces to leather stamping tools. In the video after the break, [Ben] takes us through the process, beginning with mold-making from STLs — something he picked up from another YouTuber.

He recommends adding registration marks to multi-part molds in order to keep everything lined up, and adding a small recess in the seam for easy separation with a flat-head screwdriver. So far, the molds have held up to multiple pours, though [Ben] did print them rather thick and is glad he did.

As far as making liquid metal, [Ben] used a cast iron pot with a convenient pour spout, and a blowtorch. He added graphite powder to the molds in an effort to make them give up the goods more easily. To finish the pieces, [Ben] cut the flashing with tin snips and used sandpaper and a Dremel to smooth the edges. Copper plating didn’t work out, but [Ben] is going to try it again because he thinks he screwed something up in the process. He’s also going to try printing with TPU, which we were just about to recommend for its flexibility.

There are many ways to cast metal on the (relatively) cheap. Have you considered Kinetic Sand?

Continue reading “3D Printed Molds For Casting Rose’s Metal”