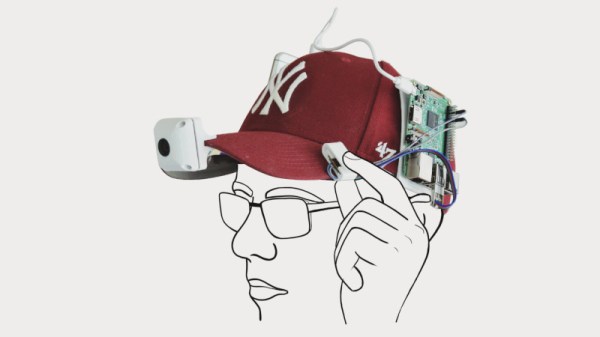
FindyBot3000 Is Listening And Ready To Help

It’s a problem every maker faces at one time or other – how to organise the ever-growing mass of components in the workshop. Some give up and just live with box upon box of disordered parts. That wasn’t good enough for [Inventor22], though – who created FindyBot3000 to tackle the job. 

The first step is to source a set of those tiny component drawers we all know and love. These are then combined with WS2812B LED strips, which act as indicators for each individual drawer. A Particle Photon is used as the brains of the operation, and drives the strips. So far, so good.

Of course, blinking LEDs are great and all, but it’s the voice control where things get really interesting. Through Google Home and IFTTT, it’s possible to give commands to the Particle Photon. This can be used to manage the parts in the drawers, as well as to quickly highlight the location of various components. It’s backed up with an Azure backend, which manages the component database and keeps track of everything.

It’s a tidy build that does away with tiny sticky labels, and is reconfigurable on the fly as parts come and go. Of course, if you’re mostly storing SMD parts, you might prefer a reel based solution. Video after the break.

Continue reading “FindyBot3000 Is Listening And Ready To Help”

Windows 3.1 In My BIOS? It’s More Likely Than You Think

It might be difficult for modern audiences to believe, but at one point Microsoft Windows fit on floppy disks. This was a simpler time, with smaller hard drives, lower resolution displays, and no hacker blogs for you to leave pessimistic comments on. A nearly unrecognizable era, to be sure. But if you’re one of the people who looks back on these days fondly, you might wonder why we don’t see this tiny graphical operating system smashed into modern hardware. After all, SkiFree sure ain’t gonna play itself.

Well, wonder no more. A hacker by the name of [redsPL] thought that Microsoft’s latest and greatest circa 1992 might do well crammed into the free space remaining on a ThinkPad X200’s firmware EEPROM. It would take a little fiddling, plus the small matter of convincing the BIOS to see the EEPROM as a virtual floppy drive, but clearly those are all minor inconveniences for anyone mad enough to boot their hardware into a nearly 30 year old copy of Visual Basic for a laugh.

The adventure starts when [redsPL] helped a friend install libreboot and coreboot on a stack of old ThinkPads by using the Raspberry Pi as an SPI flasher, a pastime we’re no strangers to ourselves. Once the somewhat finicky software and hardware environment was up and running, it seemed a waste not to utilize it further. Especially given the fact most firmware replacements only fill a fraction of the X200’s 8 MB chip.

Of course, Windows 3.1 was not designed for modern hardware and no proper drivers exist for much of it. Just getting the display resolution up to 1024×768 (and still with only 256 colors) required patching the original video drivers with ones designed for VMWare. [redsPL] wasn’t able to get the sound hardware working, but at least the PC speaker makes the occasional buzz. The last piece of the puzzle was messing around the zip and xz commands until the disk image was small enough to sneak onto the chip.

Believe it or not, this isn’t the first time we’ve seen Windows from this era running on a (relatively) modern ThinkPad. For whatever reason, these two legends of the computing world seem destined to keep running into each other.

[Thanks to Renard for the tip.]

Reproducing Vintage Plastic Parts In Top-Notch Quality

Plastic is a highly useful material, but one that can also be a pain as it ages. Owners of vintage equipment the world over are suffering, as knobs break off, bezels get cracked and parts warp, discolor and fail. Oftentimes, the strategy has been to rob good parts from other broken hardware and cross your fingers that the supply doesn’t dry up. [Eric Strebel] shows us that’s not the only solution – you can replicate vintage plastic parts yourself, with the right tools.

In the recording industry there’s simply no substitute for vintage gear, so a cottage industry has formed around keeping old hardware going. [Eric] was tasked with reproducing VU meter bezels for a classic Neve audio console, as replacement parts haven’t been produced since the 1970s.

The first step is to secure a good quality master for replication. An original bezel is removed, and polished up to remove scratches and blemishes from 40+ years of wear and tear. A silicone mold is then created in a plywood box. Lasercut parts are used to create the base, runner, and vents quickly and easily. The mold is then filled with resin to produce the final part. [Eric] demonstrates the whole process, using a clear silicone and dyed resin to make it more visible for the viewer.

Initial results were unfortunately poor, due to the silicone and hardener used. The parts were usable dimensionally, but had a hazy surface finish giving very poor optical qualities. This was rectified by returning to a known-good silicone compound, which was able to produce perfectly clear parts first time. Impressively, the only finishing required is to snap off the runner and vents. The part is then ready for installation. As a final piece of showmanship, [Eric] then ships the parts in a custom laser-engraved cardboard case. As they say, presentation is everything.

With modern equipment, reproducing vintage parts like knobs and emblems is easier than ever. Video after the break.

Continue reading “Reproducing Vintage Plastic Parts In Top-Notch Quality”

A Vintage Sony Portable TV, Brought Up To Date

In the time before smartphones for on-the-go visual entertainment, there were portable TVs. You might think of a portable TV as a luggable device, but the really cool ones were pocket-sized. Perhaps if you are familiar with pocket TVs you’ll be thinking of a Citizen or a Casio with a matchbox-sized LCD, but before those devices reached the market there was an earlier generation that featured tiny CRTs. These were simply the coolest electronics that an ’80s kid could lust after, and [Nick Reynolds] is lucky enough to have one. It’s a Sony Watchman from some time in the first half of that decade, and because it’s useless in the age of digital broadcasts he’s upgraded it by installing a Raspberry Pi in its case.

The unlikely inspiration for the project came from the 1970s British sci-fi TV series Space 1999, in which portable CRT-based communicators were a prop. They were typical of the sci-fi vision of the future in shows of the period, one that got so much right but didn’t quite see the smartphone coming.

The Watchman features Sony’s angled CRT, and fitting a Pi Zero W into the limited space behind it called for some careful insulation of its parts with Kapton tape. He’s even included a Pi camera module with a contorted run of flexible cable, placing it beneath the screen where a tuning indicator once sat. He has no sound as yet, but is able to demonstrate a working videophone using Ekiga as a client. He has a few more Watchmen, and has plans for a suite of retro videophones, and a Pi 3 based model.

Surprisingly this isn’t the only Sony Watchman that’s had this kind of treatment, previously we’ve brought you one that hosted a Pong game.

A 6502 Computer, With Acres Of Breadboard And Dozens Of Chips

Imagine you’re time-warped back to 1979 and tasked with constructing a personal computer. Could you do it? [RadicalBrad] thinks he can, and his 6502-based “Super VIC” build looks like it’s off to a great retrocomputing start.

Most emulations of old hardware these days go the FPGA route, and while we respect those projects immensely, there’s something to be said for applying a highly artificial constraint at the outset of a project. [RadicalBrad] chose to design like it’s 1979, and limited his ode to the machines of his youth to the 6502 CPU and logic and RAM chips available before 1980. The computer will support NTSC video output and 4-channels of 8-bit sound. No circuit boards will be used – everything is to be assembled on solderless breadboards. So far he has 48 (!) of them ganged together, which sounds like an enormous amount of space to work with, but he still found things crowded enough that some of the DIP bodies were trimmed a bit to fit more closely on the breadboards. The SRAM posed a problem, though, in that the 512K chips he wanted were not available in DIPs. To stay faithful to the constraints, he soldered the SOJ-packaged RAM chips into 40-PIN DIP headers – all 25 chips! We can’t recall a PC of the era sporting 12 megabytes of RAM, but no matter – it’s too cool not to love.

[RadicalBrad] has his work cut out for him, and this could take years to finish. We’re keen to follow his progress and can’t wait till it boots for the first time. Until it does, we’ll just gaze upon such discrete computing wonders as this almost-as-simple-as-possible computer, or even this delightfully noisy adder for a relay computer.

Arduino Shield Makes Driving Nixies Easy

Nixie tubes are adored by hackers across the world for their warm glow that recalls an age of bitter nuclear standoffs and endless proxy wars. However, they’re not the easiest thing to drive, requiring high voltages that can scare microcontrollers senseless. Thankfully, it’s possible to score an Arduino shield that does the heavy lifting for you.

The HV supply is the heart of any Nixie driver.

The shield uses HV5812 drivers to handle the high-voltage side of things, a part more typically used to drive vacuum fluorescent displays. There’s also a DHT22 for temperature and humidity measurements, and a DS3231 real time clock. It’s designed to work with IN-12 and IN-15 tubes, with the part selection depending on whether you’re going for a clock build or a combined thermometer/hygrometer. There’s also an enclosure option available, consisting of two-tone laser etched parts that snap together to give a rather sleek finished look.

For those looking to spin up their own, code is available on Github and schematics are also available. You’ll have to create your own PCB of course, but there are guides that can help you along that path. If you’re looking to whip up a quick Nixie project to get your feet wet, this might just be what you need to get started. Of course, you can always go straight to hard mode, and attempt a functional Nixie watch. Video after the break.

Continue reading “Arduino Shield Makes Driving Nixies Easy”

TI-83 Gets CircuitPython Upgrade

Graphing calculators are an interesting niche market these days. They’re relatively underpowered, and usually come with cheap, low resolution screens to boot. They remain viable almost solely due to their use in education and the fact that their limited connectivity makes them suitable for use in exams. The market is starting to hot up, though – and TI have recently been doing some interesting work with Python on their TI-83.

Rumor has it that TI have been unable to get Python to run viably directly on the TI-83 Premium CE. This led to the development of the TI-Python peripheral, which plugs into the calculator’s expansion port. This allows users to program in Python, with the TI-Python doing the work and the calculator essentially acting as a thin client. The chip inside is an Atmel SAMD21E18A-U, and is apparently running Adafruit’s CircuitPython platform.

This discovery led to further digging, of course. With some hacking, the TI-Python can instead be replaced with other boards based on Atmel SAMD21 chips. For those of you that aren’t in Atmel’s sales team, that means it’s possible to use things like the Adafruit Trinket M0 and the Arduino Zero instead, when flashed with the appropriate CircuitPython firmware. It’s a tricky business, involving USB IDs and some other hacks, but it’s nothing that can’t be achieved in a few hours or so.

This is a hack in its early days, so it’s currently more about building a platform at this stage rather then building fully-fledged projects just yet. We’re fully expecting to see Twitter clients and multiplayer games hit the TI-83 platform before long, of course. When you’ve done it, chuck us a link on the tip line.

[Thanks to PT for the tip!]