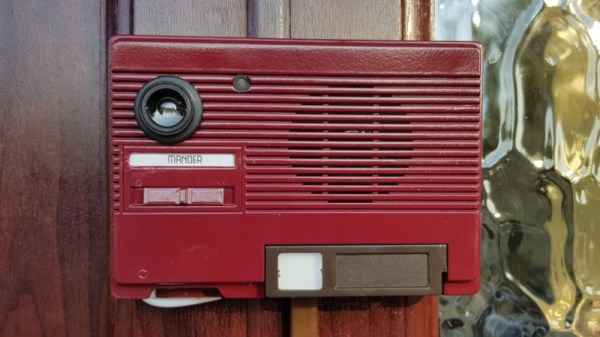
Designing Tiny Motors Right Into The Robot’s Circuit Board

Motors are not overly complex, but this one is downright simple. Carl Bujega has been working on a motor design that heavily relies on the capabilities of the printed circuit board (PCB) fabrication processes. His talk at the 2018 Hackaday Superconference covers how he built a brushless DC motor and speed controller into a PCB. You can watch the newly published video after the break.

There are two main parts of an electric motor; the stator is stationary while the rotor spins on bearings. Electromagnetic forces are used to cause that spinning action. In this case, Carl has built the electromagnets as coils on a 4-layer circuit board (six coils on each layer). When electrified, a magnetic field is generated that pushes against the rare-earth magnets housed in the rotor.

A couple of things are really interesting here. First, those coils are usually made of “magnet wire” (enamel covered wire that is very thin) wrapped around an iron core. Using the circuit board instead saves both physical space, and the time and expense of wrapping coils of wire in the traditional way. Second, Carl has been designing with manufacture in mind; you can see in the image show that his motor design is dead-simple to assemble by inserting a 3mm bearing in the PCB, inserting magnets into the plastic rotor and snapping it into place. The end goal is to make robot actuators that are part of the circuit board itself.

The genesis of this idea came from Carl’s interest in drone design, in fact, he jumped right into a drone startup immediately after finishing his EE. The company didn’t last, but his thirst for interesting designs is ongoing. When looking at reducing the total parts necessary to build a quadcopter he happened on the idea of PCB-based coils and he’s followed it to this motor design, and beyond to some very interesting flexible-PCB robot design work which you can check out on his Hackaday.io page, YouTube, and Twitter.

There are of course some trade-offs to this. The motor is low torque since it uses an air core and not an iron core. And he’s had trouble implementing a sensor-less Electronic Speed Controller (ESC) as the back-EMF from the coils appears to be too weak. Not to fret, he added a hall sensor and has succeeded in designing an ESC that measures just 14mm by 8mm. In fact, he’s holding up the ESC and motor in the image at the top of this article!

Continue reading “Designing Tiny Motors Right Into The Robot’s Circuit Board”

The Art Of Vacuum Tube Fabrication

Vacuum tubes fueled a technological revolution. They made the amplification of signals a reality for transatlantic telephone cables (and transcontinental ones too), they performed logic for early computers, and they delivered that warm fuzzy sound for high fidelity audio. But they were labor intensive to produce, and fragile, so semiconductors came along and replaced tubes in almost every application. But of course tubes are still with us and some tube applications are still critical — you’ll find them used in high-power RF and there are even satellites that depend on klystrons. So there are still experts in tube fabrication around, and Charles Alexanian is one of them. His newly-published talk at the 2018 Hackaday Supercon (found below) is a whirlwind tour of what goes into building a vacuum tube.

The process of building your own vacuum tube isn’t hard, but it’s not a walk in the park. The difficulty comes in the sheer number of processes, and the tricks of the trade found at every step. Charles’ methaphor is that if you build one tube at a time each step is like learning to ride a bicycle again, but if you build many you get into the swing of it and things go a lot better. His talk is a brief overview of everything, but if you want to drill down he also wrote an excellent article that goes further in depth.

In the working components of each tube are the precision parts: the grid (or grids). For the tube to function well these must be accurately produced which can be done with photolithography, but Charles usually uses a winding process involving a lathe. After winding, the grid is stretched to straighten the nickel wire, then cut to length. Other components such as the plate are stamped using an arbor press and simple forms he fabricates for the purpose.

Tube being tested for leaks

Two glass components are used, the dome itself, and feedthrough stems that have a wire for each lead passing through a glass disc. The components are spot welded to the inside portion of the feedthrough stem, then the glass is fused together, again using a lathe. It heads over to a pumping station to evacuate the air from the tube, and is finally tested for leaks using a handheld Tesla coil (see, we knew those weren’t just toys).

Charles proposed his Supercon appearance as a chance to fabricate tubes on-site. We loved the idea, but the amount of gear needed is somewhat prohibitive (annealing ovens, vacuum cabinets, torches for sealing, and the need for 220v, plus space for it all). That’s too bad since we were really hoping to see the Jolly Wrencher in Nixie-tube form — incidentally, Charles says Nixes are simple to make compared to amplifiers and switches. He also mentions that the majority of your time is spent “washing” parts to remove impurities. Fair enough, that part sounds boring, but we hope to endure it at some point in the future because vacuum tube fabrication demos feel very much like a Hackaday event!

Continue reading “The Art Of Vacuum Tube Fabrication”

The 7400 Quad 2-Input NAND Gate, A Neglected Survivor From A Pre-Microprocessor World

There are a range of integrated circuits that most of us would regard as definitive examples of their type, devices which became the go-to for a particular function and which have entered our collective consciousness as electronics enthusiasts. They have been in production since the early days of consumer integrated circuits, remaining in use because of a comprehensive understanding of their characteristics among engineers, and the job they do well.

You can probably name the ones I’m going to rattle off here, the µA741 op-amp designed by David Fullagar for Fairchild in 1968, the NE555 timer from Hans Camenzind for Signetics in 1971, and a personal favourite, Bob Widlar’s µA723 linear regulator for Fairchild in 1967. There may be a few others that readers will name in the comments, but there’s one that until today it’s likely that few of you would have considered. Texas Instruments’ 5400 and 7400 TTL quad 2-input NAND gate has been in continuous production since 1964 and is the progenitor of what is probably the most numerous breed of integrated circuits, yet it doesn’t trip off the tongue when listing famous chips, and none of us can name its designer. So today we’re turning the spotlight on this neglected piece of silicon, and trying to bring it the adulation it deserves. Continue reading “The 7400 Quad 2-Input NAND Gate, A Neglected Survivor From A Pre-Microprocessor World”

Motorize Your Camera Slider, The Hacker Way

Camera sliders are a fantastic tool for those who wish to shoot beautiful and smooth panning video, or take expressive time-lapse shots. They can also be remarkably expensive, which creates an incentive for the DIYer to innovate at home. [Richard] wanted a motorized slider and didn’t want to break the bank, and thus, a build was born.

Starting with an existing non-motorized camera slider makes things easier, though there’s no reason [Richard]’s techniques couldn’t be applied to a completely DIY build. A NEMA stepper motor is fitted to the frame, and connected to the camera shuttle with a toothed belt. The stepper is controlled by an Arduino, which allows for both timelapse and smooth panning modes, and can be controlled with an IR remote sourced from Amazon. The slider is also interfaced with a Processing sketch, which gives a graphical representation of the slider’s current position on the laptop’s screen, which helps for setting up a shot.

[Richard] has shared the code and a shopping list, and is confident that the build can be completed for under $100. That’s a satisfying price given the quality of shots possible with a good slider.

We see plenty of slider builds here, including this impressive pantograph-type build. Video after the break.

[Thanks to Baldpower for the tip!]

Continue reading “Motorize Your Camera Slider, The Hacker Way”

Doomba Transports Your Living Room To Hell

Despite being over 25 years old, the original DOOM is still a favorite among gamers and hackers alike. For years now, running the 1993 demonic shooter has been a critical milestone when hacking or reverse engineering a piece of gear, and at this point we’ve seen it run on everything from voting machines to cameras.

But this time around, DOOM isn’t actually running on the device being hacked. Instead, the Roomba 980 that [Rich Whitehouse] has doing his bidding is being used to generate new DOOM levels based on the maps it makes of rooms while going about its business. To be fair they’re pretty simplistic maps, and most of us don’t live in a home quite palatial enough to even fill out shareware trial of id Software’s classic, but it’s still a neat trick.

For those who might not be up to date with the latest and greatest in the world of robotic helpers, newer model Roomba vacuums are equipped with a camera and the ability to generate 3D maps of its environment using a technique called Vision Simultaneous Localization and Mapping (VSLAM). Ostensibly this capability is used to create accurate maps of hazards in the cleaning area, but of course it did set off some privacy alarm bells when introduced due to the possibility that scans of users homes could end up being used for nefarious purposes. Roomba manufacturer iRobot swears they aren’t doing anything suspect with the data their robots collect while traveling through the user’s home, but that hasn’t stopped [Rich] from using the technology as a portal to Hell.

Using “DOOMBA”, the user is able to download the mapping data off of their Roomba 980 (it might work on other models, but hasn’t been tested yet) over the local network and import it into Noesis, a 3D model viewing program developed by [Rich]. The imported map is essentially just a 2D diagram of the home’s floor plan, which on its own wouldn’t make for a terribly interesting DOOM level, so the software will take the liberty of seeding it with weapons, baddies, and all the other varied delights of the netherworld. The user can fiddle around with these settings to try and fine-tune their homespun hellscape, or just let “DOOMBA” randomize it all so they can get on with the ripping and tearing.

If you’ve got Roomba in hand but aren’t a DOOM fan, have no fear. We’ve seen plenty of hacks and mods for everyone’s favorite house-cleaning hockey puck which happen to be of the non-demonic variety. If you just can’t get enough DOOM, stick around for tomorrow’s 25th anniversary celebration article. You will want to copy the banner art and use it as your new desktop background.

Word Clock Don’t Need No Stencil Font

Word clocks use natural language to display the time. They’ve been in vogue in the last 20 years or so, as low-cost digital technology makes them particularly cost effective and easy to build for the average maker. The hardware and software is a solved problem, so presentation is everything. Luckily, [watsaig]’s effort does not disappoint.

The build began with a timeframe of just seven days — a narrow window given [watsaig]’s lack of experience with lasercutting and woodworking. Not content to let that get in the way, it was time to get to work. Wood was sourced from Amazon and designs laid out, before lasercutting began in earnest.

[watsaig] decided to fill all of the letters with epoxy to achieve a flat finished surface that also served as diffuser for the LEDs. To avoid using an unsightly stencil font, the centers (the cut out portion) of letters like O, A, and R had to be placed by hand. Unfortunately his turned out quite badly. When using a squeegee method to work epoxy into the letters, the inserts tended to shift, ruining the face plate.

Undeterred, the clock face was recreated from scratch, and it was determined that a pipette was a far more suitable tool, allowing the letters to be filled with epoxy without unduly disturbing the letter inserts. The final result is visually attractive, finished with a wonderful stain and giving a pleasing glow thanks the careful attention to diffusion and masking. The hidden Happy Birthday message may have been lost in the rush, but it’s the thought that counts, after all.

For a Continental take, check out this word clock in Catalan.

Delicious Vector Game Console Runs Pac-Man, Tetris, And Mario

The only question we have about [mitxela]’s DIY vector graphics game console is: Why did he wait five years to tell the world about it?

Judging by the projects we’ve seen before, from his tiny LED earrings to cramming a MIDI synthesizer into both a DIN plug and later a USB plug, [mitxela] likes a challenge. And while those projects were underway, the game console you’ll see in the video below was sitting on the shelf, hidden away from the world. That’s a shame, because this is quite a build.

Using a CRT oscilloscope in X-Y mode as a vector display, the console faithfully reproduces some classic games, most of which, curiously enough, were not originally vector games. There are implementations of the Anaconda, RetroRacer, and AstroLander minigames from Timesplitter 2. There are also versions of Pac-Man, Tetris, and even Super Mario Brothers. Most of the games were prototyped in JavaScript before being translated into assembly and placed onto EEPROM external cartridges, to be read by the ATMega128 inside the console. Sound and music are generated using the ATMega’s hardware timers, with a little help from a reverse-biased transistor for white noise and a few op-amps.

From someone who claims to have known little about electronics at the beginning of the project, this is pretty impressive stuff. Our only quibbles are the delay in telling us about it, and the lack of an Asteroids implementation. The former is forgivable, though, because the documentation is so thorough and the project is so cool. The latter? Well, one can hope.

Continue reading “Delicious Vector Game Console Runs Pac-Man, Tetris, And Mario”