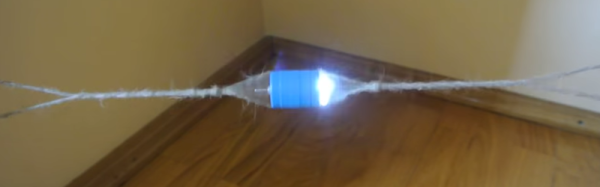
Bring Saturday Mornings Back To Life With This Cartoon Server

It was an American ritual for over four decades: wake up early on Saturday morning, prepare a bowl of sugar, and occupy the couch for four glorious hours of cartoons. The only interruptions came when the least-significant sibling had to be commanded to get up to change the channel to one of the two other networks, or when your mom decided to vacuum the TV room. It was a beautiful ritual, but now it’s gone.

Or is it? If you really want to recapture your misspent youth, you can try this Raspberry Pi multi-channel cartoon server with retro TV display. [FozzTexx] started with a yard sale 13″ Zenith set, which languished in his shop for want of a mission. When he found a four-channel video modulator, he knew he had the makings of the full channel-changing Saturday morning experience.

Four Raspberry Pis were configured to serve up four separate streams of cartoons from his Plex server, and after a late Friday night of hacking the whole thing together, each stream was ready to go live at 7:00 AM on Saturday. [FozzTexx] thought of everything — from the pre-“broadcast day” test pattern to actual commercials spliced into the cartoons to the static between the channels, it’s all there in low-definition glory. He even printed up faux TV Guide pages! You can watch a brief demo on [FozzTexx]’ Twitter feed, or you can watch the entire 2-hour Periscope feed if you’re feeling nostalgic.

[FozzTexx] chose UHF channels for his “stations,” so if you want to replicate this build it may pay to bone up on analog TV tuner basics. Or if it’s just the retro look you’re going for, this custom case inspired by a 40s TV might be nice to check out.

Continue reading “Bring Saturday Mornings Back To Life With This Cartoon Server”

MicroVox driven by Arduino Uno

MicroVox Puts The 80’s Back Into Your Computer’s Voice

[Monta Elkins] got it in his mind that he wanted to try out an old-style speech synthesizer with the SC-01 (or SC-01A) chip, one that uses phonemes to produce speech. After searching online he found a MicroVox text-to-speech synthesizer from the 1980s based around the chip, and after putting together a makeshift serial cable, he connected it up to an Arduino Uno and tried it out. It has that 8-bit artificial voice that many of us remember fondly and is fairly understandable.

The SC-01, and then the SC-01A, were made by Votrax International, Inc. In addition to the MicroVox, the SC-01 and SC-01A were used in the Heath Hero robot, the VS-100 synthesizer add-on for TRS-80s, various arcade games such as Qbert and Krull, and in a variety of other products. Its input determines which phonemes to play and where it shines is in producing good transitions between them to come up with decent speech, much better than you’d get if you just play the phonemes one after the other.

microvox-manualThe MicroVox has a 25-pin RS-232 serial port as well as a parallel port and a speaker jack. In addition to the SC-01A, it has a 6502 under the hood. [Monta] was lucky to also receive the manual, and what a manual it is! In addition to a list of the supported phonemes and words, it also contains the schematics, parts list and details for the serial port which alone would make for fun reading. We really liked the taped-in note seen in this screenshot. It has a hand-written noted that says “Factory Corrected 10/18/82”.

Following along with [Monta] in the video below, he finds the serial port’s input buffer chip datasheet online and verifies the voltage levels. Next he opens up the case and uses dips switches to set baud rate, data bits, parity, stop bits and so on. After hooking up the speakers, putting together a makeshift cable for RX, TX and ground, and writing a little Arduino code, he sends it text and out comes the speech.

Continue reading “MicroVox Puts The 80’s Back Into Your Computer’s Voice”

A Full Speed, Portable Apple //e

A while back, [Jorj] caught wind of a Hackaday post from December. It was a handheld Apple IIe, emulated on an ATMega1284p. An impressive feat, no doubt, but it’s all wrong. This ATapple only has 12k of RAM and only runs at 70% of the correct speed. The ATapple is impressive, but [Jorj] knew he could do better. He set out to create the ultimate portable Apple IIe. By all accounts, he succeeded.

This project and its inspiration have a few things in common. They’re both assembled on perfboard, using tiny tact switches for the keyboard. The display is a standard TFT display easily sourced from eBay, Amazon, or Aliexpress. There’s a speaker for terribad Apple II audio on both, and gigantic 5 1/4″ floppies have been shrunk down to the size of an SD card. That’s where the similarities end.

[Jorj] knew he needed horsepower for this build, so he turned to the most powerful microcontroller development board he had on his workbench: the Teensy 3.6. This is a 180 MHz ARM Cortex M4 running a full-speed Apple IIe emulator. Writing a simple 6502 emulator is straightforward, but Apple IIe emulation also requires an MMU. the complete emulator is available in [Jorj]’s repo, and passes all the tests for 6502 functionality.

The project runs all Apple II software with ease, but we’re really struck by how simple the entire circuit is. Aside from the Teensy, there really isn’t much to this build. It’s an off-the-shelf display, a dead simple keyboard matrix, and a little bit of miscellaneous circuitry. It’s simple enough to be built on a piece of perfboard, and we hope simple enough for someone to clone the circuit and share the PCBs.

A 6502 Retrocomputer In A Very Tidy Package

One of the designers whose work we see constantly in the world of retrocomputing is [Grant Searle], whose work on minimal chip count microcomputers has spawned a host of implementations across several processor families.

Often a retrocomputer is by necessity quite large, as an inevitable consequence of having integrated circuits in the period-correct dual-in-line packages with 0.1″ spaced pins. Back in the day there were few micros whose PCBs were smaller than a Eurocard (100 mm x 160 mm, 4″ x 6.3″), and many boasted PCBs much larger.

[Mark Feldman] though has taken a [Grant Searle] 6502 design and fitted it into a much smaller footprint through ingenious use of two stacked Perf+ prototyping boards. This is a stripboard product that features horizontal traces on one side and vertical on the other, which lends itself to compactness. Continue reading “A 6502 Retrocomputer In A Very Tidy Package”

An Electronic 90V Anode Battery

One of the miracle technological gadgets of the 1950s and 1960s was the transistor radio. Something that can be had for a few dollars today, but which in its day represented the last word in futuristic sophistication. Of course, it’s worth remembering that portable radios were nothing new when the transistor appeared. There had been tube radios in small attaché cases, but they had never really caught the imagination in the same way. They were bulky, like all tube radios they had to warm up, and they required a pair of hefty batteries to work.

If you have a portable tube radio today, the chances are you won’t be able to use it. The low voltage heater battery can easily be substituted with a modern equivalent, but the 90V anode batteries are long out of production. Your best bet is to build an inverter, and if you’re at a loss for where to start then [Ronald Dekker] has gone through a significant design exercise to produce a variety of routes to achieve that goal. It’s a page that’s a few years old, but still a fascinating read.

A problem with these radios lies with their sensitivity to noise. They are AM receivers from an era with a low electrical noise floor, so they don’t react well to high-frequency switch-mode power supplies. Thus, the inverters usually tasked for projects like this are low-frequency, at 50Hz as this is a European project, to mimic one source of electrical noise that would have been an issue for the designers in the 1950s.

We are taken through transformer selection and a variety of discrete inverter designs using multivibrators, investigating how to maximize efficiency through careful manipulation of switch-on and switch-off times. Then a PIC microcontroller design is presented, and finally a CMOS ring counter.

The final converter is mounted in a diecast box and covered with a printed card shell to mimic a period battery. If you weren’t intimately familiar with battery tube radios, you might mistake it for the real thing.

We’ve featured one of [Ronald]’s designs before, though only in passing. His Nixie PSU was used in this rather frightening clock with no PCB.

Relay Computer Starts With An Adder That Makes A Racket

Computers built using discrete logic chips? Seen it. Computers from individual transistors? Impressive, but it’s been done. A computer built out of electromechanical relays? Bring on the ozone!

The aptly named [Clickity Clack]’s new YouTube channel promises to be very interesting if he can actually pull off a working computer using nothing but relays. But even if he doesn’t get beyond the three videos in the playlist already, the channel is definitely worth checking out. We’ve never seen a simpler, clearer explanation of binary logic, and [Clickity Clack]’s relay version of the basic logic gates is a great introduction to the concepts.

Using custom PCBs hosting banks of DPDT relays, he progresses from the basic AND and XOR gates to half adders and full adders, explaining how carry in and carry out works. Everything is modular, so four of his 4-bit adder cards eventually get together to form a 16-bit adder, which we assume will be used to build out a very noisy yet entertaining ALU. We’re looking forward to that and relay implementations of the flip-flops and other elements he’ll need for a full computer.

And pay no mind to our earlier dismissal of non-traditional computer projects. It’s worth checking out this discrete 7400 logic computer and this all-transistor build. They’re impressive too in their own way, if a bit quieter than [Clickety Clack]’s project.

Continue reading “Relay Computer Starts With An Adder That Makes A Racket”

How A Van De Graaff Generator Works

What I particularly like about the Van de Graaff (or VDG) is that it’s a combination of a few discrete scientific principles and some mechanically produced current, making it an interesting study. For example, did you know that its voltage is limited mostly by the diameter and curvature of the dome? That’s why a handheld one is harmless but you want to avoid getting zapped by one with a 15″ diameter dome. What follows is a journey through the workings of this interesting high voltage generator.

Continue reading “How A Van De Graaff Generator Works”