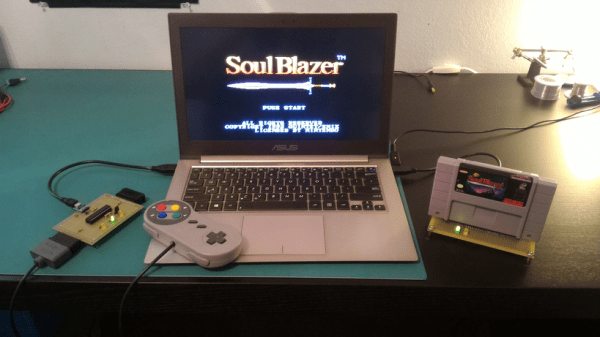
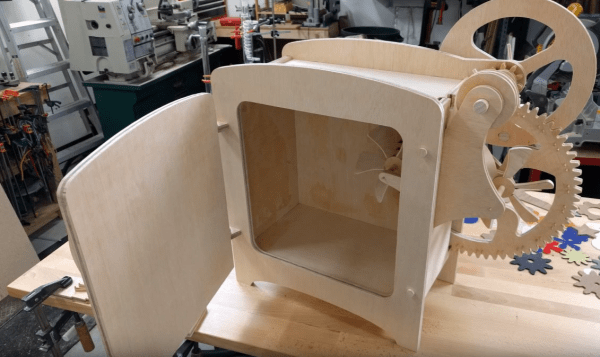
[Andrew Milkovich] was inspired build his own Super Nintendo cartridge reader based on a device we covered an eternity (in internet years) ago. The device mounts a real cartridge as a USB mass storage device, allowing you to play your games using an emulator directly from the cart.
This uses a Teensy++ 2.0 at its core. [Andrew] had to desolder the EEPROM pins from the SNES cartridge and reverse engineer the pinouts himself, but the end result was a device that could successfully read the cartridge without erasing it, no small accomplishment. The finished cartridge reader is build on some protoboard and we’d like to complement [Andrew] on his jumper routing on the underside of that board.
Of course, the experience of any console is just not the same without the original controller. So [Andrew] went a step further and made his own SNES controller to USB converter. This had the venerable Atmel ATmega328 at its core, and can be used separate from the cartridge reader if desired.
We are fortunate to live in an age of commoditized high-power computer hardware and driver abstraction, in which most up-to-date computers have the ability to do more or less anything that requires keeping up with the attention of a human without breaking a sweat. Processors are very fast, memory is plentiful, and 3D graphics acceleration is both speedy and ubiquitous.
Thirty years ago it was a different matter on the desktop. Even the fastest processors of the day would struggle to perform on their own all the tasks demanded of them by a 1980s teenager who had gained a taste for arcade games. The manufacturers rose to this challenge by surrounding whichever CPU they had chosen with custom co-processors, ASICs that would take away the heavy lifting associated with 2D graphics acceleration, or audio and music synthesis.
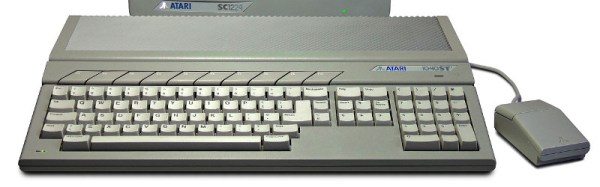
One of the 1980s objects of computing desire was the Atari ST, featuring a Motorola 68000 processor, a then-astounding 512k of RAM, a GUI OS, high-res colour graphics, and 3.5″ floppy drive storage. Were you to open up the case of your ST you’d have found those ASICs we mentioned as being responsible for its impressive spec.
Jumping forward three decades, [Christian Zietz] found that there was frustratingly little information on the ST ASIC internal workings. Since a trove of backed-up data became available when Atari closed down he thought it would be worth digging through it to see what he could find. His write-up is a story of detective work in ancient OS and backup software archaeology, but it paid off as he found schematics for not only an ASIC from an unreleased Atari product but for the early ST ASICs he was looking for. He found hundreds of pages of schematics and timing diagrams which will surely take the efforts of many Atari enthusiasts to fully understand, and best of all he thinks there are more to be unlocked.
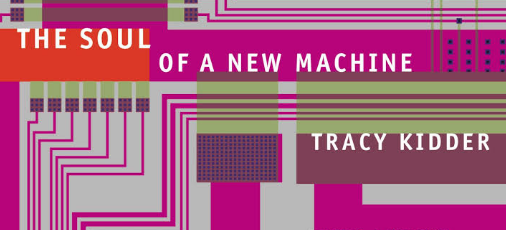
If there was one book that describes what it means to be in the trenches of a cutting edge design, that book is The Soul Of a New Machine. Tracy Kidder’s Pulitzer prize-winning book has been an inspiration to thousands over the years.
Soul is the story of the creation of the Data General Eclipse MV/8000, code-named Eagle. Eagle was Data General’s first 32-bit minicomputer. If you’re not a retrocomputing aficionado, minicomputers were a major industry back in the 70’s and 80’s. Starting in 1964 with the Digital Equipment Corporation (DEC) PDP-8, minis provided a low-cost means for companies to get a computer. The only other option was a huge mainframe from companies like IBM. Minicomputers chugged along until the 1990s when microprocessor-based PCs and workstations passed them by. The market, and the industry evaporated.
Today, more than 30 years later, minicomputers are all but forgotten. Data General itself is long gone, purchased by EMC in 1999. DG’s mark on the landscape has all but been erased by the swiftly moving sands of technical progress. All except for the snapshot Kidder set down in Soul.
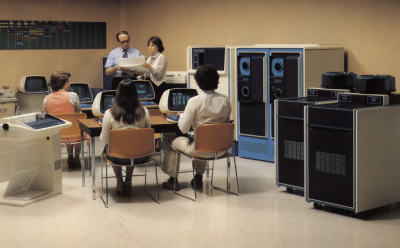
An MV/8000 installation (from DG literature)
The technical side of designing a new computer is just one part of this book. The Soul of a New Machine is three stories: the story of the engineers, the story of the managers, and the story of the machine they built. For this reason, the book has found itself on the reading list of engineering schools and management institutes alike.
The thing that makes this book appeal to the masses is Kidder’s uncanny ability to explain incredibly complex topics in layman’s terms. He manages to explain the inner workings of a 32-bit CPU, all the way down to the level of microcode. He delves into Programmable Array Logic (PALs), forerunners of the CPLD and FPGA devices you read about on our pages today. PALs were a hot new technology back in the late 70’s. They allowed the Eagle team to make changes quickly — without pulling out their wire wrapping tools.
Kidder manages to explain these things in a way that doesn’t leave the average Joe scratching their head, yet doesn’t bore the technically savvy. If he ever decides to stop writing non-fiction, Tracy Kidder would have a career writing user manuals.
The Soul of a New Machine starts in a very unlikely place – on the deck of a sailing ship during a rough storm. The scene is our introduction to the star of the book – Tom West, a manager at Data General. West is multifaceted and enigmatic to say the least. A folk guitarist who was inspired to work on electronics by the Apollo program. He was a few years too late for NASA though. Eventually he found himself travelling the world building and adjusting incredibly accurate clocks at astronomical observatories for the Smithsonian. This meandering path eventually led him to DG, where he was hired as a computer engineer and quickly worked his way up the ranks.
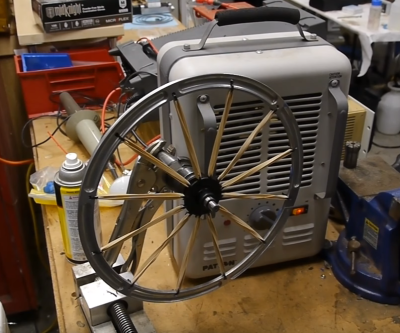
Ever noticed that a rubber band gets warmer when it’s stretched? The bands also get cooler when allowed to snap back to relaxed length? [Ben Krasnow] noticed, and he built a rubber band cooled refrigerator to demonstrate the concept. The idea of stretching a rubber band to make it hotter, then releasing it to make it cooler seems a bit counter intuitive. Normally when things get smaller (like a gas being compressed) they get hotter. When pressure is released the gas gets cooler. Rubber bands do the exact opposite. Stretching a rubber band makes it hot. Releasing the stretched band causes it to get cooler.
No, the second law of thermodynamics isn’t in jeopardy. The secret is in the molecular structure of rubber bands. The bands are made of long polymer chains. A relaxed rubber band’s chains are a tangled mess. Stretching the band causes the chains to untangle and line up in an orderly fashion. By stretching the band you are decreasing its entropy. The energy of the molecules in the band don’t change, but entropy does. All the work one does to stretch the band has to go somewhere, and that somewhere is heat. This is all an example of entropic force. For a physics model of what’s going on, check out ideal chains. If you’re confused, watch the video. [Ben] does a better job of explaining entropic force visually than we can with text.
To test this phenomenon out, [Ben] first built a wheel with rubber bands as spokes. Placing the wheel in front of a heater caused it to slowly rotate. [Ben] then reversed the process by building a refrigerator. He modeled his parts in solidworks, then cut parts with his Shaper handheld CNC. The fridge itself consists of an offset wheel of rubber bands. The bands are stretched outside the fridge, and released inside. Two fans help transfer the thermal energy from the bands to the air. The whole thing is hand cranked, so this would make a perfect museum or educational demonstration. Cranking the fridge for 5 minutes did get the air inside a couple of degrees cooler. Rubber is never going to displace standard refrigerants, but this is a great demo of the principles of entropic force.
For more thermodynamic fun, check out [Al Williams] recent article about building a DIY heat pipe.
When the story of an invention is repeated as Received Opinion for the younger generation it is so often presented as a single one-off event, with a named inventor. Before the event there was no invention, then as if by magic it was there. That apple falling on Isaac Newton’s head, or Archimedes overflowing his bath, you’ve heard the stories. The inventor’s name will sometimes differ depending on which country you are in when you hear the story, which provides an insight into the flaws in the simple invention tales. The truth is in so many cases an invention does not have a single Eureka moment, instead the named inventor builds on the work of so many others who have gone before and is the lucky engineer or scientist whose ideas result in the magic breakthrough before anyone else’s.
The history of computing is no exception, with many steps along the path that has given us the devices we rely on for so much today. Blaise Pascal’s 17th century French mechanical calculator, Charles Babbage and Ada, Countess Lovelace’s work in 19th century Britain, Herman Hollerith’s American tabulators at the end of that century, or Konrad Zuse’s work in prewar Germany represent just a few of them.
So if we are to search for an inventor in this field we have to be a little more specific than “Who invented the first computer?”, because there are so many candidates. If we restrict the question to “Who invented the first programmable electronic digital computer?” we have a much simpler answer, because we have ample evidence of the machine in question. The Received Opinion answer is therefore “The first programmable electronic digital computer was Colossus, invented at Bletchley Park in World War Two by Alan Turing to break the Nazi Enigma codes, and it was kept secret until the 1970s”.
It’s such a temptingly perfect soundbite laden with pluck and derring-do that could so easily be taken from a 1950s Eagle comic, isn’t it. Unfortunately it contains such significant untruths as to be rendered useless. Colossus is the computer you are looking for, it was developed in World War Two and kept secret for many years afterwards, but the rest of the Received Opinion answer is false. It wasn’t invented at Bletchley, its job was not the Enigma work, and most surprisingly Alan Turing’s direct involvement was only peripheral. The real story is much more interesting.
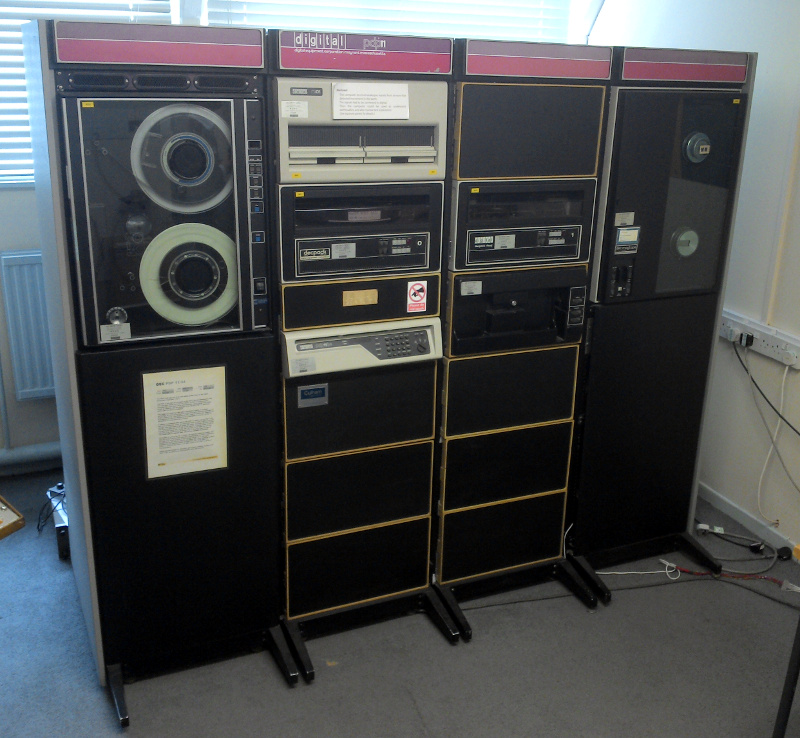
If you entered the world of professional computing sometime in the 1960s or 1970s there is a high probability that you would have found yourself working on a minicomputer. These were a class of computer smaller than the colossal mainframes of the day, with a price tag that put them within the range of medium-sized companies and institutions rather than large corporations or government-funded entities. Physically they were not small machines, but compared to the mainframes they did not require a special building to house them, or a high-power electrical supply.
One of the most prominent among the suppliers of minicomputers was Digital Equipment Corporation, otherwise known as DEC. Their PDP line of machines dominated the market, and can be found in the ancestry of many of the things we take for granted today. The first UNIX development in 1969 for instance was performed on a DEC PDP-7.
DEC’s flagship product line of the 1970s was the 16-bit PDP-11 series, launched in 1970 and continuing in production until sometime in the late 1990s. Huge numbers of these machines were sold, and it is likely that nearly all adults reading this have at some time or other encountered one at work even if we are unaware that the supermarket till receipt, invoice, or doctor’s appointment slip in our hand was processed on it.
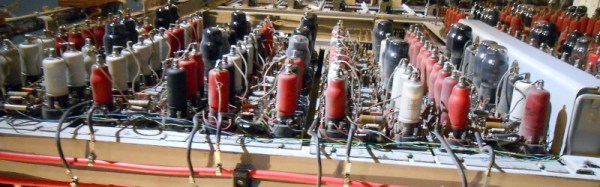
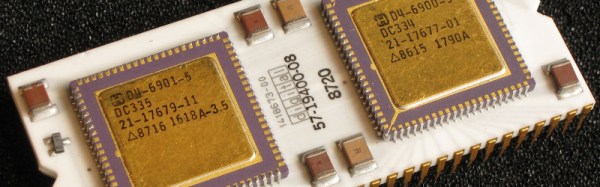
During that over-20-year lifespan of course DEC did not retain the 74 logic based architecture of the earliest model. Successive PDP-11 generations featured ever greater integration of their processor, culminating by the 1980s in the J-11, a CMOS microprocessor implementation of a PDP-11/70. This took the form of two integrated circuits mounted on a large 60-pin DIP ceramic wafer. It was one of these devices that came the way of [bhilpert], and instead of retaining it as a curio he decided to see if he could make it work.
The PDP-11 processors had a useful feature: a debugging console built into their hardware. This means that it should be a relatively simple task to bring up a PDP-11 processor like the J-11 without providing the rest of the PDP-11 to support it, and it was this task that he set about performing. Providing a 6402 UART at the address expected of the console with a bit of 74 glue logic, a bit more 74 for an address latch, and a couple of 6264 8K by 8 RAM chips gave him a very simple but functional PDP-11 on a breadboard. He found it would run with a clock speed as high as 11MHz, but baulked at a 14MHz crystal. He suggests that the breadboard layout may be responsible for this. Hand-keying a couple of test programs, he was able to demonstrate it working.
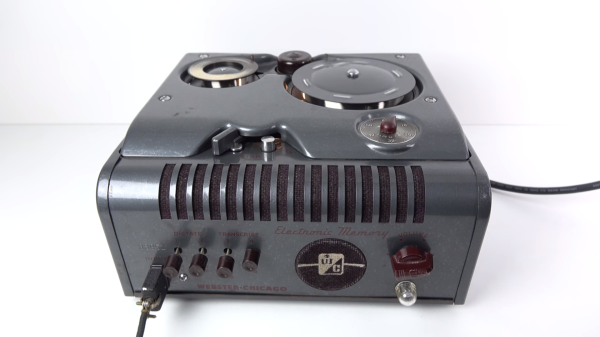
For a brief period in the 1940’s it might have been possible for a young enamored soul to hand his hopeful a romantic mix-spool of wire. This was right before the magnetic tape recorder and its derivatives came into full swing and dominated the industry thoroughly until the advent of the compact disk and under a hundred kilogram hard disk drives. [Techmoan] tells us all about it in this video.
The device works as one would expect, but it still sounds a little crazy. Take a ridiculously long spool of steel wire the size of a human hair(a 1 hour spool was 2.2km of wire), wind that through a recording head at high speed, magnetize the wire, and spool it onto a receiving spool.
If you’re really lucky the wire won’t dramatically break causing an irreversible tangle of wire. At that point you can reverse the process and hear the recorded sound. As [Techmoan] shows, the sound can best be described as… almost okay. Considering that its chief competition at the time was sound carved into expensive aluminum acetate plates, this wasn’t the worst.
The wire recorder lived on for a few more years in niche applications such as airplane black boxes. It finally died, but it does sound like a really fun couple-of-weekends project to try and build one. Make sure and take good pictures and send it in if any of you do.
 retch the band has to go somewhere, and that somewhere is heat. This is all an example of