An Epic Quest To Put More Music On An IPod Nano 3G

While many would argue that the original iPod is the most iconic entry in the long and diverse line of digital audio players that Apple released over the years, there must certainly be some consideration for the third generation (3G) iPod Nano. It’s a device that was ahead of its time in many ways, and is still perfectly usable today, although [Tucker Osman] does think it could stand to have its maximum flash storage doubled to 16 GB.

Now, we’d like to tell you that he’s already succeeded in this task. After all, in theory, it should be pretty straightforward: just remove the 8 GB flash chip and replace it with a pin-compatible 16 GB version. But of course, this is Apple we’re talking about. Nothing is ever quite that easy, and it seems that at every turn both the hardware and software in the thirteen-year-old iPod are fighting the change.

It took several attempts before the original flash chip could be swapped out, but eventually [Tucker] and his friend [Wesley] got one to survive the operation. Unfortunately, all they had to show for their effort was an unhelpful error screen.

From here on out the assumption was that they were dealing with a software problem. Luckily the Rockbox bootloader had previously been ported to the 3G Nano, which helped get the ball rolling. The next step would be to patch the Nano’s firmware to accept the ID of the new flash chip, but after a year of work, it’s turned out to be a bit more complicated than that.

[Tucker] hasn’t given up yet, and is actively looking for anyone who’d like to help out with his quest. He’s shared some information with a few like minded individuals on Hackaday.io, and he’s also started a Discord server dedicated to Nano hacking. At this point, it sounds like he’s very close to actually reading data from the 16 GB chip, but there’s still a long way to go before the Nano’s firmware will actually play music from it.

Despite most people now using their smartphones to play music these days, we still see a lot of interest in upgrading and modernizing the iPod. From replacing their original hard drives with micro SD cards to installing a Raspberry Pi Zero in place of the original electronics, hackers are still infatuated with Apple’s legendary media player.

Continue reading “An Epic Quest To Put More Music On An IPod Nano 3G”

Build An ESP32 Stock Ticker To Watch Your GME Gains

Meme investing is all the rage these days, and what better way to get in on the loss fun than with your very own old-timey mechanical stock ticker? Unfortunately, they’re about as expensive and rare as you might expect for a piece of Victorian-era electronics. Lucky for us, [secretbatcave] has shown that you can put together a functional look-alike that costs about as much as a GameStop (GME) share was worth before it started heading to the Moon.

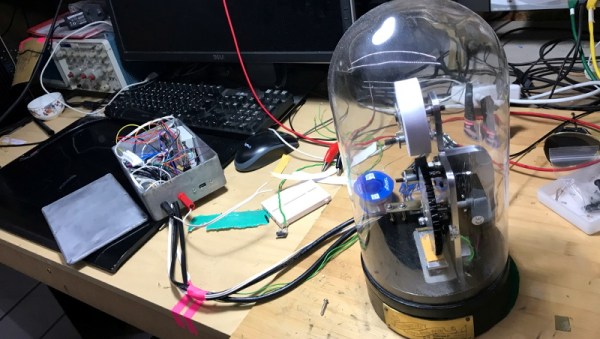
This might seem like an ambitious project, but in actuality the machine only has a few moving parts. There’s a stepper motor to feed the paper, another to spin an inked embossing wheel, and a couple of solenoids attached to a pusher plate. Rather than trying to move the heavy wheel, the pusher plate smashes the paper up into it. The fact that this produces a satisfying “clack” sound as each character is printed is just an added bonus.

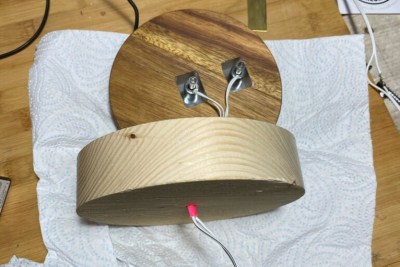
Extending the base to hold the solenoids.

To sell the look, [secretbatcave] put the whole mechanism inside a tall glass dome from IKEA. The matching wooden base was extended so the pusher plate solenoids could fit inside, after which it was dunked in ink and sprayed with a gloss sealer to give it that shiny black finish people seemed to love in the 1900s. With the addition of an engraved brass nameplate, it looks like the machine fell out of a time warp.

In terms of electronics, there’s an ESP32, a pair of stepper motor controllers, and a relay for the solenoids. As of right now it all lives in a rather utilitarian box that’s tethered to the ticker, but we’re sure the lot could get tucked under the base with the help of a custom PCB should you be so inclined.

With an ESP32 at the helm, the ticker could easily be configured to print out whatever data it receives over the network or picks up from MQTT. With hardware like this and a pair of Diamond Hands, those tendies are as good as yours.

Continue reading “Build An ESP32 Stock Ticker To Watch Your GME Gains”

Woofer-Based Parts Cleaner Bounces To The Beat

Is there anything more satisfying than building a useful machine from mostly junk? We think not. [ke4mcl] is a big fan of reusing and repurposing things before settling for the recycle bin, and was in the market for a vibratory parts tumbler to quickly clean off old, rusty bits and bobs in the course of repairing old electronics. For just $10, most of which went into a new tube of RTV silicone, [ke4mcl] built their own tumbler and came away with a reusable amplifier setup in the process.

We’ve all seen speaker cones dance, and they are definitely our favorite way to observe non-Newtonian fluids. This old woofer can still move, so it’s got a second life shaking sand and screws around until they’re somewhat shiny. The ideal woofer for this purpose has a rubber surround — that’s the ring that connects the speaker cone to the frame. [ke4mcl]’s foam-surrounded woofer works just as well, though it may not last as long.

After scrounging a container with a screw-top lid that fits the woofer perfectly, [ke4mcl] joined them together with a bead of RTV silicone. Since there weren’t any amplifiers lying around, [ke4mcl] spent a few bucks on a class D amplifier board and found a spare laptop brick to power it. An old phone with a tone generator app gets the sand churning with a friendly sine wave, which you can see in the videos after the break.

We think it’s particularly nice to keep things like fire extinguishers out of the landfill. If you don’t need a parts tumbler, why not use one to make your own refillable, re-pressurizable solvent container?

Continue reading “Woofer-Based Parts Cleaner Bounces To The Beat”

Toggle Switch Puzzle Boggles The Mind, Opens The Box

We all have too much stock of one component or another. Maybe you have more audio pots than you know what to do with, or maybe it’s zener diodes. For [technologyguy], that thing is a pile of toggle switches.  Fortunately he’s always wanted to build a locking box with a binary code that’s laid out in switches — as in, find the right code, and a solenoid unlatches the box. This lovely parts bin special only responds to two combinations out of a possible 4,000+, so anyone who tries to open it should probably block out the afternoon.

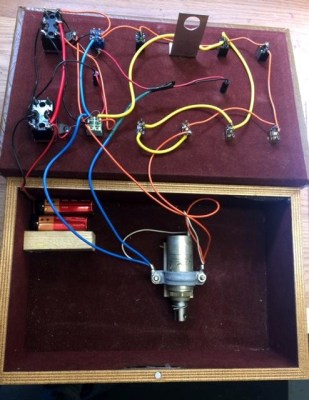
Inside you’ll find two 9 V batteries, a home-brew metal latch, a solenoid, and the undersides of four DPDT and eight SPDT toggle switches. If you just picked this thing up and had no idea what was going on, you’d be so screwed as to what to do first. The box needs power, so you’d have to figure out which switch is which. But it’s so much harder than that, because the bottom left switch selects between the two paths that result in an unlocked book-box.

The next two toggles in from the left are on/off selectors for code A and code B, so not only do you have to have the right path chosen, you have to power it, too. The only progress indicators are the LEDs — there’s one for main power, and the other lets you know that the box is unlatched. What a fun conversation piece for the coffee table Zoom-viewable area!

Want to do something far less useful with your throng of toggles? How about a complicated useless machine?

BEAM-Powered, Ball-Flinging Beam Has Us Beaming

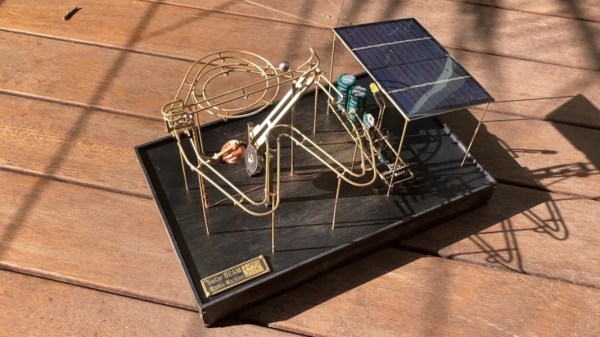
We have a soft spot for BEAM projects, because we love to see the Sun do fun things when aided by large capacitors. [NanoRobotGeek]’s marble machine is an extraordinary example — once sufficiently charged, the two 4700 μF capacitors dump power into a home-brew solenoid, which catapults the ball bearing into action toward the precipice of two tracks.

[NanoRobotGeek] started with the freely-available Suneater solar circuit. It’s a staple of BEAM robotics, slightly modified to fit the needs of this particular project. First up was verifying that the lever (or beam, if you will) principle would work at all, and [NanoRobotGeek] just built it up from there in admirable detail. The fact that it alternates between the swirly track and the zigzag track is entrancing.

There are several disciplines at play here, and we think it’s beautifully made all around, especially since this was [NanoRobotGeek]’s first foray into track bending. We love the way it flings the ball so crisply, and the track-changing lever is pretty darn satisfying, too. You can check it out in action in the video after the break.

Although this was [NanoRobotGeek]’s maiden marble track, it’s not their first circuit sculpture — check out this flapping, BEAM-powered dragonfly.

Continue reading “BEAM-Powered, Ball-Flinging Beam Has Us Beaming”

The Dynamotor Simplified

[Robert Murray-Smith] doesn’t like the price of inverters to convert DC to AC. That led him to build a dynamotor, or what is sometimes called a motor-generator set. These devices are just DC motors driving a generator. Of course, motors can also be used as generators and [Robert] had a stack of brushless motors in the form of PC fans. A two-fan dynamotor was born.

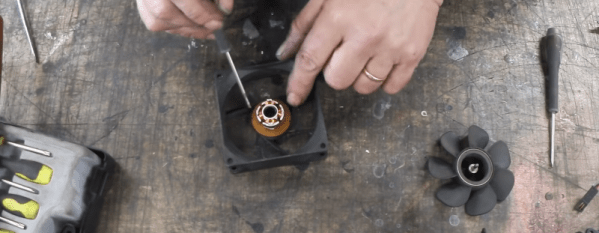
The brushless motors are attractive because, traditionally, the brushes are what usually fail on a dynamotor. The fan that will act as a generator needs some surgery, but it is simple. He scraped off all the control electronics and connected wires to the coils to form a three-phase generator. There’s no need for the fan blades in that configuration, either. If you were using ordinary motors and a generator, getting shafts concentric would be an important task. With the fans, it is simple to just line up the mounting holes and you get perfect alignment for free.

How does it work? [Robert] has a second video showing the output on a scope. You can see both videos below. The dynamotor makes a good-looking sine wave, probably much better than most reasonable-priced solid state inverters. He didn’t mention how much current he could successfully draw, but it probably isn’t much. You’d also need a transformer to replace a commercial inverter that would put out line voltage, so that would be some more loos in the system. On the other hand, if you wanted AC at a lower voltage, you might just replace all the transformers, if you were building a piece of gear yourself.

We’ve looked at how these things work in some detail. There were common in old tube radios, particularly military ones.

Continue reading “The Dynamotor Simplified”

Spinning Up A Water Cooled 3D Printed Stirling Engine

The Stirling external combustion engine has fascinated gear heads since its inception, and while the technology has never enjoyed widespread commercialization, there’s a vibrant community of tinkerers who build and test their own takes on the idea. [Leo Fernekes] has been working on a small Stirling engine made from 3D printed parts and common hardware components, and in his latest video he walks viewers through the design and testing process.

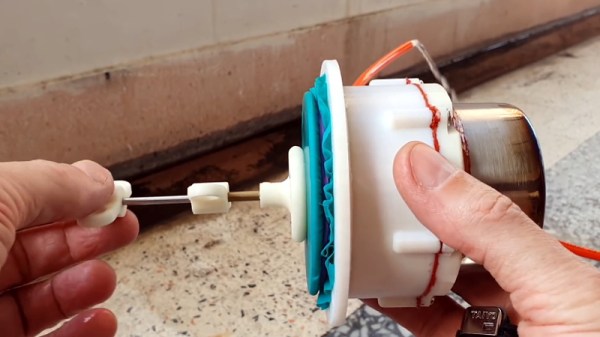
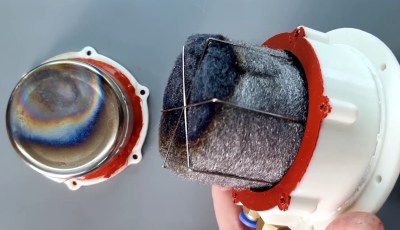
We’ve seen Stirling engines with 3D printed parts before, but in most cases, they are just structural components. This time, [Leo] really wanted to push what could be done with plastic parts, so everything from the water jacket for the cold side of the cylinder to the gears and connecting rods of the rhombic drive has been printed. Beyond the bearings and rods, the most notable non-printed component is the stainless steel spice shaker that’s being used as the cylinder.

The piston is made of constrained steel wool.

Mating the hot metal cylinder to the 3D printed parts naturally introduced some problems. The solution [Leo] came up with was to design a toothed collar to hold the cylinder, which reduces the surface area that’s in direct contact. He then used a piece of empty SMD component feed tape as a insulator between the two components, and covered the whole joint in high-temperature silicone.

Like many homebrew Stirling engines, this one isn’t perfect. It vibrates too much, some of the internal components have a tendency to melt during extended runs, and in general, it needs some fine tuning. But it runs, and in the end, that’s really the most important thing with a project like this. Improvements will come with time, especially once [Leo] finishes building the dynamometer he hopes will give him some solid data on how the engine’s overall performance is impacted as he makes changes.

If you’ve got a glass test tube laying around, putting together a basic Stirling engine demonstration is probably a lot easier than you might think. Commercial kits are also available if you’re looking for something more substantial, but even those can benefit from some aftermarket modifications. With a little effort, you’ll have a power plant ready for the surface of Mars in no time.

Continue reading “Spinning Up A Water Cooled 3D Printed Stirling Engine”