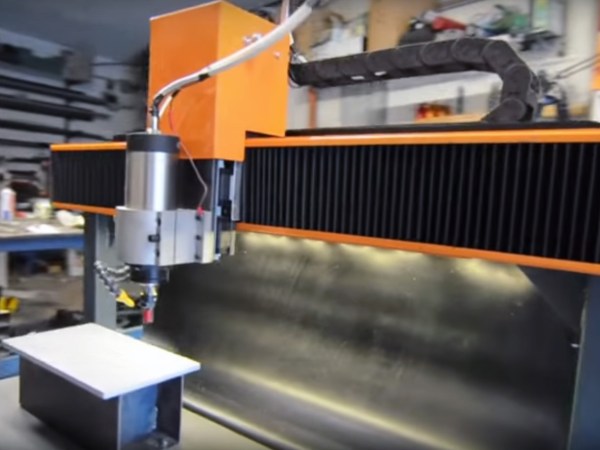
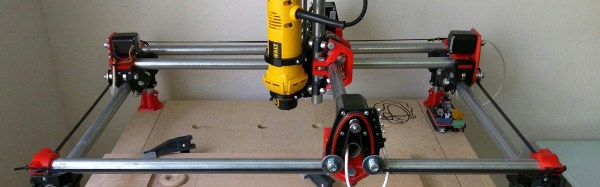
Laser-cut Cardboard Planetary Gearset Is Pretty, But Useless

[Shane] made a project that speaks directly to our heart — combining laser cutting, cardboard, and gears. How could it be any better? Well, it could do anything. But that’s quibbling. It’s fun enough just to watch the laser-cut cardboard planetary gears turn. (Video after the break.)

It was made on a laser cutter using the gear extensions for generating gears in Inkscape, everybody’s favorite free SVG editor.

In his writeup, [Shane] touches on all of the relevant details: all of the gear pitches need to be the same, and the number of teeth in the sun gear (in the center) needs to equal the number of teeth in the ring (outside) divided by the number of planets (orbiting, in the middle). So far so good.

Continue reading “Laser-cut Cardboard Planetary Gearset Is Pretty, But Useless”

Garbage Can CNC Machine Build

Forget sourcing parts for your next project from some fancy neighborhood hardware store. If you really want to show your hacker chops, be like [HomoFaciens] and try a Dumpster dive for parts for a CNC machine build.

OK, we exaggerate a little – but only a little. Apart from the control electronics, almost everything in [HomoFacien]’s build could be found by the curb on bulk-waste pickup day. Particle board from a cast-off piece of flat-pack furniture, motors and gears from an old printer, and bits of steel strapping are all that’s needed for the frame of a serviceable CNC machine. This machine is even junkier than [HomoFacien]’s earlier build, which had a lot more store-bought parts. But the videos below show pretty impressive performance nonetheless.

Sure, this is a giant leap backwards for the state of the art in DIY CNC builds. but that’s the point – to show what can be accomplished with almost nothing, and that imagination and perseverance are more important for acceptable results than an expensive BOM.

With that in mind, we’re throwing down the gauntlet: can anyone build a CNC machine from cardboard and paperclips?

Continue reading “Garbage Can CNC Machine Build”

Review: Voltera V-One PCB Printer

Back in Feburary, I was one of the first people to throw some cash at the Voltera V-One circuit board printer on Kickstarter. With an anticipated delivery date of Q4 2015, I sat back and waited. This week, my V-One arrived!

I’ll preface this article by pointing out that I do know the folks at Voltera as we went to university together. That being said, I did put down my own cash for the device, so I’ve bought the right to be critical. I also have no relationship with their company. In this article, we’ll go through unboxing and printing, then get into a review of the V-One based on what we’ve seen so far.

Continue reading “Review: Voltera V-One PCB Printer”

3D Carver Makes Magnetic Fields Visible

The history of science is full of examples when a 3D physical model led to a big discovery. But modelling something that’s actually invisible can be tough. Take magnetic fields – iron filings on a card will give you a 2D model, but a 3D visualization of the field would be much more revealing. For that job, this magnetic field following 3D carving machine is just the thing.

What started out as a rapid prototyping session with servos and hot glue ended up as quick and dirty 3D carving rig for [Frits Lyneborg]. The video shows his thought progression and details how he went from hot glue and sticks to LEGO Technics parts and eventually onto Makerbeam extrusions for the frame of his carver. A probe with a Hall effect sensor is coupled to a motor spinning a bit that cuts into a block of floral foam. A microcontroller keeps the Hall sensor a more or less fixed distance from a rare-earth magnet, resulting in a 3D model of the magnetic field in the foam, as well as a mess of foam nubbles. Despite a few artifacts due to in-flight adjustments of the rig, the field presents clearly in the block as two large lobes.

Carving foam isn’t the only way to visualize a magnetic field in three dimensions, of course. If you’d rather have a light show based on the local magnetic field, try this 3D compass build we covered a while back.

Continue reading “3D Carver Makes Magnetic Fields Visible”

Frank Makes A CNC Table

[Frank Howarth] is one of the big guns when it comes to woodworking on YouTube, and now he’s doing something completely unlike his other builds. He’s building a gigantic CNC machine. Yes, we’ve seen dozens of CNC router builds, but this one adds a few nifty features we’ve never seen before.

The plans for [Frank]’s CNC machine call for a 4 foot by 8 foot table, over which a router on a gantry gnaws away at wood. This is the standard size for shop-sized CNC router, but [Frank] is adding in his own twist: he’s building a 12 foot long table, by way of a four foot extension. This one small addition allows [Frank] to put tenons in tree trunks, engravings on the side of furniture, or just to make one part of a very large piece flat.

Right now, the build is just about the base, constructed out of 2″ square steel tube. While the welding is by all accounts an amateur job, everything is square, straight, and true. Now, with a metal base scooting around on hockey puck feet, [Frank] is ready to start on the robotic part of the build, something we’re all interested to see.

It’s going to be really big, but still not the biggest.

Development Tools Of The Prop-Making World

We’ve seen them before. The pixel-perfect Portal 2 replica, the Iron Man Arc Reactor, the Jedi Lightsaber. With the rise of shared knowledge via the internet, we can finally take a peek into a world hidden behind garage doors, basements, and commandeered coffee tables strewn with nuts, bolts, and other scraps. That world is prop-making. As fab equipment like 3D printers and laser cutters start to spill into the hands of more people, fellow DIY enthusiasts have developed effective workflows and corresponding software tools to lighten their loads. I figured I’d take a brief look at a few software tools that can open the possibilities for folks at home to don the respirator and goggles and start churning out props.

Continue reading “Development Tools Of The Prop-Making World”

Breaking Out A Game Boy Link Cable

[Samuel] is working on one of the most important electronics projects of our generation. He’s building a device for the Game Boy that will allow Pokemon trades between generation II and III. Yes, This means bringing your Charmander from Pokemon Red to your team in Pokemon Ruby, Sapphire, or Emerald. and finally completing the National Dex you’ve been working on for 20 years. Before he gets to designing this system, he first needs to listen in on the Game Boy Link Cable, and that means creating a breakout board.

The Game Boy Link Cable – sometimes inaccurately referred to as the Zelda cable – is a special proprietary connector. The design is well documented, but unlike the Wii Nunchuck controller, there’s no readily available breakout board available for this piece of obsolete technology.

Together with a his friend [David], [Samuel] loaded up a copy of Eagle and designed a board that will fit on a small piece of copper clad FR4. This design was then sent over to a small CNC mill, The traces were machined away, and a sextet of pins were soldered into the holes.

With a breakout board for the Game Boy Link Cable, [Samuel] now has a great platform for peering into the strange and magical world of Pokemon. He’ll be using a Teensy microcontroller for his trading device, and with several similar projects already completed by others around the Internet, the potential for a Gen II to Gen III Pokemon trader is palpable.