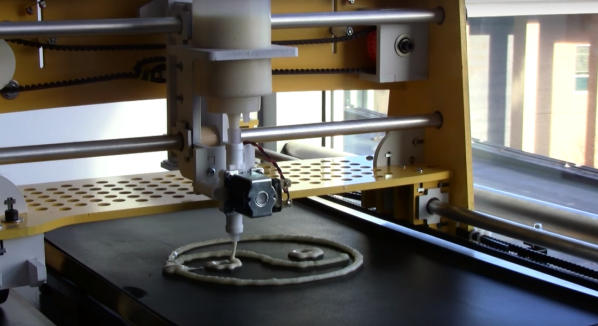
In case you didn’t know it, pancake art is a thing. People are turning out incredible edible artwork using squeeze bottles and pancake batter. But even if you’re not terribly artistic, you can still amaze your breakfast buddies with this robotic pancake printer.
At its simplest – and in our opinion its most impressive – pancake art involves making patterns with thin batter on a hot griddle. The longer the batter is cooked, the darker it becomes, and art happens. To capitalize on this, [Trent], [Kevin], [Sunny] and [Isaac] built a 2-axis gantry with a working area the size of an electric griddle. A bottle is pressurized with a small air pump and controlled by a solenoid valve to serve as a batter extruder, and an Arduino controls everything. Custom pancake design software lets you plan your next masterpiece before committing it to batter.
Sadly, the video below shows us that the team didn’t include an automatic flipper for the pancake, but no matter – that’ll make a great feature for the next version. Maybe something like this?
Perhaps the tolerances on today’s hobbyist machines just aren’t good enough for you, or perhaps the work area is just too cramped. Either way, there are times when an off-the-shelf solution just wont fit your needs, and you resolve to build your own CNC machine. Fortunately, none of us are alone in this endeavor because hobbyists have been building their own automation equipment for years. Whether you’re talking building the machine, generating the G-code, or interpreting that G-code into motor signal pulses, the DIY CNC community has evolved a sophisticated set of tools aimed at getting the job done. I thought I’d take a tour of some of the hobbyist’s tools that hallmark 2016 as the best year yet to build your CNC machine.
Hardware
In the last few years, affordable extruded profiles and brackets have made leaps and bounds to satisfy a hungry DIY 3D printer community. Beyond 3D printers, these beams and brackets are a good start for some of our needs in the world of linear motion control. Here’s a quick look at a few components off-the-shelf.
Makerslide Extruded Profiles
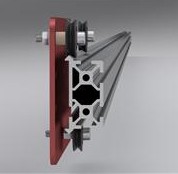
Unless you’ve discovered a deal on eBay or AliExpress, building up a machine from precision linear rails can be a pricey ordeal. Linear rails offer us a rigid, wiggle-free guide for motion along a single axis, but in some cases, the cost needed for hobbyists to afford this precision is outside their budget. [Barton Dring] took the idea of guided linear motion and launched a custom extruded rail that enables bearings to slide freely along an axis. Dubbed Makerslide, this extruded rail features a groove embedded directly into the extrusion and aims to be compatible with most other 20-mm extruded profiles like those from Misumi and Rexroth.
On a similar note, the folks at OpenBuilds took [Barton’s] concept in a slightly different direction. For many of us who have already committed to extrusions from one vendor and have our closets gushing with excess tubes, Open Rail is an extruded v-groove attachment that enables bearing-mounted plates to slide freely just like the extrusions of Makerslide. Unlike Makerslide, however, almost any 20-mm extrusion can be retrofitted with Open Rail, rather than requiring a specialized extrusion.
OpenBuilds Linear Actuator Kits
CNC machines encompass a wide variety of machine designs that spans far beyond this article’s scope. For conventional machines, however, a single motor drives a motion along a single axis. To add direction in a separate dimension, we can sometimes chain together two of the same linear motion units. The folks at OpenBuilds have taken this principle to heart offering single-axis systems as kits. With some creativity and forethought, users can develop a number of automated solutions based on the principle of appending multiple axes. Of course, the folks at OpenBuilds haven’t stumbled upon a never-before-seen solution. Misumi, Rexroth, and other professional automation equipment companies have been selling linear motion systems for years; however, their price range easily leaps beyond the 10K mark.
Not an End-All, but a Solid Start
Despite the design flexibility, neither Makerslide nor OpenBuilds is the all-encompassing solution for every CNC endeavor. Specifically, for rigid machines that can chew through steel, a structure built from bolted aluminum extrusions will be far less rigid than professional machines of a similar scale. Nevertheless, for machines that don’t experience heavy loads, like a 3D printer, a laser cutter, or even some small routers, both Makerslide and OpenBuilds offer an excellent starting point.
Software
With our hands full of stepper motors, extruded profiles, and belts, it’s time to start exploring a software solution to drive it all. While there are plenty of machine-specific solutions, I thought I’d highlight two that are flexible enough to be tuned to a custom machine.
G-code Interpreters
G-code interpreters do just that: they accept input commands in G-code (be it directly from a file or serially through a cable) and convert the commands to step and direction digital outputs with the right timings to produce the control signals for stepper motor drivers. In one sense, they’re the “brains” of the machine, taking the G-code “instruction set” and outputting behaviors that correspond to the input instructions.
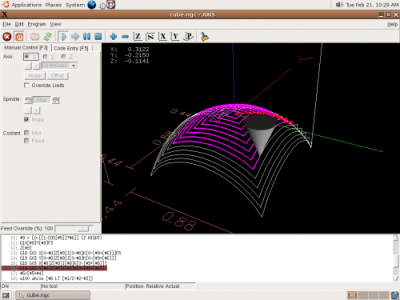
LinuxCNC
Image Credit: LinuxCNC Wiki
LinuxCNC spun out from a US-government-funded initiative to develop a motion control package for standards testing back in the 90s. Over time, it has evolved into a software package designed to turn a PC into a G-code interpreter, and it’s currently packaged as real-time Linux distribution. From your LinuxCNC-configured PC, you can simply connect your stepper motors, limit switches and other digital I/O devices to the PC’s parallel port which, in turn, outputs motor step and direction pulses to drive your physical hardware.
LinuxCNC isn’t just a G-code interpreter, though. The 15+ years of active development have given it a solid foundation which makes it one of the most adaptable software packages for developing custom machines. By enabling custom kinematics, users can drive non-Cartesian machines like SCARA arms. With a core operating system based on Debian Linux, users can link additional PC peripherals, like USB game controllers, to drive their machines. Some devoted software hackers have even fleshed out the current user interface to directly generate G-code for simple cuts, rather than simply run existing G-code.
Grbl
With over 7 years of active development, Grbl has proven itself to be simple, reliable G-code interpreter firmware for the Arduino Uno. Simply connect your motor controllers and limit switches to the Uno, and Grbl firmware handles the step and direction pulse timing for all 3 axes of your machine. Grbl doesn’t aim to be an all-encompassing interpreter like LinuxCNC, but in exchange it’s a far simpler solution that is relatively easy to set up and works for most, if not all, typical use-cases for a 3-axis machine.
Though Grbl drives the physical hardware, it still requires a serial interface to receive G-code instructions to execute. Fortunately, G-code-streaming packages exist: bCNC and UGS, which have been tested specifically with Grbl.
G-code Generators
Having a fancy CNC machine doesn’t say much if we can’t generate instructions to drive it to cut parts! We need a solution for generating G-code, and, once again, the open source software community has jumped in to provide several packages.
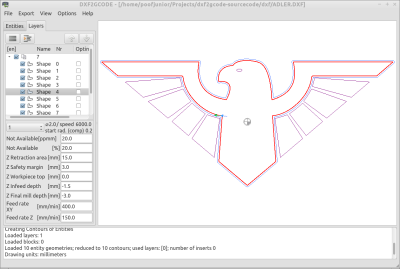
dxf2gcode
It’s not unlikely that many of your designs may boil down to a collection of flat plates with simple features on them. For 2D milling, dxf2gcode simplifies the process of generating G-code based on an original design file, in this case: a dxf. The project also features automatic cutter compensation done in software, a very handy feature that will generate an offset toolpath based on the diameter of the tool and the type of cut (pocket or outside edge).
gcmc
Image Credit: gcmc homepage
If you’ve ever tried writing G-code manually, you’ll quickly realize just how unreadable it is without having memorized the majority of the commands. GCMC is a front-end language aimed at producing human-readable machine routines. By abstracting away the unnecessary idiosyncrasies of the language, gcmc facilitates the generation of complex tool motions and patterns simply by tweaking a few parameters.
Doing the Research
Building your own CNC machine may just be your next labor of love, but unless you prefer to reinvent the wheel (and, hey, starting from first principles isn’t always a bad thing), it’s worth taking a look at the tomes of build logs, forum posts, and existing software from the gurus who have built CNCs before us. While I’ve highlighted a few of the more common tools in the land of hardware and software, this list is far from complete. So go forth! Do your research–and, of course, let us know what you find in the comments.
2007 wasn’t that long ago, but [Adam Ziegler’s] build log is, nevertheless, a pleasant romp through a not so distant past. From beginning to the end of the build, we enjoyed reading [Adam]’s progress and struggles as he worked through the build. Sometimes it’s hard to see the very normal daily work that goes into a project when it’s all polished up at the end.
He designed the mechanics himself, but after some less-successful attempts, decided to just buy the electronics. The machine is a well executed MDF gantry mill with conduit rails and 6000-series ball bearings on angle stock. It’s a good example of what you can do with cheap materials and careful planning.
[Adam] ran a few jobs on the machine, some of which he took on before it was even built (which he doesn’t recommend doing). After his adventure with this gateway machine, he’s put it up for sale and is purportedly working on a new model. The standard pattern of CNC addiction is a live alive and well.
If you’re looking to get into CNC machining on the cheap, we’ve seen similar affordable builds for your inspiration.
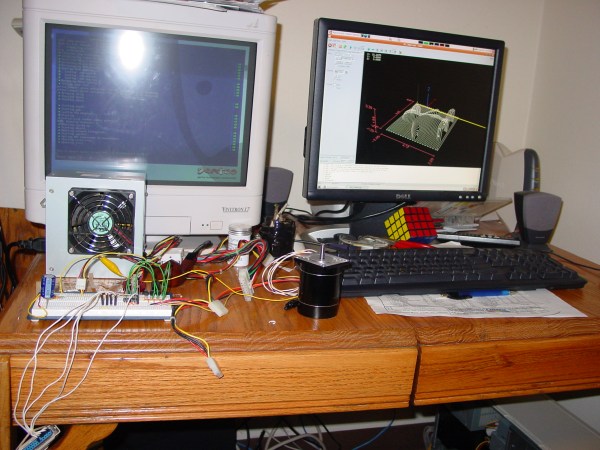
Is it really possible to build a rotary encoder out of a flattened tin can and a couple of photodetectors? Sure it’s possible, but what kind of resolution are you going to get from such a contraption? Is there any way that you’d be able to put them to work in a DIY project like a CNC router? If you pay attention to the basics then the answer is yes, and [HomoFaciens] wants to prove that to you with this detailed video on homebrew encoder design.
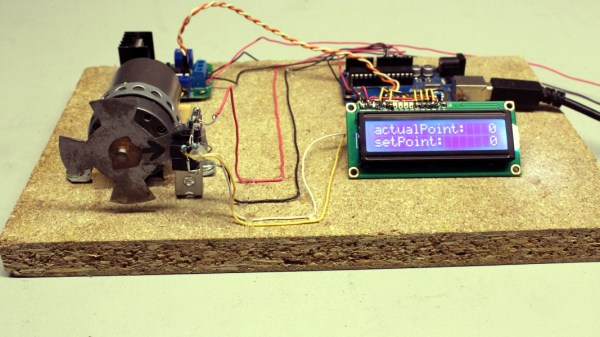
Faithful Hackaday readers will no doubt recognize [HomoFaciens] from a number of prior appearances on these pages, including this recent hardware store CNC router build. When we first ran across his builds, we admit a snicker or two was had at the homemade encoders, but if you watch the results he manages to get out of his builds, you quickly realize how much you can accomplish with very little. The video is a primer on encoder design, walking you through the basics of sensing rotation with phototransistors, and how a pair of detectors is needed to determine the direction of rotation. He also discusses the relative merits of the number of teeth in the chopper; turns out more isn’t necessarily better. And in the end he manages to turn a car wiper motor into a high-torque servo, which could be a handy trick to have filed away.
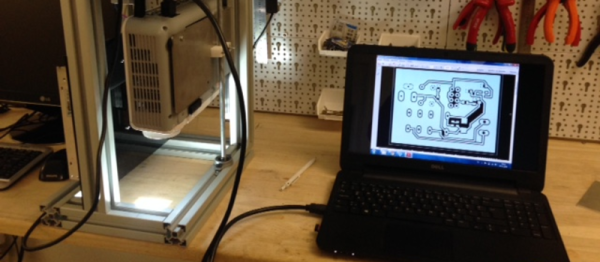
There’s so many ways to skin the home-fabrication-of-PCBs cat! Here’s yet another. [Nuri Erginer] had a DLP projector on hand, and with the addition of some reducing optics, managed to turn it into a one-shot PCB exposer.
If you’ve ever used photo-resist PCB material before, you know the drill: print out your circuit onto transparency film, layer the transparency with the sensitized PCB, expose with a UV light for a while, dissolve away the unexposed resist, and then etch. Here, [Nuri] combines the first three steps in one by exposing the board directly from a DLP projector.
The catch is that the projector’s resolution limits the size of the board that you can make. To fab a board that’s 10cm x 10cm, at XGA resolution (1024×768), you’ll end up with a feature size of around 0.004″ in the good direction and 0.005″ in the other.
For DIP parts, that’s marginal, but for fine-pitch or small SMT parts, that won’t do. On the other hand, for a smaller board, optimally one in the same 4:3 ratio, it could work. And because it exposes in one shot, you can’t beat the speed. Cool hack, [Nuri]!
There’s almost nothing you can’t build with the right set of Lego parts. [Rigjob] built up a Lego-based wireless remote follow-focus system that’ll give professional systems a run for their money.
Now [Rigjob] self-identifies as a hillbilly, but he’s not just a redneck with a camera. He’s set up the Lego controller to remember minimum and maximum focus positions as well as mark points along the way. The controller simply won’t turn the lens outside of the focus range, and an interactive graph shows you where you are within the range. For a focus wheel, he uses (drum-roll please!) a Lego off-road wheel. It looks really comfortable, usable, and actually quite professional.
There’s a lot of tech in the Lego controller and motors that make this “simple” hack simple. Under the hood, there’s a Bluetooth connection, a geared stepper motor with a position sensor, a communication protocol, and a whole ton of programming in the Lego controller that makes it all drag-and-drop programmable. But to a long-bearded hillbilly cameraman, it all looks like child’s play. And that’s the hallmark of good design. Kudos, Lego.
Hobbyist 3D printers have had a home in the maker space for years now. Along the way, they’ve left a mark in our imaginations. They’ve tickled our fancy for watching a computer orchestrated symphony written in G-code hum away while cranking out parts. They’ve opened a door to the idea that while computer controlled machines may be decades old, having one or two homebrew setups in our garage might not be as far-fetched as we first thought. Now that we’ve seen the steppers and linear slides that go into these setups, it’s not unreasonable for many of us to start asking: What else? Perhaps a computer numerically controlled (CNC) lathe, mill, or even a laser cutter–anything that would add to the vocabulary of tools and techniques that we’re starting to build at home.
VSlot linear rail system for building multiaxis linear actuator systems
Since 3D printers have become somewhat commonplace, it’s not too difficult to find commodity spare parts spilling to the surface of online vendors’ websites. We can even find kit versions for building our own variants. Now that the notion of CNC-at-home is here to stay, the question for 2016 is: do we build our own CNC tools or buy them?
Despite the countless CNC build logs, extruded aluminum kits, and open source G-code interpreters, I’m still convinced that unless your needs are truly custom, buying the machine that fits your needs will have you putting together projects faster and with far less maintenance than you’d need if you assembled the machine yourself. In what follows, I thought I’d explore a few machines that we can find today in 2016 that make the dream of desktop fabrication a reality.

 Unless you’ve discovered a deal on eBay or
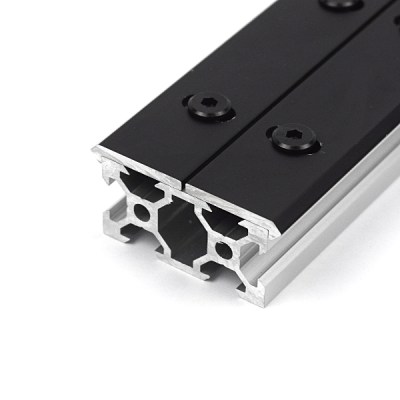
 It’s not unlikely that many of your designs may boil down to a collection of flat plates with simple features on them. For 2D milling, dxf2gcode simplifies the process of generating G-code based on an original design file, in this case: a dxf. The project also features automatic cutter compensation done in software, a very handy feature that will generate an offset toolpath based on the diameter of the tool and the type of cut (pocket or outside edge).