Intel Suggests Dropping Everything But 64-Bit From X86 With Its X86-S Proposal

In a move that has a significant part of the internet flashing back to the innocent days of 2001 when Intel launched its Itanium architecture as a replacement for the then 32-bit only x86 architecture – before it getting bludgeoned by AMD’s competing x86_64 architecture – Intel has now released a whitepaper with associated X86-S specification that seeks to probe the community’s thoughts on it essentially removing all pre-x86_64 features out of x86 CPUs.

While today you can essentially still install your copy of MSDOS 6.11 on a brand-new Intel Core i7 system, with some caveats, it’s undeniable that to most users of PCs the removal of 16 and 32-bit mode would likely go by unnoticed, as well as the suggested removal of rings 1 and 2, as well as range of other low-level (I/O) features. Rather than the boot process going from real-mode 16-bit to protected mode, and from 32- to 64-bit mode, the system would boot straight into the 64-bit mode which Intel figures is what everyone uses anyway.

Where things get a bit hazy is that on this theoretical X86-S you cannot just install and boot your current 64-bit operating systems, as they have no concept of this new boot procedure, or the other low-level features that got dropped. This is where the Itanium comparison seems most apt, as it was Intel’s attempt at a clean cut with its x86 legacy, only for literally everything about the concept (VLIW) and ‘legacy software’ support to go horribly wrong.

Although X86-S seems much less ambitious than Itanium, it would nevertheless be interesting to hear AMD’s thoughts on the matter.

Here’s How To Build A Tiny Compiler From Scratch

Believe it or not, building a tiny compiler from scratch can be as fun as it is accessible. [James Smith] demonstrates by making a tiny compiler for an extremely simple programming language, and showing off a hello world.

Here’s what happens with a compiler: human-written code gets compiled into low-level machine code, creating a natively-executable result for a particular processor. [James]’ compiler — created from scratch — makes native x64 Linux ELF binary executables with no dependencies, an experience [James] found both educational and enjoyable. The GitHub repository linked below has everything one needs, but [James] also wrote a book, From Source Code to Machine Code, which he offers for sale to anyone who wants to step through the nitty-gritty.

The (very tiny) compiler is on GitHub as The Pretty Laughable Programming Language. It’s tiny, the only data types are integers and pointers, and all it can do is make Linux syscalls — but it’s sufficient to make a program with. Here’s what the code for “Hello world!” looks like before being fed into the compiler:

; the write() syscall:
; ssize_t write(int fd, const void *buf, size_t count);
(syscall 1 1 "Hello world!\n" 13)
0

Working at such a low level can be rewarding, but back in the day the first computers actually relied on humans to be compilers. Operators would work with pencil and paper to convert programs into machine code, and you can get a taste of that with a project that re-creates what it was like to program a computer using just a few buttons as inputs.

Mythic I: An Exploration Of Artisanal Computing

While computers have become ever faster and more capable over the years, it’s hard to say they’ve become any more exciting. In fact, they’ve become downright boring. Desktop, laptop, or mobile, they’re all more or less featureless slabs of various dimensions. There’s not even much in the way of color variation — the classic beige box is now available with white, black, or metallic finishes.

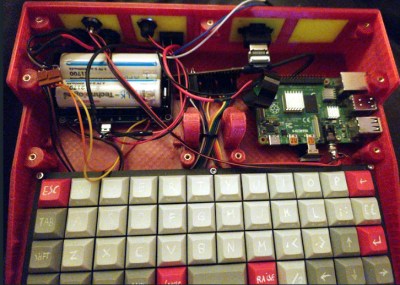
Believing that such a pedestrian appearance isn’t befitting a device that puts the world’s collected knowledge at our fingertips, [Keegan McNamara] started exploring a more luxurious approach to computing. Gone is the mass produced injection molded plastic, in its place is hand-carved maple and Tuscan leather. Common computing form factors are eschewed entirely for a swooping console inspired by fine furniture and classic sports cars. The final result, called the Mythic I, is equal parts art and science. Not just a bold reimaging of what a computer can be, but an object to be displayed and discussed. Continue reading “Mythic I: An Exploration Of Artisanal Computing”

A DR-DOS console showing the IDLE command

Missing DR-DOS Power Management Source Code Found In Patent

Modern processors come with all kinds of power management features, which you don’t typically notice as a user until you start a heavy program and hear the CPU fan spin up. Back in the early 1990s however, power management was largely unheard of, meaning that a CPU with nothing to do would run through an idle loop that dissipated about as much power as a real computing task. [Michal Necasek] noticed this while experimenting with DR-DOS 6.0 in a virtual machine – his laptop fan would start running on full blast whenever he opened the VM. His search for a solution to this annoyance led him down a fascinating journey into the intricacies of DOS power management.

As it turned out, DR-DOS 6.0 does have functionality built in for putting the CPU in power saving mode when it’s idle. This feature is not complete, however: Digital Research required each computer manufacturer to develop an IDLE driver customized to their specific hardware platform in order to enable power management. Sadly, no manufacturer ever bothered to do so, leaving [Michal] with no option other than writing a driver himself. While there was some documentation available, it didn’t include any example code or sufficient detail to write a driver from scratch.

A snippet of x86 assembly code found in a patentWhat it did include was a reference to U.S. Patent No. 5,355,501. Normally this sort of information is of interest only to those planning to sell a competing system, but this specific patent happens to include dozens of pages of well-documented but poorly-scanned x86 assembly code, including source code for a basic IDLE86.SYS driver. As [Michal] wasn’t looking forward to chasing bugs caused by OCR errors, he simply copied the source code by hand, then ran it through an assembler. The end result was a working IDLE driver, which is now available for download from his website.

[Michal]’s blog post also includes lots of details on early power saving implementations, including all the DOS interrupt calls involved in the process. Patents might seem boring in contrast, but they sometimes contain surprising amounts of usable information. You might find enough details to reverse-engineer a wireless protocol, or even to help track down an obscure instrument’s original designer.

Op-Amp Challenge: Interactive Analog LED Wave Array

A while back, [Chris Lu] was studying how analog circuits, specifically op-amps can be used to perform mathematical operations and wondered if they could be persuaded to solve differential equations, such as the wave equation. After sitting on the idea for a few years, it was time to make it a reality, and the result is an entry into the Op-Amp Challenge.

Unlike many similar interactive LED matrix displays that are digital in nature (because it’s a lot easier), this design is pure analog, using many, many op-amps. A custom PCB houses a 4×4 array of compute units, each with a blue and white LED indicating the sign and magnitude of the local signal.

The local input signal is provided by an IR photodiode, AC coupled to only respond to change, with every other circuit sharing a sensor to keep it simple. Each circuit is connected to its immediate neighbors on the PCB, and off the PCB via board-to-board connectors. This simple scheme makes this easily scalable if desired in the future.

[Chris] does a great job of breaking down the math involved, which makes this project a neat illustration of how op-amp circuits can implement complex mathematical problems in an easy-to-understand process. Even more op-amps are pressed into service for generating the split-rail voltage reference and for amplifying the weak photodiode signals, but the computation circuit is the star of the show.

We like analog computing a fair bit around these parts. Here’s a little something we were previously drooling over.

Continue reading “Op-Amp Challenge: Interactive Analog LED Wave Array”

Op Amp Contest: Magnetic Core Memory The Dr Cockroach Way

No matter how memory technology marches on, magnetic core memory is still cool. Radiation-hard, nonvolatile, and so pretty. What’s there not to love? [Mark Nesselhaus] is no stranger to fun in-your-face electronics builds — judging from his hackaday.io projects — and this entry to the Hackaday Op-Amp contest is no outlier. This is a sixteen-bit magnetic core RAM demonstrator built upon glass using copper tape and solder, which always looks great and is actually not all that hard to do yourself provided you grab a new scalpel blade from the pack before starting.

Transformer-coupled differential front-end amplifier driving an SR latch.

For the uninitiated, the crossed X and Y wires each host a hard magnetic toroid which can only be magnetised by a field beyond a certain threshold due to the shape of the B-H curve of ferrite materials. The idea is for a required threshold current, drive the selected X line and Y line each with a current half of this value, so that only the selected core bit ‘sees’ the full field value, and flips state. This means that only a single bit can be written for each core plane, so to form longer words these layers are stacked, producing some wonderful cubic structures. These magnetic circuits are responsible for putting a human on the moon.

Reading the bit state is basically the opposite. A third sense wire is passed sequentially through each bit in the array. By driving a current the opposite way through the selected core bit, if the core was previously magnetised then the sense wire will read a short pulse that can be amplified and registered. The eagle-eyed will realise that reading is a destructive process, so this needs to be followed up by a write-back process to refresh the bit, although the core state will persist without power, giving the memory nonvolatile behaviour.

[Mark] utilises a simple discrete transistor differential transformed-coupled front end which senses the tiny current pulse and passes it along to a Set-Reset latch for visualisation. This simple concept could easily be extended to make this a practical memory, but for now, addressing is courtesy of a pair of crocodile clips and a discrete write/read pulse switch. We will watch with interest how far this goes.

DIY core memory builds are not a regular occurrence around these parts, but we see them from time to time, like this polished 64-bit setup. Core arrays are not the only magnetic memory in town, we’ve also seen DIY core rope memories as well.

Continue reading “Op Amp Contest: Magnetic Core Memory The Dr Cockroach Way”

Hackaday Prize 2023: 65uino 6502 Learning In A Familiar Package

[Anders Nielsen] presents his entry for the 2023 Hackaday Prize: The 65uino. Which as you might be able to guess, is a 6502-based microcomputer wedged into an Arduino Uno form factor (well, almost wedged in, but we’ll let it slide) The premise is simple, older micros are easier to understand, the board can be build up from new-old or salvaged stock, and that’s more chips on boards and less sitting on a dusty shelf. After all, even though the 6502 in its original form is long obsolete, it’s far better to be pushing some electrons around, than sitting there decaying.

The OLED frame buffer is bigger than the host’s entire RAM. No problem!

From an educational perspective, the first lesson is the hand-soldering of through-hole DIP components and a smattering of straightforward surface mount parts in their supporting roles.  Then on to setting up the cc65 toolchain. To say this is a pure 6502 system is a little misleading, it actually uses the 6507 device variant, which is a die-bond variant of the same device but with only 28 of the pins utilized.

The use of the 6532 RIOT (RAM-I/O-Timer) chip provides two 8-bit ports of GPIO as well as a timer and 128 bytes of SRAM, making the design more compact. There is a socket that will accept a 24 or 28-pin E(E)PROM device, with the extra four pins removable and the PCB snapped off if fitment into a standard ‘Uno case is desirable. Neat!

Full hardware build and PCB design (using KiCAD) are available on the 65uino GitHub page. Just remember folks, with everything minimal 6502 related — some assembly required :D

We see the 6502 a lot, let’s be fair. But why not? Here’s a slightly more practical board with a bit more resources, an absolute beast of a luggable dual-6502 machine, and yet another 6502 verilog implementation ready to be dropped into a spare corner of a FPGA project that needs a little extra.