BeefBot: Your Robotic Grill Master

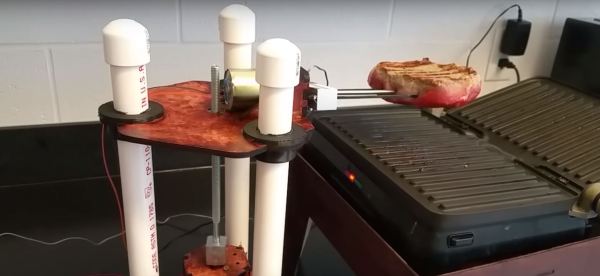
Have you ever been too busy to attend to the proper cooking of a steak? Well, lament no more, and warn your cardiologist. A trio of students from Cornell University have designed and built the steak-grilling BeefBot to make your delicious dinner dreams a reality.

[Jonah Mittler], [Kelsey Nedd], and [Martin Herrera] — electrical and computer engineering students — are the ones you should thank for this robot-chef. It works as follows: after skewering the steak onto the robot’s prongs, BeefBot lowers it onto the grill and monitors the internal temperature in a way that only the well-seasoned grillmaster can replicate. Once a set temperature is reached, the steak is flipped — sorry, no crosshatch grillmarks here — and cooked until a desired doneness. A small screen displays the temperature if you want to babysit BeefBot — some manual adjustment may be needed after the steak flip to ensure it is cooking evenly — but it is otherwise a hands-off affair. If you don’t mind salivating over your screen, check out the project demonstration after the break.

At first glance you might think this a YouTube stunt, but this is real science. The writeup is exquisite, from the design and fabrication, to the math behind temperature calibration and regulation. Kudos to the hungry Cornell students who slaved over a hot griddle bringing this one to life!

Continue reading “BeefBot: Your Robotic Grill Master”

An Automated Ice Cream Topper For The Ultimate In Zero Effort Desserts

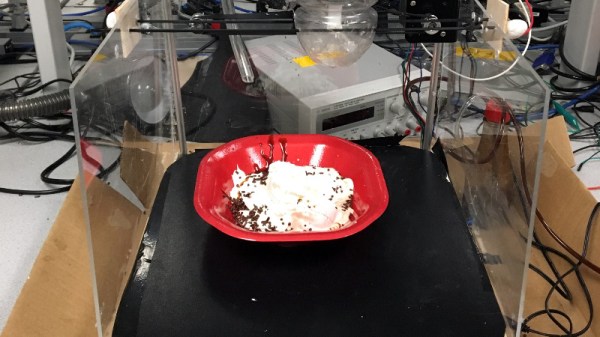
It’s a highly personal facet of the eating experience, the choice of topping applied to your frozen dessert. Everybody has their own preferences when it comes to whipped cream, sprinkles, and chocolate syrup. Should the maintenance of those preferences become a chore, there is a machine for that, and it comes courtesy of [Kristen Vilcans] and [Ramita Pinsuwannakub] in the form of their Cornell University project as students of [Bruce Land]. Their Automated Ice Cream Topper holds profiles for each registered user, and dispenses whipped cream, chocolate sauce, and candy sprinkles onto ice cream at the simple push of a button.

The hardware seems simple enough until you appreciate the many iterations used to ensure that it works smoothly. The bowl of ice cream sits on a motorised turntable, and a can of whipped cream is suspended above it upon rails made from kebab skewers. A servo and lever operates the can to release the cream.  Meanwhile the sprinkles come from an inverted spice jar with a motorised disc to momentary align a hole with the jar’s spout, and the chocolate syrup comes courtesy of an air pump and some plastic tubing. The whole is controlled from a PIC32 microcontroller.

It is refreshing to see that such projects do not have to tackle especially high-tech problems to be extremely successful. We could all dispense our own toppings, but now we know there’s s machine for the task, who wouldn’t want to give it a try!

If ice cream student projects are your thing, perhaps you’d like a 3D printer?

Cocktail mixing machine

Cocktail Machine Mixes Perfect Drinks Every Time

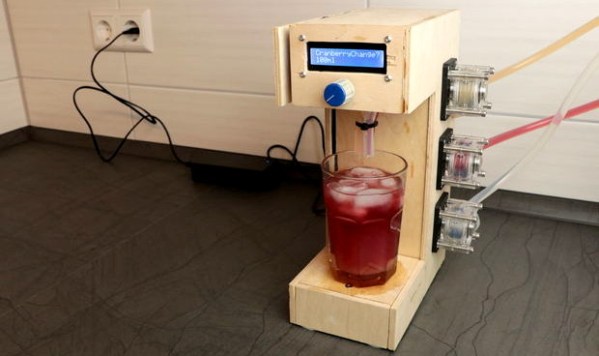
For many of us. the holiday season is coming up and that means hosting parties and mixing drinks, which can get tiresome. [GreatScott] has come up with a solution, what he calls a crude cocktail mixing machine. But don’t be fooled — it may look crude on the surface, and vibrate a bit while working, but the mechanism is plenty sound and functional.

The machine can mix three different liquids and does so using three peristaltic pumps. In typical [GreatScott] style, while he tears apart the pumps to replace the tubes, he gives us a good glimpse of just how they work. Using a knob and LCD screen, you can enter any quantity you want for the three liquids, though you’ll have to edit the Arduino code if you want to change the liquids’ names.

Load cell
Load cell

How does the machine know when to stop pumping a certain liquid? Each pump is rated for a specific quantity per second, though he tests this for each liquid anyway and finds a slight variation which he accounts for in the code. After the machine turns a pump on, a load cell located under the glass tells it when liquid has started arriving at the glass. A simple calculation based on the pump’s quantity per second and the desired quantity tells it how long to leave the pump on for. When the times up, it stops the pump. The result is a machine that’s sure to be a centerpiece for any hacker-filled party. Check out his build and the pump in action in the video below.

Continue reading “Cocktail Machine Mixes Perfect Drinks Every Time”

Refinishing A Vintage KitchenAid Mixer

If you know anyone who is serious about baking, there’s a good chance you’ve seen one of these classic KitchenAid mixers. Built to last, they are often handed down generation to generation (or at least, when a newer model comes out), which is how [Kaitlin Flannery] received hers. While it didn’t look too bad considering its long life and the fact it’s been through a motor replacement already, she decided to spruce it up a bit by stripping it down and repainting the whole machine.

Sanding between coats of paint.

These KitchenAid mixers are solidly built and look highly serviceable, it’s refreshing to see a teardown that doesn’t involve any finicky plastic clips or glue. A standard philips screwdriver gets you inside the case, and a couple more screws allow the trim pieces to be removed.

Most of the work [Kaitlin] does is not completely unlike what you might have to do if you wanted to respray the fender of your car. You take off as much extra hardware as your patience allows, put painters tape over everything you want to keep over-spray off of, and then go to town.

To get the smooth metallic finish that you’d expect on a kitchen appliance, [Kaitlin] sands with 220 paper between the coats of hardware store Rust-Oleum. Generally we’d advise switching over to wet sanding at a higher grit once a few coats of paint have been laid down, but we can’t argue with the final results [Kailtin] got. The last coat is followed up with a clear enamel, which will help protect the finish from scratches; very important for a kitchen appliance.

[Kaitlin] does mention that she mistakenly taped off a bit more than she should have, and there’s still some of the original color visible on the rear of the machine. But beyond that, the finish looks fantastic, and with the new motor installed it looks like this machine is going to stick around long enough to get handed down a second time at least.

Hackaday has regrettably made few inroads into the kitchen as of late, one might get the impression that there isn’t a whole lot of overlap between the workbench and the counter-top. If you’ve got something you’ve made or remade sitting in your kitchen as you read this, by all means let us know.

3D Printed Cookie Molds For The Best Speculoos

Experiencing nostalgia for the outstanding Belgian cuisine [Adam], currently stuck in Ohio, found himself in craving some home-made speculoos. For the uninitiated, speculoos is what those brown cookies usually served with coffee on planes dream of becoming one day.

To add some extra regional flavour, [Adam] decided to print his own molds featuring motifs from Brussels. The risks of 3D prints in the kitchen are the subject of a lively discussion. They are addressed in this project by recommending the use of food safe filament and sealant for the molds. The fact that the dough will be removed from the molds almost instantly and that the molds don’t go into the oven puts the risks in the vicinity of using plastic cutting boards in your kitchen.

[Adam]’s write up features solid, well illustrated baking instructions that should enable any of you to replicate this delicacy. Some links to additional references and two recipes are thrown in for good measure. The article finishes with detailed instructions for designing your own molds that take the properties of the medium into account, to ensure your custom motif will still be recognizable after baking. Line art with a stroke width of around 2-3 mm seems to work best. It is that time of year and we hope to see a lot more tricks to take your cookie and edible house designs to the next level so don’t forget to send in a tip.

With 3D printed molds having been used to shape resin, silicone and even metal, we are at a point where cookie dough looks like a natural progression.

Problems That Plagued An Edible Marble Machine

Prolific creator [Martin Raynsford] recently created a plus-sized edible version of his laser-cut Marble Machine for a Cake International exhibit and competition; it seemed simple to do at first but had quite a few gotchas waiting, and required some clever problem-solving.

Gears are three layers, stacked and cemented with sugar glue, and coated with a hard edible shine.

The original idea was to assemble laser-cut gingerbread parts to make the machine. Gingerbread can be laser-cut quite well, and at first all seemed to be going perfectly well for [Martin]. However, after a few days the gingerbread was sagging badly. Fiddling with the recipe and the baking was to no avail, and it was clear [Martin] needed to find something other than gingerbread to work with. After experimenting, he settled on a modified sugar paste which kept its shape and dried hard enough to work with. (While appearing to stretch most people’s definition of “cake” past the breaking point, the category [Martin] entered in the competition allows it.) The parts were cut by hand using laser-cut wood parts as a guide, then finished in a food dehydrator overnight.

The next problem was how to create the large spiral which forms the main ramp. The answer was to laser-cut a custom support structure that supported the piece while it dried out, and doubled as a way to transport the piece safely. High stress points got extra layers cemented with sugar glue, and some parts were reinforced internally with strands of uncooked spaghetti. Everything was sealed with an edible shine, which [Martin] says acts as a kind of varnish for cakes. A video demonstration is embedded below. Continue reading “Problems That Plagued An Edible Marble Machine”

3D Prints And Food

We recently ran a post about a cute little 3D printed elephant that could dispense booze. The design didn’t actually have the plastic touching the liquid — there was a silicone tube carrying the shots. However, it did spark a conversation at the secret Hackaday bunker about how safe it is to use 3D printed objects for food. In particular, when I say 3D printing, I’m talking fused deposition modeling. Yes, there are other technologies, but most of us are printing using filament laid out in layers with a hot nozzle.

There’s a common idea that ABS is bad in general, but that PET and PLA are no problem because there are food-safe versions of those plastics available. However, the plastic is only a small part of the total food safety picture. Let me be clear: I am not a medical professional and although my computers have run a few plastics plants in years past, I am not really an expert on polymer chemistry, either. However, I don’t use 3D printed materials to hold or handle food and while you might not drop dead if you do, you might want to reconsider.

Continue reading “3D Prints And Food”