Hackaday Links Column Banner

Hackaday Links: February 1, 2015

It’s Sunday evening, and that means Hackaday Links, and that means something crowdfunded. This week it’s UberBlox. It’s a modular construction system based on Al extrusion – basically a modern version of an Erector set. Random musings on the perceived value UberBlox offers in the comments, I’m sure.

[Trevor] sent in something from his Etsy shop. Normally we’d shy away from blatant self-promotion, but this is pretty cool. It’s reproductions of 1960s Lockheed flying saucer plans. We’re not sure if this is nazi moon base/lizard people from the inner earth flying saucer plans or something a little more realistic, but there you go.

3D computer mice exist, as do quadcopters. Here’s the combination. It looks like there’s a good amount of control, and could be used for some aerobatics if you’re cool enough.

Who doesn’t love LED cubes? They’re awesome, but usually limited to one color. Here’s an RGB LED cube. It’s only 4x4x4, but there’s a few animations and a microphone with a beat detection circuit all powered by an ATMega32u4.

A while ago we had a post about a solar powered time lapse rig. Time lapse movies take a while, and the results are finally in.

Hacklet 32 – LED Persistence Of Vision Displays

Blinking LEDs are good. Moving, spinning things are good too. Put them both together and you get a Persistence of Vision (POV) display. Hackers have been building these displays for years. This week’s Hacklet focuses on some of the best LED POV displays on Hackaday.io!

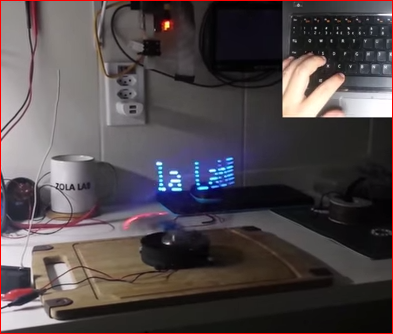
povtypeWe start with [EduardoZola] and POV as you type, write on the air. [Eduardo] used an Arduino Nano, a pair of 433 MHz radios, some blue LEDs and a motor to create a simple spinning display. A hall effect sensor keeps everything in sync. The entire display is powered by a 500 mAh LiPo battery. The awesome thing about this display is the interactive aspect. The transmitter module connects to a laptop via an on-board USB to serial converter. Typing into any serial terminal sends the text directly to the POV display, where the letters appear to hang in the air.


deathringNext up is [boolean] with Silent Orchestra POV aka “Death Ring”. [boolean] didn’t want to just create a POV ring, he wanted a huge 5 foot diameter display for his local Burning Man decompression. Death Ring is an aluminum ring spun by a 3HP motor. A hall effect sensor keeps everything synced up, and keeps Death Ring’s 3 horsepower motor in check. Light is provided by a PixelPusher and WS2812 RGB strips. The system is designed to be interactive, controlled with a Leap Motion controller or a Microsoft Kinect. An MPU-6050 keeps acceleration in check while processing maps video to the LED strip. An Arduino Yun allows the entire system to be controlled via WiFi. [boolean] and his team have taken Death Ring through several revisions. Judging by the quality of their aluminum welding though, they’re on the right track to an awesome end result!

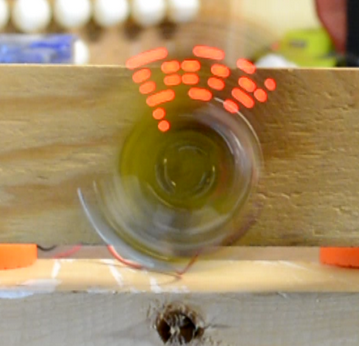
locoHackaday.io power user [Davedarko] has been working on a POV display of a different sort. His Locomatrix is an 8×8 LED matrix which moves in and out on the Z axis. [Dave] originally created Locomatrix as his entry in the 2014 Hackaday Prize. We have to admit this is the first time we’ve seen this sort of display, but the idea is sound. In fact, [Bruce Land] posted in the comments to let [Dave] know that he’d seen a similar technique used with a CRT display back in 1964. We’re betting Dave’s 3D printed gears and LED matrix display will be more robust than a CRT tube slamming two and fro at several hundred pulses per minute!

CPOVFinally, we have Hackaday’s own [Mike Szczys] with CPOV – a Crappy Persistence of Vision display . CPOV is a proof of concept made from upcycled parts which [Mike] threw together in a couple of hours. He grabbed the motor from an old cassette deck, some plywood, perfboard, and of course LEDs to build his display. The processor is an ATtiny2313 running Adafruit’s MiniPOV 3 firmware. The system display doesn’t have a sync input, so [Mike] uses a novel form of Human-in-the-loop PWM control to keep the motor speed in check. CPOV is proof that Hackaday.io isn’t just for polished projects, but for proof of concepts, fails, and just plain research. Even if your project isn’t perfect, documenting it will help you learn from it. It might even inspire someone else to move forward and continue where you left off!

Want more POV goodness? Check out our new POV display list!

Our LEDs are going dim, so that’s about all the time we have for this Hacklet. As always, see you next week. Same hack time, same hack channel, bringing you the best of Hackaday.io!

Fail Of The Week: Electrically Effective Emulators Exceed Enclosure, Enrage Engineer

After a few years of on and off development, [Steve] from Big Mess ‘o Wires completed work on a floppy disk drive emulator for older Macs such as the Plus. The emu plugs into the DB-19 port on the Mac and acts just like a 3.5″ floppy, using an SD card to store the images. He’s been selling the floppy emus for about the last year, and assembled the first several scores of them himself. At some point, he enlisted a board house to make them, and as of November 2014, he’s had enclosures available in both clear acrylic and brown hardboard.

[Steve] recently ran out of emu stock, so it was time to call up the board house and get some more assembled. After waiting six weeks, they finally showed up. But in spite of [Steve]’s clear and correct instructions, all 100 boards are messed up. One resistor is missing altogether, and they transposed a part between the extension cable adapter board, connecting it directly to the emu main board. But get this: the boards still work electrically. They don’t fit in the housings, however, and the extension cables are useless. After explaining the situation, the board house agreed to cook up a new batch of boards, which [Steve] is waiting patiently to receive.


2013-09-05-Hackaday-Fail-tips-tileFail of the Week is a Hackaday column which runs every Wednesday. Help keep the fun rolling by writing about your past failures and sending us a link to the story — or sending in links to fail write ups you find in your Internet travels.

Retrotechtacular: The Gossamer Condor

For centuries, human-powered flight eluded mankind. Many thought it was just an impossible dream. But several great inventions have been born from competition. Challenge man to do something extraordinary, offer him a handsome cash incentive, and he may surprise you.

In 1959, London’s Aeronautical Society established the Kremer Prize in search of human-powered flight. The rules of the Kremer Prize are simple: a human-powered plane must take off by itself and climb to an altitude of ten feet. The plane must make a complete, 180° left turn, travel to a marker one-half mile away, and execute a 180° right turn. Finally, it must clear the same ten-foot marker. While many tried to design crafts that realized this dream, man is, at his strongest, a weak engine capable of about half a horsepower on a good day.

Continue reading “Retrotechtacular: The Gossamer Condor” →

Hackaday Links Column Banner

Hackaday Links: January 25, 2015

Misumi is doing something pretty interesting with their huge catalog of aluminum extrusions, rods, bolts, and nuts. They’re putting up BOMs for 3D printers. If you’ve ever built a printer with instructions you’ve somehow found on the RepRap wiki, you know how much of a pain it is to go through McMaster or Misumi to find the right parts. Right now they have three builds, one with linear guides, one with a linear shaft, and one with V-wheels.

So you’re finally looking at those fancy SLA or powder printers. If you’re printing an objet d’arte like the Stanford bunny or the Utah teapot and don’t want to waste material, you’re obviously going to print a thin shell of material. That thin shell isn’t very strong, so how do you infill it? Spheres, of course. By importing an object into Meshmixer, you can build a 3D honeycomb inside a printed object. Just be sure to put a hole in the bottom to let the extra resin or powder out.

Remember that episode of The Simpsons where Homer invented an automatic hammer? It’s been reinvented using a custom aluminum linkage, a freaking huge battery, and a solenoid. Next up is the makeup shotgun, and a reclining toilet.

[Jan] built a digitally controlled analog synth. We’ve seen a few of his FM synths VA synths built from an LPC-810 ARM chip before, but this is the first one that could reasonably be called an analog synth. He’s using a digital filter based on the Cypress PSoC-4.

The hip thing to do with 3D printers is low-poly Pokemon. I don’t know how it started, it’s just what the kids are doing these days. Those of us who were around for Gen 1 the first time it was released should notice a huge oversight by the entire 3D printing and Pokemon communities when it comes to low-poly Pokemon. I have corrected this oversight. I’ll work on a pure OpenSCAD model (thus ‘made completely out of programming code’) when I’m sufficiently bored.

*cough**bullshit* A camera that can see through walls *cough**bullshit* Seriously, what do you make of this?

New Part Day: Silent Stepper Motors

Some of the first popular printers that made it into homes and schools were Apple Imagewriters and other deafeningly slow dot matrix printers. Now there’s a laser printer in every office that’s whisper quiet, fast, and produces high-quality output that can’t be matched with dot matrix technology.

In case you haven’t noticed, 3D printers are very slow, very loud, and everyone is looking forward to the day when high-quality 3D objects can be printed in just a few minutes. We’re not at the point where truly silent stepper motors are possible just yet, but with the Trinamic TMC2100, we’re getting there.

Most of the stepper motors you’ll find in RepRaps and other 3D printers are based on the Allegro A498X series of stepper motor drivers, whether they’re on breakout boards like ‘The Pololu‘ or integrated on the control board like the RAMBO. The Trinamic TMC2100 is logic compatible with the A498X, but not pin compatible. For 99% of people, this isn’t an issue: the drivers usually come soldered to a breakout board.

There are a few features that make the Trinamic an interesting chip. The feature that’s getting the most publicity is a mode called stealthChop. When running a motor at medium or low speeds, the motor will be absolutely silent. Yes, this means stepper motor music will soon be a thing of the past.

However, this stealthChop mode drastically reduces the torque a motor can provide. 3D printers throw around relatively heavy axes fairly fast when printing, and this motor driver is only supposed to be used at low or medium velocities.

The spreadCycle feature of the TMC2100 is what you’ll want to use for 3D printers. This mode uses two ‘decay phases’ on each step of a motor to make a more efficient driver. Motors in 3D printers get hot sometimes, especially if they’re running fast. A more efficient driver reduces heat and hopefully leads to more reliable motor control.

In addition to a few new modes of operation, the TMC2100 has an extremely interesting feature: diagnostics. There are pins specifically dedicated as notification of shorted outputs, high temperatures, and undervolt conditions. This is something that can’t be found with the usual stepper drivers, and it would be great if a feature like this were to ever make its way into a 3D printer controller board. I’m sure I’m not alone in having a collection of fried Pololu drivers, and properly implementing these diagnostic pins in a controller board would have saved those drivers.

These drivers are a little hard to find right now, but Watterott has a few of them already assembled into a Pololu-compatible package. [Thomas Sanladerer] did a great teardown of these drivers, too. You can check out that video below.

Continue reading “New Part Day: Silent Stepper Motors” →

Hacklet 31 – Software Tools

For every computer error, there are two human errors, and one of them is blaming the computer. Whenever a human blames a computer for something, there are two tools, and one of them is the computer.

Not all of your nifty tools need to be fancy robots, CNC machines, or nifty Robertson screwdrivers; a computer is equally capable of being a fantastic tool, provided it has the right software. For this week’s Hacklet, we’re going through some of the best software tools on hackaday.io.

6653681421957570397[Alan] was inspired to build a software tool for making sewing patterns. Sewing patterns are usually designed for the ‘average’ person, but if you’re making custom wearables, you should end up with a piece of clothing that fits perfectly.

The first project [Alan] is using this tool for is a fleece cap that fits the contour of his head. He captured a 3D mesh of his head, imported the mesh into Blender, and unwrapped the resulting mesh. The two halves of the hat were then plotted with a Silhouette Cameo, cut out of fleece, and sewn together. The result is a beanie that fits perfectly around [Alan]’s head. It’s an extremely cool and novel application of 3D modeling, and if you ever need to wrap a 3D object with a 2D material, this is the project you want to check out.

5869061407871295021 And you thought the autorouter in Eagle was bad.

[Anderson] built a tool called Pyrite that will take a schematic and build a layout in three-dimensional space. He calls them Volumetric Circuits, and it’s basically the point-to-point wiring found in old radios and amplifiers taken to the next level. We featured this project before, and there haven’t been many updates since then. Maybe giving [Anderson]’s project a few skulls will help motivate him to get back to the project.
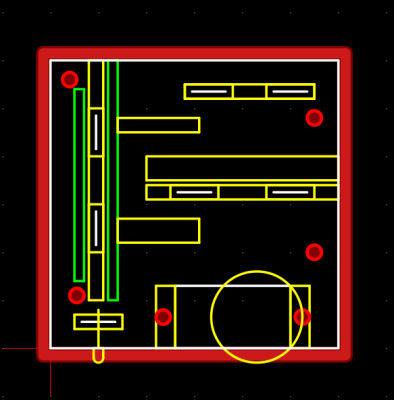
133031421839442989 Not satisfied with the existing free and open source CAM programs, [Snegovick] started work on his own.

[Snegovick] calls his project BCAM, and it’s exactly what you need to mill holes in PCBs, cut gears with a CNC router, engrave plastic, and anything else a 2.5 axis CNC machine can do. The project is written in Python, and yes, the source is available. Supported operations include drilling, path following, offset path following, and pocketing.

Write enough microcontroller projects, and you’ll eventually come up with your own library of common code that does one thing and one thing well. If you’re smart, you’ll reuse that code in future projects. [ericwazhung] is cutting through the hard part of developing all this code and released some things that are useful in a whole lot of projects.

Included in the commonCode library are the usual ‘heartbeat LED’, non-blocking input, a standard interface for AVR timers, bitmaps of text characters, DC motor control, and a whole bunch more. Extremely useful in any event.

That’s it for this round of the Hacklet, bringing you the best hackaday.io has to offer.