What to call this LED strip music visualizer is a puzzler. It lights up and pulsates in time with music similar to the light organs of 1970s psychedelia fame, but it’s more than that. Is it more like the Larson Scanner that graced the front of [David Hasselhoff]’s ride on Knight Rider? A little, but not quite.
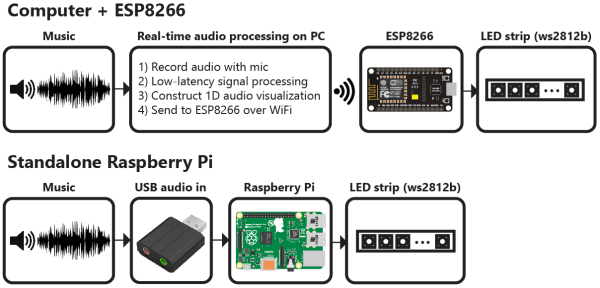
 Whatever you decide to call this thing, it looks pretty cool, and [Scott Lawson] provides not one but two ways to build it. The business end is a simple strip of WS2812b addressable LEDs. It looks like the first incarnation of the project had an ESP8266 driving the LEDs in response to commands sent to it from a PC running the visualization code, written in Python. That setup keeps the computationally intensive visualization code separate from the display, but limits the display to 256 pixels and probably has to deal with network latency. The Raspberry Pi version both crunches the numbers and drives the display, but the Pi doesn’t have the oomph to run both the LEDs and the GUI, which is pretty interesting to look at by itself. The video below shows the different visualization modes available — we’re partial to the “energy effect” at the end.
Take your pick of hardware and throw a couple of these things together for your next rave. And if you need a little more background on the aforementioned Larson Scanner, we’ve got you covered.
Continue reading “LED Strip Display Gives You Two Ways To See The Music”