There are only so many ways to make noise on standard instruments such as acoustic pianos. Their rigidity and inputs just don’t allow for a super-wide range of expression. On the other hand, if you knit your interface together, the possibilities are nearly endless. MIT’s new and improved knitted keyboard is an instrument like none other — it responds to touch, pressure, and continuous proximity, meaning that you can play it like a keyboard, a theremin, and something that is somewhere in between the two. Because it’s a MIDI interface, it can ultimately sound like any instrument you’ve got available in software.
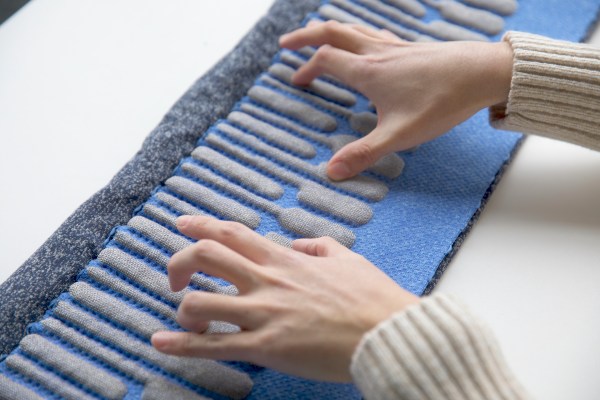
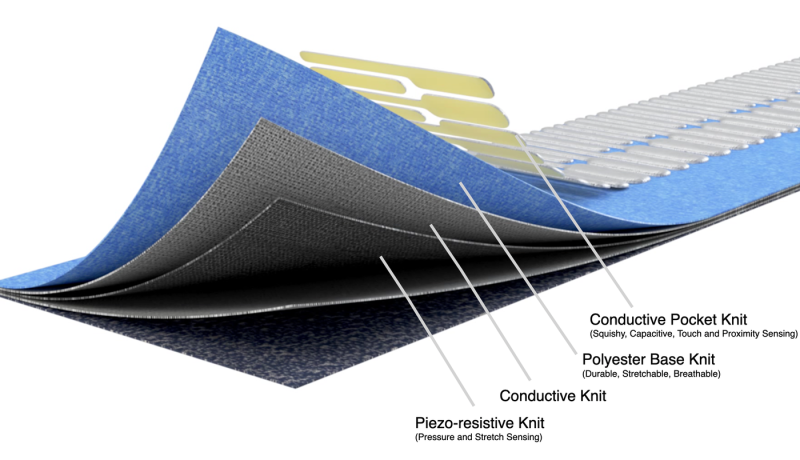 The silver keys of this five-octave interface are made of conductive yarn, and the blue background is regular polyester yarn. Underneath that is a conductive knit layer to complete the key circuits, and a piezo-resistive knit layer that responds to pressure and stretch. It runs on a Teensy 4.0 and uses five MPR121 proximity/touch controllers, one per octave.
The really exciting thing about this keyboard is its musical (and physical) versatility. As you might expect, the keyboard takes discrete inputs from keystrokes, but it also takes continuous input from hovering and waving via the proximity sensors, and goes even further by taking physical input from squeezing, pulling, stretching, and twisting the conductive yarns that make up the keys. This means it takes aftertouch (pressure applied after initial contact) into account — something that isn’t possible with most regular instruments. And since this keyboard is mostly yarn and fabric, you can roll it up and take it anywhere, or wrap it around your neck for a varied soundscape.
If you’re looking for more detail, check out the paper for the previous version (PDF), which also used thermochromic yarn to show different colors for various modes of play using a heating element. With the new version, [Irmandy Wicaksono] and team sought to improve the sensing modalities, knitted aesthetics, and the overall tactility of the keyboard. We love both versions! Be sure to check it out after the break.
Want to play around with capacitive touch sensors without leaving the house for parts? Make your own from paper and aluminum foil.
Continue reading “MIT’s Knitted Keyboard Is Quite A Flexible MIDI Controller” →