PiPod: A Raspberry Pi Zero Portable Music Player

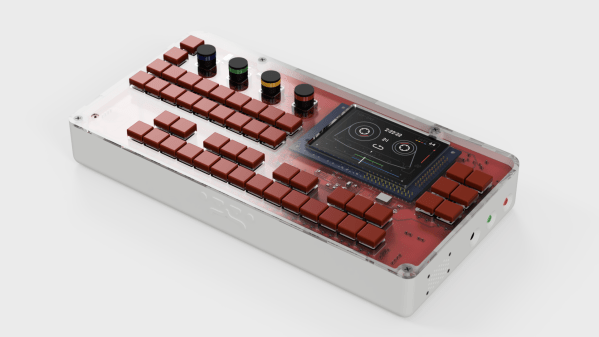
[Bram] wasn’t satisfied with the portable music playback devices that were currently available. He craved an offline music player that had a large storage capacity but found that this was only available in high-end, off-the-shelf options, which were far too expensive. [Bram] decided to make his own, powered by a Raspberry Pi zero. After building an initial prototype, the design was iterated a few times, with the latest version featuring a BOM cost of roughly €80.
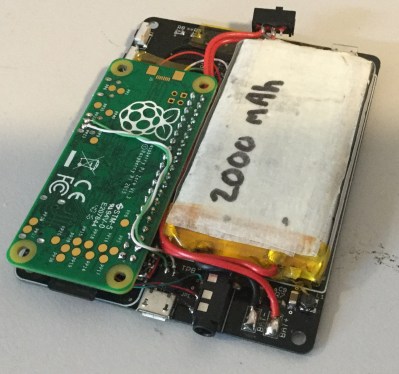
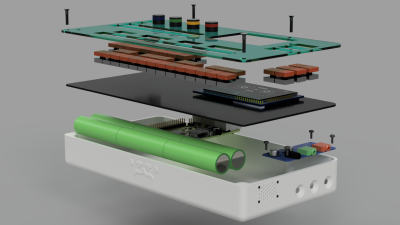
The whole project is open source, with hardware and software files available on the project GitHub. A 2.2″ TFT displays the UI, which is of course completely customisable. Everything is squashed into a 3D printed case, which has the smallest form factor possible whilst retaining a decent amount of battery life. The electronics are what you’d expect: a boost converter to produce 5 V for the Pi from the 3.7V battery, a charge controller and a battery protection circuit. As a bonus, the battery voltage is monitored with a 12-bit ADC which reports to the Pi, enabling it to do a safe shutdown at low voltage, and display battery level on the UI.

Since the whole purpose of the device is to play audio, onboard filtered PWM wasn’t going to cut it, so instead a 24-bit DAC talks to the Pi via I2S. The audio player backend is VLC, so there’s support for plenty of different file types. A disc image of the whole system is available with everything pre-configured, and you can even buy the assembled PCB from Tindie.

Want to keep the look and feel of your old iPod? We covered an impressive restoration of a 6th gen model, upgrading the storage and battery significantly.

Let The Musical Instrument Challenge Begin!

Today is the start of the Musical Instrument Challenge. This newest part of the 2018 Hackaday Prize asks you to go far beyond what we’re used to seeing from modern musical instrumentation. Twenty entries will be awarded $1,000 each and go on to compete in the final round of the Hackaday Prize.

Imagine music without the electric guitar amp, violin, two turntables and a microphone, the electric drum pad, or in the absence of autotune. Maybe that last one made you groan, but autotune is a clever use of audio manipulation and when used to augment the music (rather than just to correct off-key voices) it shows its value as a new tool for creativity.

Musicians have always been hackers. The story of Brian May’s handmade guitar — the Red Special — is one of not being able to buy it, so he built it. Unlocking emotion in the listener has always meant finding new and different ways to use sound. This is a natural motivator to re-imagine and invent new ways of doing that. That first hand-built guitar got him in the door, but iterative improvements to the tremolo bar, the pickups, and even just the mechanical engineering of the neck made it a new instrument that you’ve heard in every Queen performance since.

So what’s next? What does a brand new instrument, interface, tool, or trick look like? That’s what we want to see from this Hackaday Prize challenge. From instrument makers to the people who write software for sampling, synthesizing, sequencing, and manipulating sound, we’re looking for things that let others make music. These creations are the tools of the trade that help more people unlock their musical creativity. Show off your work by sharing all the details of your design, and demonstrate the music you can make with it.

You have until October 8th to put your entry up on Hackaday.io. The top twenty entries will each get $1,000 and go on to the finals where cash prizes of $50,000, $20,000, $15,000, $10,000, and $5,000 await.

MIDI Association Releases Spec For TRS Jacks

The MIDI spec was released in 1983, and for more than thirty years every synthesizer, drum machine, and piece of computer hardware with MIDI has sported an enormous DIN-5 jack on the back. Why did they choose such a large connector? Well, MiniDIN connectors hadn’t even been invented yet, and today even MiniDIN connectors are rarely-seen, obsolete connectors.

In the last decade, MIDI has found its way into some very small machines. Those Pocket Operators have MIDI sync, you can control a Game Boy with MIDI using the right hardware, and the cute little Korg synths also have MIDI tucked away in there somewhere. You can’t put a DIN-5 jack on those things, leading to some weird implementations of MIDI over non-standard connectors.

Now the MIDI Association has weighed in on the situation. There’s now a spec for MIDI over 2.5mm and 3.5mm TRS jacks. In just a few short decades, you’ll be able to connect MIDI gear with an audio aux cable.

Although there are five connectors in a DIN-5 jack, most implementations use only two connectors to send and receive data. Synth manufacturers have capitalized on this fact and cheap TRS connectors to build their own implementation of MIDI using smaller connectors, sometimes with incompatable pinouts.

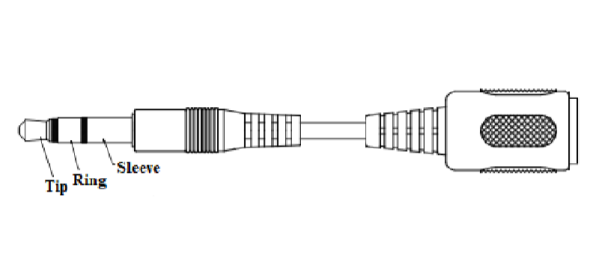
Now, though, there’s a standard. For TRS connectors, the tip is pin 5 on the DIN-5, the ring is pin 4, and the sleeve is pin 2. It sends and receives data to synths and drum machines from 1983, and it doesn’t use gigantic connectors.

The only caveats to the new MIDI standard is that 2.5mm TRS connectors are recommended, and that protection circuitry is strongly recommended in the case a headphone driver is inevitably connected to a MIDI device. Other than that, everything’s coming up roses, and this opens up the door to MIDI jacks that are much, much easier to source.

Ask Hackaday Answered: The Tale Of The Top-Octave Generator

We got a question from [DC Darsen], who apparently has a broken electronic organ from the mid-70s that needs a new top-octave generator. A top-octave generator is essentially an IC with twelve or thirteen logic counters or dividers on-board that produces an octave’s worth of notes for the cheesy organ in question, and then a string of divide-by-two logic counters divide these down to cover the rest of the keyboard. With the sound board making every pitch all the time, the keyboard is just a simple set of switches that let the sound through or not. Easy-peasy, as long as you have a working TOG.

I bravely, and/or naïvely, said that I could whip one up on an AVR-based Arduino, tried, and failed. The timing requirements were just too tight for the obvious approach, so I turned it over to the Hackaday community because I had this nagging feeling that surely someone could rise to the challenge.

The community delivered! Or, particularly, [Ag Primatic]. With a clever approach to the problem, some assembly language programming, and an optional Arduino crystalectomy, [AP]’s solution is rock-solid and glitch-free, and you could build one right now if you wanted to. We expect a proliferation of cheesy synth sounds will result. This is some tight code. Hat tip!

Squeezing Cycles Out of a Microcontroller

Let’s take a look at [AP]’s code. The approach that [AP] used is tremendously useful whenever you have a microcontroller that has to do many things at once, on a rigid schedule, and there’s not enough CPU time between the smallest time increments to do much. Maybe you’d like to control twelve servo motors with no glitching? Or drive many LEDs with binary code modulation instead of primitive pulse-width modulation? Then you’re going to want to read on.

There are two additional tricks that [AP] uses: one to fake cycles with a non-integer number of counts, and one to make the AVR’s ISR timing absolutely jitter-free. Finally, [Ag] ended up writing everything in AVR assembly language to make the timing work out, but was nice enough to also include a C listing. So if you’d like to get your feet wet with assembly, this is a good start.

In short, if you’re doing anything with hard timing requirements on limited microcontroller resources, especially an AVR, read on!

Continue reading “Ask Hackaday Answered: The Tale Of The Top-Octave Generator”

Don’t Forget Your Mints When Using This Synthesizer

While synthesizers in the music world are incredibly common, they’re not all keyboard-based instruments as you might be imagining. Especially if you’re trying to get a specific feel or sound from a synthesizer in order to mimic a real instrument, there might be a better style synth that you can use. One of these types is the breath controller, a synthesizer specifically built to mimic the sound of wind instruments using the actual breath from a physical person. Available breath controllers can be pricey, though, so [Andrey] built his own.

To build the synthesizer, [Andrey] used a melodica hose and mouthpiece connected to a pressure sensor. He then built a condenser circuit on a custom Arduino shield and plugged it all into an Arduino Mega (although he notes that this is a bit of overkill). From there, the Arduino needed to be programmed to act as a MIDI device and to interact with the pressure sensor, and he was well on his way to a wind instrument synthesizer.

The beauty of synthesizers is not just in their ability to match the look and sound of existing instruments but to do things beyond the realm of traditional instruments as well, sometimes for a greatly reduced price point.

Continue reading “Don’t Forget Your Mints When Using This Synthesizer”

OTTO: A Pi Based Open Source Music Production Box

Want an open source portable synth workstation that won’t break the bank? Check out OTTO. [Topisani] started OTTO as a clone of the well-known Teenage Engineering OP-1. However, soon [Topisani] decided to branch away from simply cloning the OP-1 — instead, they’re taking a lot of inspiration from it in terms of form factor, but the UI will eventually be quite different.

On the hardware side, the heart of the OTTO is a Raspberry Pi 3. The all-important audio interface is a Fe-Pi Audio Z V2, though a USB interface can be used. The 48 switches and four rotary encoders are wrangled by a pair of Arduino pro micros which pass the data on to the Pi. Data is related to the user through a 320×200 LCD.
The software is being written from scratch in C++17. If you’re not a hardcore C++ developer, don’t worry. The synth engines, audio effects, and other DSP software is written in Faust, which is a bit easier to learn.

OTTO is actively being developed, with synth engines already running, a prototype in progress, and fleshed out guidelines for programming the UI. If you’re into creating music, this one is worth checking out, as is Zynthian, another Raspberry Pi based synth.

The Precise Science Of Whacking A Wine Glass

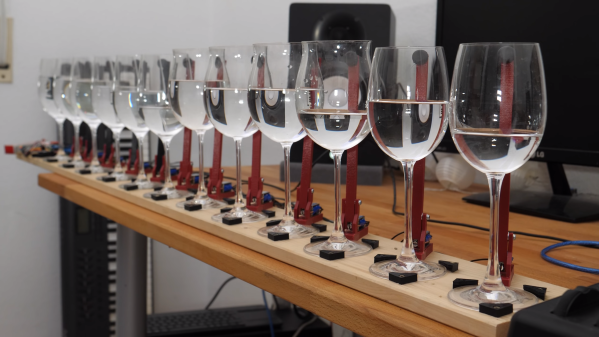
It’s common knowledge that tapping a wine glass produces a pitch which can be altered by adjusting the level of the tipple of choice inside. By filling twelve glasses with different amounts of liquid and tuning them to the twelve notes of the scale, it’s possible to make a one-octave instrument – though the speed and polyphony are bottle-necked by the human operator. If you think it sounds like a ripe project for automation, you’re correct: [Bitluni’s lab] has done what needed to be done, and created a MIDI instrument which plays the glasses using mallets.

Electronically it’s a simple build – some 12 V solenoids driven by MOSFETs, with an Arduino in charge. For the mechanical build, a 3D printer proved very useful, as each mallet could be made identical, ensuring a consistent tone across all glasses. Rubber covers printed in flexible filament were fitted to reduce the overtones and produce a clearer sound. [Bitluni] also utilised different types of glasses for the low and high pitches, which also helped to improve the clarity of the tone.

MIDI is of course the perfect protocol for this application; simple, lightweight and incredibly widely used, it’s the hacker’s delight for projects like this. The instrument can perform pre-programmed sequences, or be played live with a MIDI controller. Both of these are shown in the video after the break – stick around for a unique rendition of Flight Of The Bumblebee. For a more compact wine glass based music creation solution, we recommend this nifty project, which alters pitch using a water balloon raised and lowered into the glass by a servo.  Continue reading “The Precise Science Of Whacking A Wine Glass”